TD7930 Posted June 10, 2011 Share Posted June 10, 2011 Name: Mike Mautz Legion ID: TD-7930 Forum Name: Miksi Garrison: German Garrison Trooper Emulated: Captain Road-Block-Version Me on the left showing the weathering which is going after Mr. "move along" Member must currently be deployed as an MEPD Police Officer to be considered. - yes Weathering must be appropriate to screen used armor. Too little or too much weathering will not be allowed. - yes Pack, pauldron, and weapon combinations must match a specific trooper a seen on screen. - yes next pic shoing my puffy pauldron with the round detail: next is my backpack which is based on a crashmann-kit. Syphon by Gordon, Large Dial by Vodoo and some ohter details are selfmade: here all of my gear togehter: Latex-Rubber Gloves with Latex-Handguards: my rivets on the left: snap on the right: the beeeeeep-snaps: the front-snap: my TK-boots: my E-11 Blaster with real weapon parts: canvas MP40-pouch on the left shoulder: my MP40-leather Pouches on the hips. One is original If i get another one, they will be replaced! the Abdomen with the charakteristik weathering-spot: a side by side comparison from the original to mine: helmet comparison: my real tubecrack: and to see it complete..here in action: the second from the left: show me your identification! and here: the first from the left: yes...it´s me I hope, i dind´t forget anything important..? We´ll see :-) For those, who are interested in the gear: It´s a 3mm HIPS Movie FX Armour (from Germany), a 1.5mm PT-Helmet, painted extra to fit to the armour. Mic-Tips by VAJ from Germany, Sandtrooper-Tubestripes from TK-4510. Boots are TK-Boots, Handguards are from Sonnenschein. Backpack is by Crashmann, syphon by Gordon , Large Radio Dial by Vodoo. My Blaster is a full resin-blaster with real aluminium and weapon parts (full aluminium blaster comming soon ). The armour is weathered with black and dark brown water-based (airbrush)acrylics, rough cleaning-sponges, towels and shoe polish! As you can see, i spent hours and days to go right afer the "move along" trooper. Some might call me crazy, but YES..i cut a real crack in the right tube, to get the original look. It is glued with fiberglass from the inside to get the crack fixed. It´s a very massive armour (some like it, some don´t) It weighs (all in all) about 15 Kilos = 30 pounds. After 2 Days of troopin´in it, you really know, what you did the last days Please don´t wonder about my handguards on the trooping-pics. I got my hardplastic-guards with me as backup and used it the second day, cause the latexguards had to be glued again. So let´s see, what happens Cheers, Mike "move along...move along"... Quote Link to comment Share on other sites More sharing options...
DarthChridan Posted June 10, 2011 Share Posted June 10, 2011 Yeaaaah Mike...go for SWAT... Rock on dude... the crack on the tube is awesome^^ Good luck with your request bro.... Best wishes, Dan Quote Link to comment Share on other sites More sharing options...
TD-6599 Posted June 10, 2011 Share Posted June 10, 2011 Good luck with your request Bro ... Quote Link to comment Share on other sites More sharing options...
iconoclasta_88 Posted June 10, 2011 Share Posted June 10, 2011 Looking great bro! I have read your application and need to check some specifics and compared to the real move along trooper. But since that is the trooper I have studied the most, I can tell you already that you are looking great. There is one thing I need to ask you already. And that is to modify the pouches to better resemble what we see on ANH. This, I would not do to the original one, just to the replicas. So, good luck you had those. ANH production pouches were not real, but are assumed as reproductions made by the art department in 76. So this will work perfectly with the proper mods. Here you go: Leather MP40 trim the flaps so that it better resembles the ANH pouches like this: This mod was also done by Smally http://forum.mepd.ne...topic=8499&st=0, so maybe you can find some interest info and references on his SWAT thread: Canvas MP38/40 The tool box should be placed more to the right. The middle of the tool box should meet the edge of the right most slot. Make the blue and green lines meet and thats it. Also, if you could post a picture of your knee strap, just to check out how you trimmed it. I can't see it in any picture. I will review your request during the weekend, but you can work on these mods if you want to. The joy ride starts!! Great job so far! Saludos Juan Quote Link to comment Share on other sites More sharing options...
Rolf Posted June 11, 2011 Share Posted June 11, 2011 Hi Mike, you got top gear there bro. I´m sure, you will on the swat team real soon Quote Link to comment Share on other sites More sharing options...
JK007 Posted June 11, 2011 Share Posted June 11, 2011 Good luck Bro Possible some close up of the helmet frown minus any mesh can't really see in the pic and lenses i missed that one on my pics. SWAT is the way to go Quote Link to comment Share on other sites More sharing options...
TD7930 Posted June 11, 2011 Author Share Posted June 11, 2011 i´ll get some coffee and then i´ll go right downstairs to fix these things and to show you, I am SWAT-worthy Thanks guys! Mike Quote Link to comment Share on other sites More sharing options...
Gordonator Posted June 11, 2011 Share Posted June 11, 2011 Good luck there Mike! Just to check. Are there additional 2 snaps at the front and back of your pauldron? Like here -> http://forum.mepd.net/index.php?showtopic=7942 Quote Link to comment Share on other sites More sharing options...
Smally Posted June 11, 2011 Share Posted June 11, 2011 Wow Mike - looking good there bro! Looking forward to you joining the ranks! Smally. Quote Link to comment Share on other sites More sharing options...
TD7930 Posted June 11, 2011 Author Share Posted June 11, 2011 ok..there we go: the Pouches were trimmed and the toolbox´s place moved to the right: and again: you asked for my lenses and frown: Btw: my frown never has seen any mesh and never will!! he he.. my shins.. Assembled original after the AHN with the small gaps: and at least my thighs: also assembled in the AHN-style: Pauldron follows asap! I´ll have to add the additional snaps first! Cheers, Mike Quote Link to comment Share on other sites More sharing options...
TD7930 Posted June 11, 2011 Author Share Posted June 11, 2011 ok..i just added the snaps on the pauldron: and here: one step closer to the holy S.W.A.T ? Cheers, Mike Quote Link to comment Share on other sites More sharing options...
Rolf Posted June 11, 2011 Share Posted June 11, 2011 Here you go: Quote Link to comment Share on other sites More sharing options...
TD7930 Posted June 12, 2011 Author Share Posted June 12, 2011 Hey Rolf...i know that. I added the snaps as you can see. I am looking for a Trooper 1 Pauldron, hope mine is ok so far? I didn´t want to remove the whole leather-section, so i just put in the 4 snaps, to get the optical effects. Anybody found something else? :jawa: Quote Link to comment Share on other sites More sharing options...
TD7930 Posted June 12, 2011 Author Share Posted June 12, 2011 or is it necessary to remove the leather things to get 2 cm into the first "puffy" pauldron-area? Quote Link to comment Share on other sites More sharing options...
trooper1 Posted June 12, 2011 Share Posted June 12, 2011 Looking good my friend. As they have all said, we will see you in the Pub soon I am sure. I have sent you a PM, so let me know if it is something I can help with. for Life..... Quote Link to comment Share on other sites More sharing options...
Rolf Posted June 13, 2011 Share Posted June 13, 2011 Hey Rolf...i know that. I added the snaps as you can see. I am looking for a Trooper 1 Pauldron, hope mine is ok so far? I didn´t want to remove the whole leather-section, so i just put in the 4 snaps, to get the optical effects. Anybody found something else? :jawa: Good you are getting the Trooper1 pauldron bro, its the best out there Quote Link to comment Share on other sites More sharing options...
TD7930 Posted June 13, 2011 Author Share Posted June 13, 2011 yes man.. i hope to get a trooper-1 Pauldron soon! And when we´re all at the cantina bar, i´ll get you some tatooine-beer! Cause I was the one, who was overrun by the old Jedi and let the droids pass through .. danm Quote Link to comment Share on other sites More sharing options...
sir david Posted June 13, 2011 Share Posted June 13, 2011 looking great there bro! Quote Link to comment Share on other sites More sharing options...
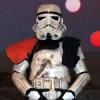
FIVE Posted June 14, 2011 Share Posted June 14, 2011 You are so close I can taste it!! I also have to say, that this picture is just pure WIN! Quote Link to comment Share on other sites More sharing options...
DirtyBoy Posted June 14, 2011 Share Posted June 14, 2011 ya....great pic for sure!!! you really are getting close man....everything looks really on target Quote Link to comment Share on other sites More sharing options...
JK007 Posted June 14, 2011 Share Posted June 14, 2011 Mike could you show a pic of the ammo leg belt havn't seen any Bro. Looking good. Quote Link to comment Share on other sites More sharing options...
iconoclasta_88 Posted June 14, 2011 Share Posted June 14, 2011 Sorry for the delay bro. I have been busy at work and home. But I have some time now to review your stuff. I have to say it looks great already. The comparison shot with the move along trooper is impressive. Weathering and overall looks is looking good. For the weathering, chestplate looks awesome. Maybe the rest of the body parts just need a background layer with a more organic/scrubbed look. Check out any of the SWAT deployment threats. Maybe that will help explain better what I mean. or is it necessary to remove the leather things to get 2 cm into the first "puffy" pauldron-area? This would be great. Sorry for that... If you are getting a trooper1 pauldron, this is already done anyway. Are you? If you are going on with this pauldron, then, I need to see a picture showing the puffy black sections on both sides. It looks like it is puffy just on one side, but could be the pictures. Also, I need to see a picture of how you trimmed the edges (sides) of the knee ammo belt. On the knee plate. It looks like it is a bit too high. The middle angles should be aligned to the middle of the "strap" like detail on the top of the shin. Backpack This is the area where you will find the greater area for improvements. The radio is looking OK. Great for Police Officer Standards even. But since this faceplate is not as accurate as some others have achieved (eithe scratch built or kits), we feel there is the need for you to make it look better more accurate. Some hints: the move along trooper has an all black radio faceplate. No green dial. Also, there are different layers of detail on the faceplate. This could be done with plastic sheets or for sale signs. Also, I cant see the small knobs. But one looks not that accurate. If you could modify it to have the small detail of the little fin (the right one), that would be awesome. If you decide to mode or partially use this faceplate for your final one, you could drill out the holes on the speaker, considering that not all of them are the same size. Specially the one on the center. Bee stinger looks a bit to centered. Maybe move it to the left. Also, the move along trooper uses silver brackets to mount the stinger. I cant see yours but that would be a great detail to add. The seedtrays could be more close together, almost touching each other. On your pack, there is a small gap between them. If you could close it it would be much better. If you could post some pictures of your pack from the sides to better see the details, it would be great. Finally on the pac, if you could remove the rust dripping from the screws would better resemble the screen used pack. There is a subtle weathering on the pack, but not to these degree. Also considering that we can not definitely see any screws of whatever holding the two sides of the trays together other than the tape on the blue one. Also, if you could post some more pictures of your E11. It looks great but I would like to see some more detailed picts of it if possible. Thats what I see so far Mike. But... what do you think? Check out other requests and let me know if I am going too shallow or too deep in my evaluation and review... It is very important for us to hear what you (and everyone) have to say about this evaluations and the whole SWAT program. If you need any more input or have any question, let me know... Just post or PM me. I will be happy to help. Saludos. Juan Quote Link to comment Share on other sites More sharing options...
TD7930 Posted June 14, 2011 Author Share Posted June 14, 2011 Hey Guys, Saludos, Juan! Thanks for all your critics. Honestly i am a little bit surprised and also disappointed, how much i obviously did wrong with my backpack. It was my first costume at that time and so i obviously din´t spent enough time for research and reference-pics. So i got a lot of homework to do. It comes to the point, where I have to ask myself, if it´s worth to configure all these points on my pack (the material won´t get better), or should i start a new one without "mistakes" from zero and get the better and accurate faceplate.? I´ll have to sleep a night or two over it and let you know, what i am going to do. Unfortunately i can´t afford all these things right now, cause I am still in education till october. What´s for sure is a Trooper1 Pauldron (soon) and a Blastech-Full Aluminium E-11 Blaster with moveable parts (when they´re ready in about 2 months)... but man.. that´s S.W.A.T. Best Regards, Mike Quote Link to comment Share on other sites More sharing options...
iconoclasta_88 Posted June 14, 2011 Share Posted June 14, 2011 Hey Bro... Thx for your reply. Honestly, is not that bad. The only thing I think you might need to start again (if that is what you choose) is the radio faceplate. You can do an awesome one using a few "for sale" plastic signs and the tutorials on this forum. Not too expensive, maybe just a bit of time consuming. But isn't that the whole hobby? Really bro, most of the mods or adjustments needed are more a drilling and painting thing than getting or buying. Your gear is great. Dont be disappointed at all. SWAT is way more demanding and more personal than police officer deployment, but at the end I am sure it will be worth of all the extra work. Think about it bro as much as you need to, and whenever and whatever you decide we will be here to help you out anyway we can. Good luck bro! Hope to see you join he SWAT team very soon! Saludos Juan Quote Link to comment Share on other sites More sharing options...
TD7930 Posted June 15, 2011 Author Share Posted June 15, 2011 OK... i will do that!. It will just take some time..It´s not done in a few hours, like the other adjusments. Thanks for your help! So i have to study especially this pack a bit more. We´ll see the progress.. Quote Link to comment Share on other sites More sharing options...

Recommended Posts
Join the conversation
You can post now and register later. If you have an account, sign in now to post with your account.