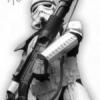
sir david Posted June 15, 2011 Share Posted June 15, 2011 Name: DAVE HARRIS Legion ID #: TD-5996 Forum Name:SIR DAVID Garrison:UNITED KINGDOM GARRISON Trooper Emulated: STOP THAT SHIP/DOCKING BAY 94 SQUAD LEADER Member must currently be deployed as an MEPD Police Officer to be considered. - yes Weathering must be appropriate to screen used armor. Too little or too much weathering will not be allowed. - yes Pack, pauldron, and weapon combinations must match a specific trooper a seen on screen. - yes hi guys thought i'd start the ball rolling here with my swat attempt. juan,rick,noel and rolf among others have seen my progress for a while on face book,i just need boots to finish,but,i'll post some earlier pics anyway,until brad or dave can get round to take the final ones! THE HELMET... think thats it????? just need the action pics taking,and if ive forgot anything,please give me a nudge guys! Uploaded with ImageShack.us THE ARMOUR WEATHERING...... ( THIS IS THE ARMOUR MY BUDDY ,AND FIRST U.K SWAT TROOPER, "SMALLY" KINDLY GAVE TO ME! ) I HAVE USED ONE PIGMENT ONLY HERE HERE GUYS !!!! (as per 76' ) , I CHOSE TO GO WITH BURNT UMBER ! (as the jundland wastes sand seemed to have a "reddish hue "to it ! ) , but if you want a "browner,less reddish shade,RAW UMBER would be ok! , I THEN WEATHERED THE ARMOUR USING A COMBINATION OF HARD,AND SOFT BRISTLED BRUSHES in the "SLAP IT ON IN A RUSH" style ! (as per 76'), AND A LITTLE SPONGE WORK !!!! ,- and that was after i had a very informative chat with my buddy ANTHONY FORREST! - to ask questions regarding the techniques used on set for weathering the armour back in 76' ! ..... THANX MATEY! ) .... i also took black and white pics to compare my weathering to the original tunisia off screen black and white pics from 76', where mollo and the prop guys were weathering the td's up and also using some great information on weathering from archive sources ! ...... Uploaded with ImageShack.us Uploaded with ImageShack.us i have also replicated the "white belt line" on the ab where,after weathering in 76',during takes the belt must have slipped down on anthony to reveal the white section on the ab armour as per "move along" roadblock captain! PAULDRON.... Uploaded with ImageShack.us ARMOUR MODS..... Uploaded with ImageShack.us Uploaded with ImageShack.us BLASTER..... my scratch-built T -21,complete with a genuine Lewis gun stock mounted sling bracket and also ,genuine Lee Enfield slings too ! (THANX TO PANDATROOPER for the awesome T-21 templates, his inspiration for "dry brush" weathering, and his awesome tutorial (here on MEPD )that helped me to build this big, heavy baby!!! THANX TERRY! ) .... I will remove the "scope sight", and the curly wire will stay,as per 76' !!!! (scope sight will still be used for certain troop events) Uploaded with ImageShack.us Uploaded with ImageShack.us Uploaded with ImageShack.us GLOVES...... thanx to billy (BILLHAG) for the kind gift of the latex handplates without his help on this,i'd be stuck!!!! Uploaded with ImageShack.us Quote Link to comment Share on other sites More sharing options...
sir david Posted June 15, 2011 Author Share Posted June 15, 2011 and a better pauldron shot!... Uploaded with ImageShack.us Quote Link to comment Share on other sites More sharing options...
nick.black Posted June 15, 2011 Share Posted June 15, 2011 Way to go Dave. Hope it all goes well for you mate. Nick Quote Link to comment Share on other sites More sharing options...
DirtyBoy Posted June 15, 2011 Share Posted June 15, 2011 Dave....When are you sending me that AWESOME T-21???? lol looking good brother Quote Link to comment Share on other sites More sharing options...
JK007 Posted June 15, 2011 Share Posted June 15, 2011 Nice one Dave good luck Bro AWESOME work as usual wouldn't expect any less. Quote Link to comment Share on other sites More sharing options...
sir david Posted June 15, 2011 Author Share Posted June 15, 2011 bless you bro! there will be a little surprise on my armour in the final action shots too just to get it nearer to 76' style! b.t.w ,i have based the weathering on the "move along" roadblock captain (single pigment weathering) hope this is acceptable for "stop that ship" ???? Quote Link to comment Share on other sites More sharing options...
trooper1 Posted June 15, 2011 Share Posted June 15, 2011 Very nice my friend. One question I have right off. Where are the rivets, or where does the shoulder strap under your armpit attach? Screen had the small leather patch on top with the flat side rivets. I dont see them and was just wondering. Cant wait to see more of this one progress. Best of luck, your looking good. Quote Link to comment Share on other sites More sharing options...
sir david Posted June 15, 2011 Author Share Posted June 15, 2011 oh,and the details ...... i have replicated the "move along" road block captains "white belt line" on the ab plate too ,to get the 76' feel! Uploaded with ImageShack.us Uploaded with ImageShack.us Uploaded with ImageShack.us Uploaded with ImageShack.us Uploaded with ImageShack.us Quote Link to comment Share on other sites More sharing options...
sir david Posted June 15, 2011 Author Share Posted June 15, 2011 Very nice my friend. One question I have right off. Where are the rivets, or where does the shoulder strap under your armpit attach? Screen had the small leather patch on top with the flat side rivets. I dont see them and was just wondering. Cant wait to see more of this one progress. Best of luck, your looking good. on the pauldron jay??? ,look at the back of the pauldron strap near the mortar tube in the pic below..... my attempt at copying this is the next photo..... i originally did this at the back but juan pointed out it looked like the shoulder bell strap (hence the low sitting bell on the pauldron side) Uploaded with ImageShack.us Uploaded with ImageShack.us is that what you meant bro??? Quote Link to comment Share on other sites More sharing options...
trooper1 Posted June 15, 2011 Share Posted June 15, 2011 Yeah... Sorry forgot that. LOL Quote Link to comment Share on other sites More sharing options...
trooper1 Posted June 15, 2011 Share Posted June 15, 2011 Here, between the orange and segmentmented black Quote Link to comment Share on other sites More sharing options...
sir david Posted June 15, 2011 Author Share Posted June 15, 2011 Here, between the orange and segmentmented black yeah,it is not the same bro!!! well spotted! ,an easy mod though! Quote Link to comment Share on other sites More sharing options...
sir david Posted June 15, 2011 Author Share Posted June 15, 2011 that will be done tomorrow! Quote Link to comment Share on other sites More sharing options...
sir david Posted June 15, 2011 Author Share Posted June 15, 2011 actually,ive just done it now guys! Uploaded with ImageShack.us Uploaded with ImageShack.us is that ok guys? Quote Link to comment Share on other sites More sharing options...
trooper1 Posted June 15, 2011 Share Posted June 15, 2011 Very Good! that was fast to. Quote Link to comment Share on other sites More sharing options...
trooper1 Posted June 15, 2011 Share Posted June 15, 2011 on the pauldron jay??? ,look at the back of the pauldron strap near the mortar tube in the pic below..... my attempt at copying this is the next photo..... i originally did this at the back but juan pointed out it looked like the shoulder bell strap (hence the low sitting bell on the pauldron side) Uploaded with ImageShack.us Uploaded with ImageShack.us is that what you meant bro??? Yeah, what Juan thought, is what Rolf and I thought when we designed the ones I make now. You have the look now! with the change you made. Quote Link to comment Share on other sites More sharing options...
sir david Posted June 15, 2011 Author Share Posted June 15, 2011 Very Good! that was fast to. i dont hang around bro! cant believe i never noticed that!!! lol! thanx for pointing it out bud! god, i feel such a dork!!! Quote Link to comment Share on other sites More sharing options...
sir david Posted June 15, 2011 Author Share Posted June 15, 2011 oh, and i suppose i gotta add the " customary" SWAT emoticon too ! ......... :popcorn A GENERAL IDEA ON HOW MY ARMOUR LOOKS (me on the right) AT A RECENT TROOP ALONGSIDE SWAT DEPLOYED BROTHERS SMALLY ,AND JK007 !!! (i had a pack on here though! ) Uploaded with ImageShack.us Quote Link to comment Share on other sites More sharing options...
trooper1 Posted June 15, 2011 Share Posted June 15, 2011 oh, and i suppose i gotta add the " customary" SWAT emoticon too ! ......... LOL This is us watching all this unfold! LOL Like watching a good action film. Cant wait to see what happens next, and then be able to hit the pub after to talk about all the excitement..... Quote Link to comment Share on other sites More sharing options...
sir david Posted June 15, 2011 Author Share Posted June 15, 2011 LOL This is us watching all this unfold! LOL Like watching a good action film. Cant wait to see what happens next, and then be able to hit the pub after to talk about all the excitement..... bless you bro! love those 2 popcorn munching guys though! always brings a smile to my face! Quote Link to comment Share on other sites More sharing options...
sir david Posted June 16, 2011 Author Share Posted June 16, 2011 back to the helmet guys.... first,the tooth mesh WILL BE REMOVED FOR FINAL PICS!!! as i have said, i have studied the original MOVE ALONG lid on starwarshelmets.com and have tried to replicate it as near as i can...... first,...... THE UNEVEN TUBE STRIPES (i wish i had got the HAND PAINTED LOOK ones now! ) ...... Uploaded with ImageShack.us Uploaded with ImageShack.us "WONKY HOVI MIC TIPS"... Uploaded with ImageShack.us CRACK AND CHIPS ON THE HELMET .... Uploaded with ImageShack.us TRAP DETAILS SIMULATING THE ORIGINAL HELMET.... Uploaded with ImageShack.us i have tried to simulate the very SCRUFFY ("do it quickly people!!- cos time costs money on set !!!! " ) handpainted look of the 76' lids using HUMBROL paints of course! GRADE 5 GREEN welding lense applied.... Uploaded with ImageShack.us AND THE HELMET FROM THE FRONT .... Uploaded with ImageShack.us i think bar the mesh removal,that about covers the helmet....again,if i missed anything let me know guys! Quote Link to comment Share on other sites More sharing options...
sir david Posted June 16, 2011 Author Share Posted June 16, 2011 NOW, BACK TO THE BLASTER ..... we can clearly see the curly phone wire where the barrel meets the reciever as compared to the "scope sight" that most of us use ,and now take as canon on our T-21'S ! .... an enormous thanx to my UKG/FISD/MEPD buddy BILLHAG for pointing that out to me! and sending me other links to T-21 details to aid my build!!! Uploaded with ImageShack.us the "scope sight " will be removed for final pics,but i will use it for trooping ,as it may be sturdier than the wire! ,but then again i have a choice of the 2 now! Quote Link to comment Share on other sites More sharing options...
nick.black Posted June 16, 2011 Share Posted June 16, 2011 On that front Dave, are there any resources for the details at the front of the barrel mate? Nick Quote Link to comment Share on other sites More sharing options...
sir david Posted June 16, 2011 Author Share Posted June 16, 2011 On that front Dave, are there any resources for the details at the front of the barrel mate? Nick p.m billy bro! Quote Link to comment Share on other sites More sharing options...
JK007 Posted June 16, 2011 Share Posted June 16, 2011 Looking good Bro helmet mesh out Quote Link to comment Share on other sites More sharing options...

Recommended Posts
Join the conversation
You can post now and register later. If you have an account, sign in now to post with your account.