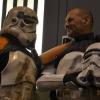
Smally Posted February 19, 2013 Share Posted February 19, 2013 Hi Troops, Well as some of you may already know, for the last three months I have been building my newest armour/Sandtrooper. I wanted something that was a very close replica to the RBC which was played by Anthony Forrest, yet I still needed something that was troop-able as I'm an active UKG member. I have been a member of the UKG since 2001 and in that time have built many kits from the old faithful Armor/FX right up to this kit, which is TM. I decided on TM, not only because you know that you're getting the best made armour, but because of the guy's 'customer care'. Thanks again for all your help and advice on this build Paul, you are a legend I also wish to also thank Dave Harris, Dave Marsden, Joe Versku and Marcus (I.T.) for all their help. It would have been sooo much harder without your help and/or input boys This is not going to be a 'build thread' as there are many out there already. This is more of a 'before and after' thread but with some pictures that I took along the way. OK so here we go: My kit arrived in late November and I made a start on it straight away. My aim was to be completed by March 2013 for the first troop at Memorabilia (One of the UKG's biggest events) The ruff trimming was done with drawing the cut lines around the moulds with a pencil and using Lexan scissors to cut the parts out. This was a long process in which I decided to move from my garage and into my kitchen as there was not enough space for all of the parts... the Missus was not happy! I then sanded down all of the edges, leaving some return edges where applicable so that I could add the armour screws later on. I could have used a dremel for this process but did 99% of it by hand - just so I didn't make a mistake A few days later the trimming was coming along nicely and was nearly completed. During my spare time I had to source everything from scratch again as I had sold my previous kit... and I mean everything! I got boots from TKboots, Pauldron from Trooperbay (I have a Trooper1 on its way as I type), Rom FX voice kit from source, blasters from Doopy doo's and Dave H, back pack parts from everywhere!, pouches etc etc the list goes on! The backpack kit I got off of an old member on here who never got round to finishing it. He was going for a version 3 BP by the looks of the kit: and so I had to source the 'move along' pack items from other places. I honestly don't mind admitting that I did not enjoy building this pack - I really don't know how you do it, Rick! But here it is all finished and weathered using fullers earth: I then went on to gluing together all of the parts to make up the armour. This was a long and steady process which was not without error. I tried another type of glue different to what I normally used. The glue was called Zap-a-gap. It was like super glue and was instant sealing. I applied it to one thigh piece, put my clamps in place, and then sat it down to dry. As I sat it down a clamp slipped and glued two thigh pieces together at totally the wrong angle! To say I S**t myself is an understatement. I did my best to separate the two halves but ended up doing this!: After I stopped crying, I contacted TM. He very kindly replaced the damaged half and I was able to save the thigh! I then quit using the zap-a-gap and went back to good old E6000. Although I doubt the TD's had bicep hooks like some of the TK's, I decided to make some to assist me when trooping. I used some spare ABS and bent the tips over before gluing them into place. *TIP* If you do not have access to a heat gun then simply use a kettle to boil some water, pour the water over the ends and then bend into shape - This is what I ended up doing After all of the armour was built up I tried it on for fitment and to see how it felt for size. My measurements we spot on and I only identified a few areas that required further trimming: Disgustingly 'clean' armour, yuck! I then added the small screws as per the original suits. Although internally I used a different form of strapping so that it was more 'trooping friendly'. So next came the weathering! I studied the RBC pics, of which I have many, and tried my best to replicate the dirt. I spent the next three days applying a base coat. This was done by using Umber paint diluted with water in a squirt bottle. I sprayed it on in a mist and left it for a couple of minutes. I then used kitchen towel to dab off any run marks. I'd leave it to then fully dry before going on for another layer. This was repeated over and over until I was happy with the results: I then started to add the dirt detailing which was the best part!: please notice the move along bucket replica with the sleepy eye, wonky mic tips, uneven tube stripes and the rushed look paint job on the frown. I decided to get some other pauldrons for when an event has an over kill of captains! lol. I've since given the black one to Dave Harris. Once I was happy with the weathering of the armour, I painted/weathered up my pouches and added them to my belt and back pack (for the shoulder pouch). I've seen different methods used to secure the small Spanish pouches to the belt, but I found this way the best. Cut a small bit off a wire hanger, bend it through the loop, thread through a length of strapping, add a press stud to the under side of the belt so that its not visible on the outside, press stud on the strap and clip together, simples! I took all my blasters round to Dave H as he kindly offered to weather them up for me. I posted another thread on this that can be found here: http://forum.mepd.ne...391#entry142336 I took my RomFX voice card and battery packs and installed them all into one sealed placstic box. I wired the rom upto an external power switch so that it can be turned off and on whilst wearing the armour. I also drilled a small hole so that the volume control sticks out the top. I mounted the Rom and its speaker all under my chest piece using velcro and it works like a dream! Very tidy. After everything was built and weathered I tried it out for some pics. I apologize for the pics as due to the weather outside I was confined to my living room and garage and the lighting wasn't the best, but, just like the movies, the camera has filtered out most of the weathering - but you get the idea. So here is the result of the last 3+ months of hard work. What do you guys think? RBC helmet RBC Replica "How long have you had these droids?" "Move along, move along" Notice the 'slipping seed try' and 'stretched tape' Drill hole in motor tube With my Dave H T21 White pauldron with DLT19 "Get some!" Change from RBC to 'Alley check SGT' Quote Link to comment Share on other sites More sharing options...
sir david Posted February 19, 2013 Share Posted February 19, 2013 PURELY AWESOME BRAD !!!!!!!!!!! ..... an incredible build in such a short space of time !! ... Guys,.i have been fortunate enough see this in the flesh, during most parts of the build process ,and,trust me, it looks even more awesome in the flesh, than what you see here guys! ...... Smally gets my vote for the role of MEPD armourer any day !!! ....76' ALL THE WAY Bro ! :salute: :salute: and.....TrooperMaster ROCKS !!!!!!! Quote Link to comment Share on other sites More sharing options...
DirtyBoy Posted February 19, 2013 Share Posted February 19, 2013 FFFFFFFAAAAAAANNNNNNTTTTTTAAAAAASSSSSSTTTTTIIIIICCCCCC!!!!!!!!!!!!! Excellent job! Quote Link to comment Share on other sites More sharing options...
SCRIBBLER Posted February 19, 2013 Share Posted February 19, 2013 @ Smally - Pure EPIC-NESS, Brother! (Is that even a word?) Now to prepare for the influx of new RBCs! lol GREAT work, Brad! Quote Link to comment Share on other sites More sharing options...
Elegance Posted February 19, 2013 Share Posted February 19, 2013 Yeah, what Dave said, awesome!!! I loved reading that and hope to have the skill and confidence to scratch build myself one day. Great to have so many pics too. Great work, you should be chuffed. Can I ask how did you fix the "over the shoulder" straps to the armour as Im goinf to change mine very soon using quick release snaps like you have. If you could let me know that would be great!!! Quote Link to comment Share on other sites More sharing options...
SAND DEVIL Posted February 19, 2013 Share Posted February 19, 2013 Brad, That is so awesome! I sat here drooling. Man you did a great job. And Dave, the gun weathering is impressive. Quote Link to comment Share on other sites More sharing options...
rhapsodyred99 Posted February 19, 2013 Share Posted February 19, 2013 Looks good man! Is that the antenna I sent you? I have yet to put a leatherette surround on mine so have not put that antenna on yet, it looks great! Quote Link to comment Share on other sites More sharing options...
DarthChridan Posted February 19, 2013 Share Posted February 19, 2013 Wooooaaah...absolutely POOOOORNNNOOOOO Really great replica, the style, the weathering, the implementation...all of it!!!! ....and of course, I agree with you...TM is the best armour (my opinion) and his service is unbeatable About your 'new' glue....that s.u.c.k.s. ....for me I use also always the E6000. One of the best glue outside...rather wait a bit and it works 100%....because in this case I don't make experiments. My full respect to this really beauty of a Sandtrooper armour....you HAVE to come to the CE II....I want to see this 'monster' LIVE About the weapons....what can I say to the work of Dave......POOOOORRNNNOOOO 2 Quote Link to comment Share on other sites More sharing options...
nick.black Posted February 19, 2013 Share Posted February 19, 2013 Wow Brad this is purely awesome. Can't wait to see it in person at MEM. Although I think you'll upstage most of the rest of us you inconsiderate bugger! Nick Quote Link to comment Share on other sites More sharing options...
sir david Posted February 19, 2013 Share Posted February 19, 2013 lol! well doneagain Brad! ..... i told you guys he would raise the standards for us with this build ;0) Quote Link to comment Share on other sites More sharing options...
DarthChridan Posted February 19, 2013 Share Posted February 19, 2013 Question to Brad: is this the new stunt helmet version of Paul?!?...it looks really great. Quote Link to comment Share on other sites More sharing options...
iconoclasta_88 Posted February 19, 2013 Share Posted February 19, 2013 STANDING OVATION!!! That is an awesome armor!!! BIG CONGRATS BRO... It looks really really cool. It is very interesting to see an armor build up to screen accuracy from day one in such detail, and at the same time remember how our armors were put together say 3 years ago. It is awesome to see how the collective work and attitude of the detachment evolving like this. Thx for inspiring us! Saludos Quote Link to comment Share on other sites More sharing options...
Smally Posted February 19, 2013 Author Share Posted February 19, 2013 Hey guys, Thanks for the comments and support. Yeah, it really was a long road but I'm extremely happy with the result. I think we can all agree that Paul lives up to his name, Troopermaster! @Daniel, I agree, I love this helmet! The pull is extremely sharp and its nice and light. I recommend you all pm Paul and get one! Quote Link to comment Share on other sites More sharing options...
sir david Posted February 19, 2013 Share Posted February 19, 2013 TROOPERMASTER ROCKS ! :0) Quote Link to comment Share on other sites More sharing options...
inglorious trooper Posted February 19, 2013 Share Posted February 19, 2013 hey brad, nothing i can really add to the comments already made bro, youve raised that bar really high,outstanding work, cant wait to be standing next to soon with my cantina sergeant! well done mate!! Quote Link to comment Share on other sites More sharing options...
Dazauto Posted February 19, 2013 Share Posted February 19, 2013 Brad, your sandy is awesome, the work and detail you have put into it is incredible and it will go on to inspire both myself and other troopers here. I love the details on your blasters, Dave did a great job and I hope when I start the mods on my DLT-19 I can get somewhere close to how yours turned out. I have to admit that the backpack has been my favorite part to do so far, its the weathering im not enjoying so much but your pics have given me some much needed guidence. Great job mate and I look foward to seeing you and your armour on a troop soon Quote Link to comment Share on other sites More sharing options...
DarthChridan Posted February 19, 2013 Share Posted February 19, 2013 @Daniel, I agree, I love this helmet! The pull is extremely sharp and its nice and light. I recommend you all pm Paul and get one! Mmmmh...I think it's time for a new stunt bucket Quote Link to comment Share on other sites More sharing options...
opi wan Posted February 19, 2013 Share Posted February 19, 2013 Your move along is really cool, only thing is, it looks a little to clean for me, but this is only my opinion. Paul´s new Helmet design is incredible good, it looks perfect! Greetings Alex Quote Link to comment Share on other sites More sharing options...
ground pounder Posted February 20, 2013 Share Posted February 20, 2013 Awesome job. Can't wait to see the presentation (wish I oculd be there!) Quote Link to comment Share on other sites More sharing options...
DaveMars Posted February 20, 2013 Share Posted February 20, 2013 Wow awesome build thread dude! I've been looking forward to seeing the final pics after seeing work in progress in the flesh! 100% SWAT worthy! Again It's definately not too clean, we can see that from the close up pics of the armour It'll be honour to be at your side in a few weeks at Britannia Patrols first troop together Same goes to our other fellow sandie brothers! WE WILL FIND THEM DROIDS! Quote Link to comment Share on other sites More sharing options...
ENFORCER Posted February 20, 2013 Share Posted February 20, 2013 Holy ball busting awesome looking Smally, the next time i get new armor i will be following your detailing to the letter. Fricken awesome job brother, all you need now is Anthony Forrest in the pic with you. Quote Link to comment Share on other sites More sharing options...
Purplehaze Posted February 20, 2013 Share Posted February 20, 2013 Brad, Looks fantastic!!!!! My personal favorite is your Sargent set up with the DLT 19.Also can i ask do the straps on your Ab/Cod section just run up over your sholders & clip in on the front & then get hidden by the chest plate. I like the look of that set up. Thanks Andrew. Quote Link to comment Share on other sites More sharing options...
Sandman Tigui Posted February 20, 2013 Share Posted February 20, 2013 Out of words Brad, simply mind blowing congrats mega big time!!!! Quote Link to comment Share on other sites More sharing options...
Smally Posted February 20, 2013 Author Share Posted February 20, 2013 Thanks guys. Very kind of you all. I've had a couple of guys asking me how I did the shoulder pouch strapping. As soon as I get a few minutes ill take some pics and will explain how I did it. Brad, Looks fantastic!!!!! My personal favorite is your Sargent set up with the DLT 19.Also can i ask do the straps on your Ab/Cod section just run up over your sholders & clip in on the front & then get hidden by the chest plate. I like the look of that set up. Thanks Andrew. Hi Andrew, Yeah, that's how I have done it mate. The straps are attached to the rear of the back piece, then they go over the shoulders and clip into the front of the AB piece. The chest and back then go over the top of them. Quote Link to comment Share on other sites More sharing options...
Joe Versku Posted February 20, 2013 Share Posted February 20, 2013 You had me at "Hi Troops.." Seriously fantastic build as has been echoed above. I read this thread and looked at your awesome pictures _while slowly rubbing my nuts ....and bolts ( I was going over my pack) and I realised I really need to look over my entire armour and upgrade ! Quote Link to comment Share on other sites More sharing options...

Recommended Posts
Join the conversation
You can post now and register later. If you have an account, sign in now to post with your account.