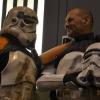
Smally Posted April 27, 2011 Share Posted April 27, 2011 Brad Small TD 7141 UK Garrison Board name: Smally Trooper: Road block captain Well here goes - I'm requesting SWAT deployment. I have gone for the infamous road block captain or the "move along" trooper. I have studied many pictures to try to replicate the weathering. I noticed that the captain has little dirt on his armour except for in all the crevasses and a large amount across his chest piece. Here is the helmet, please notice the wonky looking mic tips, as well as the brow that lifts VERY slightly over the left eye (as per the captain) Inside showing no mesh behind the frown: Flat green lenses: Studs and brads/rivets: Side ab rivets evenly spaced: Studs in the groin area: Stud in the upper ab section: And now the accessories: Canvas shoulder pouch: Leather hip pouches: Trooper 1 shoulder pauldron - notice the "removed sticker residue" (as per movie) Blaster by 'Itchynuts UK' Backpack showing in and out audio connectors: Cheers all, Smally. Quote Link to comment Share on other sites More sharing options...
sir david Posted April 27, 2011 Share Posted April 27, 2011 that rocks dude! so glad you got it all done buddy!!! where's the gaffa tape bicep shot dude???? Quote Link to comment Share on other sites More sharing options...
Smally Posted April 27, 2011 Author Share Posted April 27, 2011 Oh crap yeah! I forgot that bit haha! Oh well it shouldn't stop any deployments.. I just wanted to add it for the pics. Quote Link to comment Share on other sites More sharing options...
Rolf Posted April 27, 2011 Share Posted April 27, 2011 Eye poping nice looking sandy bro Hope to see you join the SWAT´s asap :ph34r: Quote Link to comment Share on other sites More sharing options...
Daetrin Posted April 27, 2011 Share Posted April 27, 2011 Excellent attention to detail sir Quote Link to comment Share on other sites More sharing options...
sandtrooper Posted April 28, 2011 Share Posted April 28, 2011 Very nice detail on your armour, Smally! What method/colors did you use for the weathering? Quote Link to comment Share on other sites More sharing options...
FIVE Posted April 28, 2011 Share Posted April 28, 2011 This looks fantastic man!! That being said... I do want to "warn" you that my — or anyone else — saying you look great, which you do, doesn't have anything to do with whether or not you get SWAT. This is something I'm going to start pointing out on the SWAT submission threads because it's so very easy to hear a lot of praise from us all then get the big list of "to dos" that we have Juan post — which often comes — and feel discouraged. So... that being said, you DO look great! Now... just be ready for a possible list. (btw... Juan and the rest of the command staff haven't even begun talking about your submission yet... so no need to worry... I'm just saying.) Quote Link to comment Share on other sites More sharing options...
vecspeed12 Posted April 28, 2011 Share Posted April 28, 2011 Looks awesome brad! Quote Link to comment Share on other sites More sharing options...
Smally Posted April 28, 2011 Author Share Posted April 28, 2011 Cheers for the comments troops Boss - Yeah, TOTALLY understand Pat - I got Dave H (Sir Dave) to mix me up some paints for weathering. I tried it out on some old plastic before hand and then decided to add some pigment paint to it (burnt umber). I'm really pleased with the colour that I got in the end. I then applied it with an old sea spong, let it semi dry then attacked it with a very slightly damp rag. I'm sure Dave will comment on the mix he used (thanks again Dave). Cheers all, Smally. Quote Link to comment Share on other sites More sharing options...
sir david Posted April 28, 2011 Share Posted April 28, 2011 no worries bro! it looks cool! glad i could be of help buddy! hope your SWAT submission gets you that well earned status bud!!! when you are good to go, i will follow behind buddy! Quote Link to comment Share on other sites More sharing options...
iconoclasta_88 Posted April 28, 2011 Share Posted April 28, 2011 Hey Bro! How are you doing? Great TD!!! Just wanted to let you know that I have seen and read your application. I still need to find the time to review it and compare it to screen grabs and reference material. I am having some very busy days at work, and it is not less busier at home. But will be over this very soon... Thx for understanding and for your patience. Saludos Juan Quote Link to comment Share on other sites More sharing options...
sir david Posted April 29, 2011 Share Posted April 29, 2011 i'm keeping em crossed for ya brad!!!! Quote Link to comment Share on other sites More sharing options...
Sandman Tigui Posted April 29, 2011 Share Posted April 29, 2011 Eye popping TD! My respects to you Trooper! Quote Link to comment Share on other sites More sharing options...
iconoclasta_88 Posted April 30, 2011 Share Posted April 30, 2011 Hey there Brad. How are you bro... Well, I have been checking your gear and comparing to references. It looks awesome overall, as I said before. ButI do think there is some room for some minor mods and improvements. I do want to make it clear that this improvements do not mean that the stuff is wrong or not awesome, the improvements refer to make it more similar to what we see on screen. Right? So... Here they are: Armor trimming, fitting and building looks great. The only thing I think you would need to do is to rise the knee cap a bit. The trick is to have the middle corners of the diamond meet exactly the middle of the detail on the top of the shin. Here is a picture to better explain. The two red dots on the kneeplate should meet the two blue dots on the shin. Pouches look good. The MP40 is done. The Stolla Wien (or similar) look very close to the MP40 used on production, but there are a few mods you could do to make them look better. There is detail on the flap, showing some kindo of curved edge, whereas the screen used had straight edges. You could easily noticed this comparing this to lets say Zadokk's or Imperial Outfitter's version. Or, of course, checking references from ANH. Also, the end of the flap is a little to pointy. Replica Pouches made for ANH had more "rounded" look at the end. (I had this exact kind of pouches and I modify them how in this way, made it look much better. There is a thread about that somewhere I think.) Check this picture. Red is what I think you could modify to make it more accurate. Blue is where I noticed this curved detail on flap edges. Sorry for the drawing, red is supposed to be straight. I need to go to a work meeting, but I do have a couple more comments. Mostly on the E11 scope rail, and maybe a couple of questions about the weathering. What do you think bro? Does this makes sense to you? Let me know what you think or if you have any question. Saludos Juan Quote Link to comment Share on other sites More sharing options...
sir david Posted April 30, 2011 Share Posted April 30, 2011 just minor tweaks bro!!! Quote Link to comment Share on other sites More sharing options...
Smally Posted April 30, 2011 Author Share Posted April 30, 2011 Hi Juan, Many thanks fopr looking over this for me. I can't believe I missed that on the knee plate. Such a noob mistake! I think I understand what you are saying about the pouches. I am off work from tomorrow and will adjust these bits then - I don't think it will take much time or effort to sort them. I will also wait to see what you have to say about the blaster rail and the weather...... Thanks again buddy, Brad. Quote Link to comment Share on other sites More sharing options...
sir david Posted April 30, 2011 Share Posted April 30, 2011 looks seriously cool brad! with those little tweaks done, i cant see a lot stopping ya bro! keeping em crossed for ya buddy! Quote Link to comment Share on other sites More sharing options...
FIVE Posted April 30, 2011 Share Posted April 30, 2011 I can't believe I missed that on the knee plate. Such a noob mistake! I KNOW... we were all like, 'DUDE, look at that KNEE PLATE!" Haha Seriously man, you're sooo close! Quote Link to comment Share on other sites More sharing options...
Smally Posted May 1, 2011 Author Share Posted May 1, 2011 Ok, Sniper knee plate moved up the shin armour (I have left the weathering so you can see where it was seated earlier): Pouches trimmed and straightend: And blaster scope rail modified to a lower profile (I guessed that was what you were going to say Juan ) Thanks again for taking the time to look into this for me guys Cheers, Smally. Quote Link to comment Share on other sites More sharing options...
sir david Posted May 1, 2011 Share Posted May 1, 2011 SWEET BUDDY!!!!! Quote Link to comment Share on other sites More sharing options...
iconoclasta_88 Posted May 2, 2011 Share Posted May 2, 2011 Hey Bro! How are you? Those mods are great. The pouches look totally ANH now! Great. About the E11, yes, that was one of the things I was going to suggest regarding the Rail. The other thing with it is that the way it is attached looks different. Here is a pict of how it should be... Check the shape of the rail. The red one is how it should be, the blue one is how yours is... Also, I don't really know if you should add the power cylinders or not. I do have reference for 2 different scenes where E11 had it. But none of them is being hold by the Roadblock Capt. All the references I have of his E11 are from the other side. So I dont have any reference that shows without a doubt that there are or not power cylinders on that specific E11. What do you think? Learning from Jays application, I don't want to assume anything so... Saludos. Quote Link to comment Share on other sites More sharing options...
Rolf Posted May 3, 2011 Share Posted May 3, 2011 What about the weathering. are it a bit too clean. Nice new modify stuff on the pouches etc bro, you are all most there i´m sure Quote Link to comment Share on other sites More sharing options...
Smally Posted May 3, 2011 Author Share Posted May 3, 2011 About the E11, yes, that was one of the things I was going to suggest regarding the Rail. The other thing with it is that the way it is attached looks different. Here is a pict of how it should be... Check the shape of the rail. The red one is how it should be, the blue one is how yours is... Hey Juan, Thanks again for the help here. I have been working on the E11 again this morning and using your references as a guide I have removed the rail, re-cut and re-shaped it, then added some weathering to blend it all in. Here is the front of the rail: And here is the rear: With regards to the power cylinders, I had the same problem finding any refernces showing the left side of the road block Capt's E11 also. I could not find anything that suggested either way if there were cylinders on it or not. I will therefore be guided by you on wether they should be on the blaster for SWAT deployment or not Cheers all, Smally. Quote Link to comment Share on other sites More sharing options...
Smally Posted May 3, 2011 Author Share Posted May 3, 2011 What about the weathering. are it a bit too clean. Hey Rolf, Thanks for the feedback. I'll get the pigments out again. I think I was just being cautious as my weathering was quite heavy before I applied for SWAT (in hindsight maybe a little too heavy?). Here is a picture before my SWAT application: I wanted to try to be a bit more accurate this time round. I'll get cracking on it and post up some pics later. Cheers, Smally. Quote Link to comment Share on other sites More sharing options...
trooper1 Posted May 3, 2011 Share Posted May 3, 2011 Smally, Looking good my friend. I was wondering what armor you are using? Just keep plugging along. Hope to see you at the end of the journey. If we dont go crazy getting there. LOL Quote Link to comment Share on other sites More sharing options...

Recommended Posts
Join the conversation
You can post now and register later. If you have an account, sign in now to post with your account.