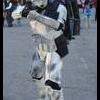
Quartermaster Posted September 4, 2010 Share Posted September 4, 2010 Wanted to share my new "AM" Armor build. This is not going to be for a TD. It will be for my Incinerator Trooper. Already have the red pauldron for it! Really wanted to do something no one else has and I really like the way this character looks. Painting to come soon. Here are a few pics. The thighs and calves/shins are ABS glued with reinforcement strips on the inside of the seams. Calves will be velcroed in the back. Biceps are ABS glued together. Forearms are glued one side and velcroed on inside seam. New EFX bucket has teeth filed out larger and frown re-painted to ANH gray. Also painted interior flat black. Quote Link to comment Share on other sites More sharing options...
DirtyBoy Posted September 4, 2010 Share Posted September 4, 2010 Looks good John....cant wait to see when you have it all done. I know it will be awesome Quote Link to comment Share on other sites More sharing options...
Caomhanach Posted September 4, 2010 Share Posted September 4, 2010 The details on the AM armor looks quite sharp... Looks greaat, shame about not getting it dirty!!!! Quote Link to comment Share on other sites More sharing options...
FIVE Posted September 4, 2010 Share Posted September 4, 2010 Lookin' good man!! Quote Link to comment Share on other sites More sharing options...
Scootch Posted September 5, 2010 Share Posted September 5, 2010 Cool! Quote Link to comment Share on other sites More sharing options...
Quartermaster Posted September 6, 2010 Author Share Posted September 6, 2010 The details on the AM armor looks quite sharp... Looks greaat, shame about not getting it dirty!!!! The details are very sharp! Really glad I went the AM route. Very thick, great pulls and very easy to put together. Everything lines up perfectly. Also, I'm a bigger guy with an athletic build. 6 ft tall, 215 with big thighs and big calves and this set is geared more towards the bigger trooper. As far as getting it dirty, I am planning another set for a new Sandie some time down the road. This one will be a little weathered....and RED! (well, in some places anyway!) Here is what I am shooting for..... Quote Link to comment Share on other sites More sharing options...
kenthork Posted September 6, 2010 Share Posted September 6, 2010 really cool project!! i like it a lot, it is a TD cousin i know there is not many incinerator troopers yet, a french guy just finished her. Quote Link to comment Share on other sites More sharing options...
DirtyBoy Posted September 6, 2010 Share Posted September 6, 2010 It's going to look awesome man. Quote Link to comment Share on other sites More sharing options...
iconoclasta_88 Posted September 6, 2010 Share Posted September 6, 2010 That armor is coming out really cool John! Good job bro! AM armor looks really nice, sharp, and with lots of details. The incinerator trooper is not my style, too much red and too little sand but Im sure you will end up with an awesome armor there. Keep us posted on your progress... Saludos Quote Link to comment Share on other sites More sharing options...
Quartermaster Posted September 9, 2010 Author Share Posted September 9, 2010 Worked on the upper chest and back armor. Decided to try something different here. Connected the front and back at the shoulders first. Then attached the ribbed shoulder straps on top. the sides will line up and be velcroed with a slight overlap. It will have more of a Clone Armor type finish. Shoulder bells will attach via snaps to the attached black elastic strips. Also got my new Red INC Trooper Pauldron. Quote Link to comment Share on other sites More sharing options...
DirtyBoy Posted September 9, 2010 Share Posted September 9, 2010 NYCC??? will it be ready? Quote Link to comment Share on other sites More sharing options...
Quartermaster Posted September 9, 2010 Author Share Posted September 9, 2010 NYCC??? will it be ready? Well, considering I haave about a month to go till then, I am hoping so. I will be going Saandie first and foremost of course. Especially given the nature of what we (Troopers helping Troopers) will be doing there as representatives of the MEPD. I may bring it as a second costume, if I have the room to transport it and the time to armor down and back up again. We shall see! Quote Link to comment Share on other sites More sharing options...
Scarbucket Posted September 9, 2010 Share Posted September 9, 2010 OOOOH!Nice,Q.Just a word of warning though.At the last NYCC we had a closet (small room) for a changing area.Reminded me of the Circus when the clowns climb into that little car.... Quote Link to comment Share on other sites More sharing options...
DirtyBoy Posted September 9, 2010 Share Posted September 9, 2010 OOOOH!Nice,Q.Just a word of warning though.At the last NYCC we had a closet (small room) for a changing area.Reminded me of the Circus when the clowns climb into that little car.... Thats no good!!! if I didnt think parking was going to be such an issue I would bring the changing trailer. I checked on booking a room and it was $400.00 for the night Quote Link to comment Share on other sites More sharing options...
Pappy Posted September 10, 2010 Share Posted September 10, 2010 I'm jealous! How can you guys build your armor so clean and well(no glue dropping etc),daym Quote Link to comment Share on other sites More sharing options...
Quartermaster Posted September 10, 2010 Author Share Posted September 10, 2010 I'm jealous! How can you guys build your armor so clean and well(no glue dropping etc),daym Most of it is just being very careful and taking my time. I also use Blue Painters tape to line up straight edges and cover parts that may get glue overlap on them. Once it is dry, I just peel the tape off. Works pretty good. Quote Link to comment Share on other sites More sharing options...
Quartermaster Posted September 15, 2010 Author Share Posted September 15, 2010 Moving right along with more of my "AM" Incinerator Trooper build. Decided to attach the upper back piece to the lower butt by adding some ABS strips to the inside seam. Just feels better to me. Added some ABS shims to the sides as well. Once armorr is on, I just line up the sides and Velcro the shims to the inside of the AB plate. No side gaps! This stuff is awesome! Installed snaps in the crotch and installed white elastic. Quote Link to comment Share on other sites More sharing options...
Quartermaster Posted September 15, 2010 Author Share Posted September 15, 2010 More pics of the progress... The biceps have a short elastic piece connected with a rivet that then snaps to the shoulder bell. The rivet is painted white on the outside and is hidden under the shoulder bell. Connected the knee plate via two rivets on either side, then painted them white. Next up...connecting the strapping for the thighs and the harness for the mid section. Quote Link to comment Share on other sites More sharing options...
FIVE Posted September 15, 2010 Share Posted September 15, 2010 This is looikin' tight!! And by "tight" I mean well executed... not physically constraining. Though it might be both. Quote Link to comment Share on other sites More sharing options...
Quartermaster Posted September 15, 2010 Author Share Posted September 15, 2010 This is looikin' tight!! And by "tight" I mean well executed... not physically constraining. Though it might be both. Thanks Nol. Definetely not tight in terms of constraining though. I made sure that I built plenty of room into this kit. It will have enough "play" in it that I could adjust it accordingly for any weight gain or loss without to much trouble. Quote Link to comment Share on other sites More sharing options...
DirtyBoy Posted September 15, 2010 Share Posted September 15, 2010 looking great man....its going to be so cool Quote Link to comment Share on other sites More sharing options...
kenthork Posted September 15, 2010 Share Posted September 15, 2010 good job John. seems to be in good way one things, armor triceps round should be placed under the armpit and not before or Behind. but perhaps for the incinerator trooper it is not the same as TK and TD?... Quote Link to comment Share on other sites More sharing options...
iconoclasta_88 Posted September 15, 2010 Share Posted September 15, 2010 good job John. seems to be in good way one things, armor triceps round should be placed under the armpit and not before or Behind. but perhaps for the incinerator trooper it is not the same as TK and TD?... Yep! Good eye Jerome! The thumb print should be pointing to the torso and under the armpit, not to the back. Just a small adjustment. Saludos Quote Link to comment Share on other sites More sharing options...
Quartermaster Posted September 15, 2010 Author Share Posted September 15, 2010 You guys are good! You don't miss a thing! You are correct, the bicept is not under the bell correctly and I struggled with this a bit when getting to this point. Here is the problem, the new AM bicep is contoured/shaped like your bicep. It is not round like the old FX bicet. To get it on comfortably, i faced it in the direction my bicept muscle faces when my arms are at my sides, facing slightly front. With the older rounded FX bicep, your arm could rotate in the armor. My old ones for my TD are installed the correct way. I am going to rotate the new bicep and see how it feels. It will definetly look much better. I will post a pic after the fix later. Quote Link to comment Share on other sites More sharing options...
kenthork Posted September 15, 2010 Share Posted September 15, 2010 Here is the problem, the new AM bicep is contoured/shaped like your bicep. It is not round like the old FX bicet. To get it on comfortably, i faced it in the direction my bicept muscle faces when my arms are at my sides, facing slightly front. yes in fact it is strange. why do you don't trim more one part of the two to fit well, and have the good form for the biceps? just a proposition Quote Link to comment Share on other sites More sharing options...

Recommended Posts
Join the conversation
You can post now and register later. If you have an account, sign in now to post with your account.