Rolf Posted April 17, 2009 Author Share Posted April 17, 2009 Can't wait to see you get to work on these lids Rolf!! and looking forward to seeing what the armour looks like. You must have a very patient family to allow you to spend so much time with this ...I have a sore ear with my mrs constantly giving me hassle Are you going to had paint all the detailing on the helmets if they are ANH? Yeah me too. I have only seen the arms, legs, chest, skin bones. Hope to have, the DL body armor home soon too. My wife are also a 501st members, it helps (try it ) Yeah i will hand paint all the details, my self like in ANH. Thanks for stopping by bro Quote Link to comment Share on other sites More sharing options...
Rolf Posted April 18, 2009 Author Share Posted April 18, 2009 Small update from yesterday. The assemble are not 100% yet, just a test. I will lower the face plate a bit, on the left side. And trim the eyes, and teeth more out. Plus trim away the extra from the back cap, the right ear) Here you go Quote Link to comment Share on other sites More sharing options...
Dutch Dirty Trooper Posted April 18, 2009 Share Posted April 18, 2009 **** bro...you are fast ! You got some magic skills !! Can't wait to see it in full effect. Awesome. Grtz RAY Quote Link to comment Share on other sites More sharing options...
MandalorianWarrior87 Posted April 18, 2009 Share Posted April 18, 2009 Love it!! Looks like the wait was worth it Rolf. That is one amazing lookin' lid. Quote Link to comment Share on other sites More sharing options...
Guest DavetheDane Posted April 18, 2009 Share Posted April 18, 2009 Looking good bro!! You work fast!! Looking forward to see your update pics (in 4 hours? ) Quote Link to comment Share on other sites More sharing options...
dutchy Posted April 18, 2009 Share Posted April 18, 2009 and here we go...#1 is almost ready so the other 3 will be done by monday then.. Great work you did already bro'..and worth the wait I would say. Quote Link to comment Share on other sites More sharing options...
RoCKo Posted April 18, 2009 Share Posted April 18, 2009 Quote Link to comment Share on other sites More sharing options...
Daetrin Posted April 18, 2009 Share Posted April 18, 2009 I'll echo that you found the perfect bride These look great - can't wait to see 'em completed. Yes, the DL project has gone on, and on, and on. And on. Nice to see that it's finally materialized. Quote Link to comment Share on other sites More sharing options...
Rolf Posted April 18, 2009 Author Share Posted April 18, 2009 Looking good bro!! You work fast!! Looking forward to see your update pics (in 4 hours? ) Ha ha you got it bro . I have trim the eyes, and teeth more. And played whit the ears. I´m happy for the look of it. They all fall in place, but it was not a easy job i must say. In a way. The Dave M helemt seems even more twisted, then the Brian R helmet (to me). If you want the two grey areas, in the end of the bow trim. To site straight in front of you, left and right. The tube L/R, do not have the same lenght. If you want them too, the grey/trim spots. Goes even back, or forward. If you make a line, over the helmet. They are about 2 cm in differece, up and dowm L/R. The face, are just twisted, like the Brian R. Looks like this / Any way, they way i love them so much. There are so much 70´history in them. Nice and accurate, looking like a monster. Twisted and evil . Well here you go. I will hand paint the humbrol details over the next days. Quote Link to comment Share on other sites More sharing options...
TD2802 Posted April 18, 2009 Share Posted April 18, 2009 Progress looks spot on Rolf - your standards and pace continue to amaze. Quote Link to comment Share on other sites More sharing options...
fon Posted April 19, 2009 Share Posted April 19, 2009 Looks good mate! Darn you work quick!! If I were you I'd trim the ears alot more, they look a bit chunky as compared to the real SFS. Quote Link to comment Share on other sites More sharing options...
TD-4510 Posted April 19, 2009 Share Posted April 19, 2009 For me the Cap n Back is weird and looks too small on the cap. The faceplate flares like a pair and seems too much like an "A" shape that I dont see on the screen used helmets... It is a thing of beauty though as far as attention to detail goes. Dan is very talented. Cant wait to see your finished collection Quote Link to comment Share on other sites More sharing options...
Rolf Posted April 19, 2009 Author Share Posted April 19, 2009 Looks good mate! Darn you work quick!! If I were you I'd trim the ears alot more, they look a bit chunky as compared to the real SFS. Copy that. Yeah maybe a bit. There are a small line in the parts, where to trim the ears. I have just follow that line, and they slide in perfect. In the front to the left, the ears looks a bit fat. But the right ear, looks good i think. Same goes from behind, there the ears fit perfect, and do not look fat. So if i trim them, only for a mm more slim look, for the front left ears case. I might get it all wrong, and get some air between the tube, and ears. Maybe i give it a go any way... Here we have the Dave M helmet, the ears are a bit fat here too. I guess my left ear is a few mm thicker: Cheers Quote Link to comment Share on other sites More sharing options...
Rolf Posted April 19, 2009 Author Share Posted April 19, 2009 For me the Cap n Back is weird and looks too small on the cap. The faceplate flares like a pair and seems too much like an "A" shape that I dont see on the screen used helmets... It is a thing of beauty though as far as attention to detail goes. Dan is very talented. Cant wait to see your finished collection Copy that. The ANH helmets, should come from the same mold. But as far as i remember, rebuild a few times, because of pull damage. Same goes for the pulls, some plastic was more hot then other, And came out a few mm, and shape differently. I´m not sure, if there was more then one stunt mold, back then. Or just different pulls, because of sloppy work. The Dave M helmet, have many different shapes. 1. Longer/slim left tube. 2. A more round skull. 3. More pointy, where the mic tips goes in. 4. Sharper nose. 5. Goes more out to the right, from the back etc... The Dave M have a more round a like skull, then the Brian R. The Brian R, looks more square a like to me. Brian R/TE/TE2 cast: Dave M/DL cast: Therefor you will get, the more a like "pear" a like look vs. the Brian R. I like both of them, all most the same. But whit each goodys. Cheers Quote Link to comment Share on other sites More sharing options...
Ghost Posted April 19, 2009 Share Posted April 19, 2009 Working quick Rolf!! And looking great so far! I love the Dave M lid and can't wait to see it complete. Quote Link to comment Share on other sites More sharing options...
nice-biscuit Posted April 19, 2009 Share Posted April 19, 2009 Off the board a few days and I see Rolf has not only received his helmets but built one already. Just one? I expected the whole lot to be done by now. Don't cut yourself on that uber sharp detail now. Looking forward to the armour arriving. Quote Link to comment Share on other sites More sharing options...
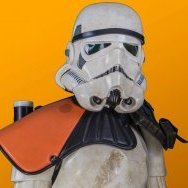
Rolf Posted April 19, 2009 Author Share Posted April 19, 2009 Thanks for your replys bro´s . The DL helmet are really something, i love the flex ABS plastic. And ow accurate, and sharp it is too. I just took some new pictures, i wanna show you before i move on. Here you go: Quote Link to comment Share on other sites More sharing options...
Rolf Posted April 19, 2009 Author Share Posted April 19, 2009 I just wanna make a post, and hear what do you think. 1). The Dave M helmet, have a triangle cut L/R side in there eyes. Maybe.. i will make that on mine too. 2). The Dave M helmet, have 15/16 tube stripes. The move a long 13/16. Stop that ship 13/13. The Dave M helmtet have 16, on the shortest side. And 15 on the longest. Maybe i will go for the 13 on my shortest side, and 16 on the longest. 3). The left ear from the front, looks a bit thick. But if i trim it down, i will have to either get some air between the tube. Or lower down the ear. If i lower the ear, it might sit too low vs. the screen used ones. Plus it will be very thin looking ear cap, looking from the back. But i might give it a go anyway: Troop on Quote Link to comment Share on other sites More sharing options...
Dutch Dirty Trooper Posted April 19, 2009 Share Posted April 19, 2009 Just fantastic work bro ! I love those lenses ! Are they different with the ones i have now in my TE 2 bucket ?! I say : '' move along '' ! Grtz RAY Quote Link to comment Share on other sites More sharing options...
Rolf Posted April 19, 2009 Author Share Posted April 19, 2009 Thanks bro. Yes they are the same, as the ones in your TE2 helmet Quote Link to comment Share on other sites More sharing options...
troopermaster Posted April 19, 2009 Share Posted April 19, 2009 Rolf, I just want to add that the ears can be trimmed more on the fronts only without touching the backs. If you look down on screen used helmets, the ear caps turn in towards the face plate and are not parallel on the side of the helmet. Take more plastic away from the forward facing parts and leave the backs. Even if there are gaps when you offer up the ear caps, they can be forced into the helmet with the screws. It's looking good mate. A few things are over sharpened and I see some areas that Dan has recreated, but overall a very nice looking helmet. If it were me, I would try to angle the ear caps more towards the back on the next build, especially the left hand side cap. Quote Link to comment Share on other sites More sharing options...
Rolf Posted April 19, 2009 Author Share Posted April 19, 2009 Rolf, I just want to add that the ears can be trimmed more on the fronts only without touching the backs. If you look down on screen used helmets, the ear caps turn in towards the face plate and are not parallel on the side of the helmet. Take more plastic away from the forward facing parts and leave the backs. Even if there are gaps when you offer up the ear caps, they can be forced into the helmet with the screws. It's looking good mate. A few things are over sharpened and I see some areas that Dan has recreated, but overall a very nice looking helmet. If it were me, I would try to angle the ear caps more towards the back on the next build, especially the left hand side cap. Thanks for your input Paul . I will try, to cut a bit off, the front ear caps. And try to force the ear caps, a bit more to the back. Quote Link to comment Share on other sites More sharing options...
Dutch Dirty Trooper Posted April 19, 2009 Share Posted April 19, 2009 Thanks bro. Yes they are the same, as the ones in your TE2 helmet Ah ok..as seen on the pics it looks that they are little more dark and having a cool reflex. Anyway, great job bro. And me..still waiting on our little trooper though ! Keep up the good work bro ! Grtz RAY Quote Link to comment Share on other sites More sharing options...
Rolf Posted April 20, 2009 Author Share Posted April 20, 2009 Ah ok..as seen on the pics it looks that they are little more dark and having a cool reflex. Anyway, great job bro. And me..still waiting on our little trooper though ! Keep up the good work bro ! Grtz RAY I´m pretty sure they are the same . Wow you two was set to the 6. of april right. Better get him out asap bro . Sara is set to the 7. of may. All most there.... stay on target... all most there... By the way, i have trim the ears in a little bit (looks great). + paint all the ears, mouth, sides/back, chin. Now i only need the out line, and blue stripes. Then its trooping time. New pics up real soon... Quote Link to comment Share on other sites More sharing options...
Rolf Posted April 20, 2009 Author Share Posted April 20, 2009 I need a black under strap. Are there any out there, there have some extra stuff. Or where to get it. If it is from this site, what # to go for. Cheers http://www.sealsdirect.co.uk/bbCMS/shoppin...partmentId=3#22 Quote Link to comment Share on other sites More sharing options...

Recommended Posts
Join the conversation
You can post now and register later. If you have an account, sign in now to post with your account.