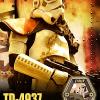
boltstrooper Posted July 29, 2013 Share Posted July 29, 2013 Victor Gallego501st TD 4937BoltstrooperSouthern California GarrisonAppling for the SWAT deployment as the Move a Long Trooper Quote Link to comment Share on other sites More sharing options...
Carbonoideo Posted July 29, 2013 Share Posted July 29, 2013 Very good work. Quote Link to comment Share on other sites More sharing options...
TheKido Posted July 29, 2013 Share Posted July 29, 2013 My first thought is that it looks a bit to clean and also I believe the bicep hooks must go since you can clearly see on the screen caps that Mat hasn't got them. The same goes with the teeth mesh. Otherwise it looks great in my eyes, great job Quote Link to comment Share on other sites More sharing options...
P3laton3 Posted July 29, 2013 Share Posted July 29, 2013 Nice job so far :thumbsup: I was thinking the same about the weathering, also it should be more Raw Humber rather than Black. I'd suggest you to double check the blue stripes on the lid which should be 13 on the right and 16 on the left Could you post a closer pic of your collar neck, I can't see the ribs on it. Also one pic of your thighs without the pouches and the blaster. Perhaps the top shape on your left thigh has to be slightly reshaped. The radio display should be black. The ammo box on the knee should be attached lower on the edge of the thigh, it's good on the outside but on the inner part should be changed. Looking forward to seeing you deployed soon!!! Quote Link to comment Share on other sites More sharing options...
DirtyBoy Posted July 29, 2013 Share Posted July 29, 2013 Looking good man!!! A few tweaks here and there you should be set to go....in addition to the things mentioned you will need to add the black disc to the radar dish on the mortar tube. The weathering may be based on the lighting of the pics but currently looks too light. Keep up the good work man. Quote Link to comment Share on other sites More sharing options...
SCRIBBLER Posted July 29, 2013 Share Posted July 29, 2013 @ Victor - Nice gear! As mentioned above, a few tweaks and you should be good to go. Your full official review with comments will be posted in the next few days... But, for now: - You need to re-position the shoulder canvas pouch to match that of the TD seen onscreen: -- The mortar tube on the pack will need to be shortened and modded with the requests made by our C.O. (Rick) in the previous post. (ex: Black base support for the dish) -- Ruggero also noted some items that require attention , as well (Please reference his post) -- Your pack needs to to be brought up higher. It's riding too low on your back. -- It may be the lighting, but your weathering may need to be enhanced (darkened) a bit and quite possibly another layer added. Your weathering for the selected trooper seems too gray. You will definitely need to add more Raw Umber, Light Tan, etc (sand based colors). Study some of the screen caps and try to replicate the colors as best as you can. More comments to come. Great work, so far! Stand by... Quote Link to comment Share on other sites More sharing options...
boltstrooper Posted July 29, 2013 Author Share Posted July 29, 2013 Thank you everyone for the feedback. I will work on the modification over the new couple of weeks. In the mean time, here is photo of the neckseal and thick armor. Thanks...VMG Quote Link to comment Share on other sites More sharing options...
P3laton3 Posted July 29, 2013 Share Posted July 29, 2013 Quote Link to comment Share on other sites More sharing options...
rhapsodyred99 Posted July 30, 2013 Share Posted July 30, 2013 Looks like you have a left and a right hand plate when move along had two lefts per break and a left on the right glove and a right on the left glove post break. Any other nit picks have been covered. I don't think the hooks should have to go you never really see them in costume. But that's just me. Over all a very solid build and should not be that painfull a process. Good luck! Quote Link to comment Share on other sites More sharing options...
trooper1 Posted July 30, 2013 Share Posted July 30, 2013 Lookin good! Can't wait to see the modifications complete. Will be watching in anticipation. Quote Link to comment Share on other sites More sharing options...
DirtyBoy Posted July 30, 2013 Share Posted July 30, 2013 I think your right on the clips. I know other troopers have been approved with them in place and pics won't show them Quote Link to comment Share on other sites More sharing options...
boltstrooper Posted July 30, 2013 Author Share Posted July 30, 2013 Frank, Jay and Rick -- I hope you are both correct in to keep the bicep clips. I hate to pry them off without damaging the bicep. Rick -- I will have to buy the black disc to the radar dish from you. This pack was made by you a long, long time ago Thanks....VMG Quote Link to comment Share on other sites More sharing options...
DirtyBoy Posted July 30, 2013 Share Posted July 30, 2013 No problem. You can also use a cd or DVD and just paint it black. It's not the exact part but does the trick Quote Link to comment Share on other sites More sharing options...
boltstrooper Posted July 30, 2013 Author Share Posted July 30, 2013 Thanks for the tip. I will do that. Quote Link to comment Share on other sites More sharing options...
DirtyBoy Posted July 30, 2013 Share Posted July 30, 2013 No problem Quote Link to comment Share on other sites More sharing options...
SAND DEVIL Posted July 31, 2013 Share Posted July 31, 2013 Victor, SCG Rules brother! So first advice, DON'T TAKE ANYTHING PERSONAL. Sh$t is about to get real. I remember thinking I was ready, and I wasn't. These guys have great tips to make you even more awesome. Just remember that. When the SWAT process is done, you will look at your armor and go "WOW". Jay once told me SWAT was like joining the US Navy Seals, he was right. Many try, few succeed. At the end of the day the only opinions that matter are Scribbler's, and Dirty Boy's. Rick is always politically correct and polite, and Mike will bring the pain. As it should be. Ours are just suggestions. Enjoy the ride and the details, don't let it stress you out. Also, once you are done, you can modify anything back how you like it (teeth mesh etc.). Ask questions and get clarity from Scribbler when you need. Great looking TD brother. Nice job so far. Looking forward to watching the build. Looks like you have a lot of the details done. Love the mic tips and placement. I think everyone above is right on with the mods needed to take that bad boy to the next level. Some of my observations: - Ruggero is right on the stripes, 13 on the right (you have 14), easy fix, little razzor blade and re-weathering. - Also need to get rid of the mesh I think. Should be able to see through the teeth. Not sure if that has changed, keep it for later. - Do you have the whole at the top of your mortar tube, near the control panel? About 1/4" drill hole. Hard to see. - Your thigh cover strips look like they go up too high and should stop short of the top with slightly rounded corners (easy Dremel fix). - Can we see the cod/butt piece rivets and the outside of the left kidney and ab sections? - Not sure if they will require the side ear screws (they were on the side, I think Smally has a good shot if not mistaken). - Weather the canvas belt and dirty the boots more, they get dirty more and should show you walk in the desert. The sides of the boots are still TK white. - Can we see the belt corners? One picture shows one corner with the correct angle cut , but can't see the others. - Black out radio decals (all). Paint them black, take the picture, then wipe it off, gives it a nice weathered look. And RETNUHHA (Robert) makes them so you can get a set to replace if you need. My food for thought for what it is worth. Be proud of that build man, seriously looks good. I would love to troop with you in SCG. Good luck my man. Quote Link to comment Share on other sites More sharing options...
SCRIBBLER Posted July 31, 2013 Share Posted July 31, 2013 This /\ /\ Quote Link to comment Share on other sites More sharing options...
DirtyBoy Posted July 31, 2013 Share Posted July 31, 2013 Quote Link to comment Share on other sites More sharing options...
boltstrooper Posted July 31, 2013 Author Share Posted July 31, 2013 Ben: Thanks for the great feedback. Below is pics of cod/butt piece rivets and the outside of the left kidney. I will on radio silence for the next two weeks due to family vacation. I will work on all the mods on my return. Thanks... VMG Quote Link to comment Share on other sites More sharing options...
Smally Posted August 4, 2013 Share Posted August 4, 2013 Victor, Firstly let me just say how great a job you are doing. As stated by others, SWAT is by no means an easy task, however with the help from the guys and girls on here as well as your skill and determination, you WILL get there buddy! I've taken a closer look at your helmet (as this is by far the most interesting part of the Move along trooper for me) and have noticed the brow height. Although there is some lift in your brow, it needs to be higher. If you look at the on screen caption, the brow lifts quite high and very slightly over the wearers left eye. Here a pic I took on my phone of mine (it's not the best pic but you get the idea) I also notice that your brow comes close to the corners of the eyes - this is almost accurate, however I would suggest trying to make it appear as one smooth swooping motion rather than the obvious change in direction... if you know what I'm trying to say lol! Also notice the "sleepy eye" on the wearers right. It's doubtful however, if you have any excess plastic on the inside of the helmet, try to recreate this. If not, you could always try adding a thin piece of plastic on the inside and filling the gap.... but this would take some doing. Keep it up dude, not far off now! http://forum.mepd.net/public/style_emoticons/#EMO_DIR#/td.gif Smally. Quote Link to comment Share on other sites More sharing options...
inglorious trooper Posted August 4, 2013 Share Posted August 4, 2013 i think everything has been covered by the guys, just wanted to say you have really great build there! Quote Link to comment Share on other sites More sharing options...
longboard8 Posted August 4, 2013 Share Posted August 4, 2013 Good job man. I think it looks great. But I've been drinking Quote Link to comment Share on other sites More sharing options...
boltstrooper Posted August 5, 2013 Author Share Posted August 5, 2013 Thanks for the input and encouragement. I will not be able to work on the mods for a couple of weeks. Vacation with family --- need to keep my wife happy Thanks... Victor Quote Link to comment Share on other sites More sharing options...
boltstrooper Posted August 25, 2013 Author Share Posted August 25, 2013 Notched Thigh Enhanced Weathering on Armor and boots Raised Brow, changed helmet tube stripes to match "Move Along" trooper Ammo pack moved painted radar dish back, lowered top, drilled hole on back pack Wear back pack higher Pouch on shoulder in correct position left hand guard on right glove Joining strips shortened and rounded at corners. [/url] Quote Link to comment Share on other sites More sharing options...
Bacta Baby Posted August 26, 2013 Share Posted August 26, 2013 Wow!! Very nice! Quote Link to comment Share on other sites More sharing options...

Recommended Posts
Join the conversation
You can post now and register later. If you have an account, sign in now to post with your account.