rhapsodyred99 Posted December 31, 2012 Share Posted December 31, 2012 Hello all! I have decided to turn my RS ESB TK into a TD. As I got a TM suit I have serving triple duty as ANH hero, stunt and ESB (all EIB Whee!) and a CFO that is a ROTJ Centurion, The RS seemed the best fit for my TD especially considering the RS suit torso WAS a TD, and they were nice enough to supply TD parts with the kit. So here is the suit as it stood as an ESB TK: and here it is with the TK parts removed and TD parts added prior to weathering: The Pouches came from TD-8256 and they are very well made I can attest. The Back pack came from Bluey, and has one of Gordon's siphons and Mike Harrisons radios, also its weathered already though I may tweak it a bit, I know I will need to add the wire around the radio at the very least: I know what you are thinking! That's an ESB lid on that TD, and you are right. As I plan on immitating a very specific TD, the whole lid is going to have to be disassembled and redone to match the right on screen look, and as I have not 100% decided on just which TD I will emulate (either Move Along, or Cantina Captain) I have not pulled off the ESB details yet and repainted it. Anyway I was just excited to get my staged on the Star Destroyer, Prior to being Deployed and getting dirty siut up done to see what I could tweak prior to weathering. Thanks for looking! Quote Link to comment Share on other sites More sharing options...
SCRIBBLER Posted December 31, 2012 Share Posted December 31, 2012 Looking forward to seeing your completed TD, Brother! Please keep us updated on what will obviously be a nice setup! Quote Link to comment Share on other sites More sharing options...
DirtyBoy Posted December 31, 2012 Share Posted December 31, 2012 AWESOME!! Can't wait to see your progress man. Quote Link to comment Share on other sites More sharing options...
nick.black Posted December 31, 2012 Share Posted December 31, 2012 Great to see another shiny going dirty. RS is a great choice for it also. You'll find loads of info here if you need any help with anything. Nick Quote Link to comment Share on other sites More sharing options...
Smally Posted December 31, 2012 Share Posted December 31, 2012 Pass the popcorn, I'm watching this thread! Quote Link to comment Share on other sites More sharing options...
rhapsodyred99 Posted December 31, 2012 Author Share Posted December 31, 2012 I think I have settled on the classic "Move Along" trooper as the cantina captain with his Stop that Ship lid is not appealing. I like the orange pauldron, move along pack DLT-19 and pouches, but the three teeth cut out on each side, the messy paint job over all (paint runs everywhere, weird joker grin on the right side but not left) basically make me shy away from him. I know a TD is dirty, and I know the old armor was thrown together, but there are some better than others. The move along trooper has most of what I like in a sandy, while also delivering the most lines on screen. He is also clearly seen in several shots that should help in my weathering attempts. He only carries an E-11, but I suppose I can carry a DLT-19 on troops without getting thrown out of the force I assembled this suit using original strapping woth the loops and bars holding it together, split rivets on the side, and shin hooks. This was built with Centurion in mind before I decided to get the Centurion Badge on my ROTJ (2nd one ever in FISD ). I am currently working on the side shims as I am 6 foot 1 and 230 lbs the real cast RS suit won't quite close. I had to add 2.5 inches on each side to close the gap. Once I get the seams sanded down to my satisfaction I will start rebuilding the helmet to match the Move Along Trooper. I had hoped to get SWAT, and I still plan on building as if I will, but since this is a TK conversion, and I already had cut the back of the legs for movement, and several other things that are not frowned on in FISD, but i have seen comments on here (like my coverstrips being 30 mm wide on the legs instead of 25 since I am a bigger guy the 5 extra mm looked better to me) may outright disqualify me from swathood. Either way I will at least get Deployed as my first goal. Quote Link to comment Share on other sites More sharing options...
nick.black Posted January 1, 2013 Share Posted January 1, 2013 Hello mate, The size of the cover strips may not preclude you from deployment as SWAT. As long as they are proportionate to your build and look right then that will be fine. We review each application on its own merits. Nick Quote Link to comment Share on other sites More sharing options...
rhapsodyred99 Posted January 2, 2013 Author Share Posted January 2, 2013 That's good news Nick! I am currently pouring over Starwars helmets.com, SWAT Apps and all other kinds of info I can find and have started to reassemble the lid. Unfortunately, since this was built as a general ESB trooper, I have cut the eyes and teeth more than the Move Along Sandy. I think I can build the eyes back up, but not sure tackling the teeth is going to be worth while. I'll Post some pics of the rebuild tonight and see what you all think. Since I really want to do it right, I may just see if the RS Boys can send me a new face. I am not sure if the teeth in the long run are going to matter much but the eyes will really need to get fixed at the least. Quote Link to comment Share on other sites More sharing options...
rhapsodyred99 Posted January 2, 2013 Author Share Posted January 2, 2013 Ok here are the pics where I attempted to get the asymetrical brow and tilted Hovi correct. The paint is left over from the ESB Lid and is not the correct pattern I am aware. You can also see the problem with the too trimmed eyes and teeth. This is what I was going for on the assembly of course: I have contacted RS about a replacement face, but I am not sure they sell parts only. What do you guys think teeth and eyes way to trimmed for SWAT? Quote Link to comment Share on other sites More sharing options...
Rolf Posted January 2, 2013 Share Posted January 2, 2013 Looks great Frank, i guess the trim eyes and teeth are all good to go The ANH Stormtrooper are mad cool but nothing beats the Sandtrooper Enjoy your upgrade Quote Link to comment Share on other sites More sharing options...
rhapsodyred99 Posted January 2, 2013 Author Share Posted January 2, 2013 Thanks Rolf it was your threads on FISD that got me sold on this project. Sandy's are total Bada$$ no doubt! Quote Link to comment Share on other sites More sharing options...
Rolf Posted January 5, 2013 Share Posted January 5, 2013 Thanks Rolf it was your threads on FISD that got me sold on this project. Sandy's are total Bada$$ no doubt! Thanks i´m happy to hear that, welcome on board to the sand pit Quote Link to comment Share on other sites More sharing options...
rhapsodyred99 Posted January 8, 2013 Author Share Posted January 8, 2013 Well just to show I am still working away, here are some pics of the lid as it stands prior to weathering: I tried to add in details like the crack on his right cheek, the diagonal cut right ear, the "chips" on his faceplate, the crooked right hovi (with interior except nipple and screen black), the oddly painted vocoder and the 13 on right 16 on left tube stripes. I attempted to paint the tears and traps like the original one as well, but was not entirely successful. I will be using the raw umber approach to weathering and hopefully will have some pics of that up soon. Quote Link to comment Share on other sites More sharing options...
Rolf Posted January 8, 2013 Share Posted January 8, 2013 Looks really good Frank, you have many of the move a long details spot on I only see two small things maybe to add on it: 1. Take your grey humbrol and paint some of the black out line over from the inside, just a few mm. That would make your black out line look more steady. 2. Maybe find a better/more accurate hdpe humbrol color to make the hdpe cracks whit. Yours seems a bit dark a like. Keep up the good work Quote Link to comment Share on other sites More sharing options...
inglorious trooper Posted January 8, 2013 Share Posted January 8, 2013 hey frank,this is just my opinion but i dont see a big problem with your faceplate! starting to look good bro!! im sure RS will help you out with a faceplate if you really wanted one as you did buy there armour from them,and there sound guys!! Quote Link to comment Share on other sites More sharing options...
rhapsodyred99 Posted January 9, 2013 Author Share Posted January 9, 2013 Well here is my first attempt at weathering. I think I might have gotten carried away.... Definately a learning process. Rolf: I see what you mean about my shaky outlining, I may try your idea I have never been able to draw a straight line much less paint one Also I tried to tone down the chips a bit I think they are pretty subtle at the moment except the cheek one could maybe be lightend. Marcus: Yeah the RS Boys are top notch. I actually have an ABS ESB lid from them as well as a "Fishpond" Stunt lid from them as well as this suit of armor and they are nice to deal with. I think I will keep the face as is for the time being as this whole process is a learning curve for me at the moment. Thanks for the kind words! Quote Link to comment Share on other sites More sharing options...
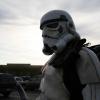
rhapsodyred99 Posted February 5, 2013 Author Share Posted February 5, 2013 Well I have finished the initial weathering and took my first suit up pics. I can see a few things that need to be worked on, mainly in the back pack area where I am wearing it too low and lopsided, with the bee stinger assembly incorrectly tilted. I am also wearing my PVC hand guards since I was waiting for a set of Karin's at the time, which have now arrived but when I went to put them on the gloves found my Superglue had dried...so I defaulted to the hard ones for this initial suit up. But without further ado: Move along...Move along.... Thigh ammo detail with correct curve and cap rivet: Interior shot showing accurate split rivets on side and some of the "loop and bar" original strapping system used, as well as some interior support detail of the 2.5 inch shim i had to add to each side: Helmet Interior showing star foam, green lens material, chin straps and s trim: Interior of the calf showing the "hook and loop" original closure system: Helmet front right side showing how I attempted to trim the ear in the distinctive angle where it meets the face plate, as well as the asymetrical high brow (lower on right side than left): Left side showing 16 tube stripes: Right side showing 13 tube stripes, and the "crack" at the tube: Front detail showing the tilted right hovi with the interiors except the back painted black as well as the screens, off angle vocoder, and I also attempted to paint the teeth as they look on the real helmet: Mortar tube hole detail: Rivet in the top mushroom cap: Authentic tupperware Radar Dish: Radio detail with Wire, I still need to put a leatherette surround and a pair of AV connections on it: So there we are. I do not think its so bad for a first suit up, but what do you all think? Quote Link to comment Share on other sites More sharing options...
dutchy Posted February 5, 2013 Share Posted February 5, 2013 Wow...nicely done Great job on the helmet I must say and I like the weathering too Quote Link to comment Share on other sites More sharing options...
Sandman Tigui Posted February 6, 2013 Share Posted February 6, 2013 Nicely done Frank! As Rolf said nothing beats a TD and just the feeling of becoming one goes beyond words Quote Link to comment Share on other sites More sharing options...
Vf2112 Posted February 6, 2013 Share Posted February 6, 2013 I think your attention to detail needed is above and beyond brother your definitely out to get it right helmet looks good too by the way nice job I can only see a couple of thing I noticed but some of the veterans will no doubt find some more It looks like you knee pouch could be lowered at the front so you can see top of ridge on bottom of thigh And a big gap between back and kidney I have to do the same on mine Backpack looks amazing but I would reposition the syphon a bit move the top of it up and toward the radio a bit beside that and finishishing your weathering your on par with swat in my opinion Looking good sir good luck Quote Link to comment Share on other sites More sharing options...
rhapsodyred99 Posted February 6, 2013 Author Share Posted February 6, 2013 Thanks all. As far as the back and kidney gap, you are right and it is one reason I thought to turn this suit into a TD since I had hoped the back pack would hide the gap, which if I had worn the pack right would have done a better job of it I am 6' 1" and the RS suit torso just simply will not fit without that gap there. I felt the back gap was better than a front gap. I have lessened the back gap by not lining the kidney up to the Ab at the sides, but I think that can look worse. I need to readjust a few things on the pack for sure, the bottom tray is not as secure as I would like and flops out a bit when it is vertical on my back, and I need to tighten that bee stinger so it wont tilt funky. I will revisit the siphon position as well. I can easily pop the thigh ammo belt down a bit as well, I tent to keep them pushed up on my TKs so as not to hook the shins, but they rotate easily enough. I am not sold on the chest weathering. This is my third attempt. My first attempt was a muddy really dark smear that looked terrible, my second was so light you could barely see it, and this one may be a bit between the two with being a little too dense I dunno. Considering each reweather involves taking all the paint off, adding up the base layers and letting them dry before I even get to the distinctive chest pattern, you are talking hours if not days. I just got a bit burned out after my last attempt. I decided heck with it lets see how it all looks together. I am still undecided if I need to go through the arduous process again, and possibly end up with something worse. I know everything can always be bettered and no costume is truely done, so at some future point I may revisit it. Or when I am definitively told it sucks and has to be changed by the powers that be Quote Link to comment Share on other sites More sharing options...
Rolf Posted February 6, 2013 Share Posted February 6, 2013 Well I have finished the initial weathering and took my first suit up pics. I can see a few things that need to be worked on, mainly in the back pack area where I am wearing it too low and lopsided, with the bee stinger assembly incorrectly tilted. I am also wearing my PVC hand guards since I was waiting for a set of Karin's at the time, which have now arrived but when I went to put them on the gloves found my Superglue had dried...so I defaulted to the hard ones for this initial suit up. But without further ado: Move along...Move along.... Thigh ammo detail with correct curve and cap rivet: Interior shot showing accurate split rivets on side and some of the "loop and bar" original strapping system used, as well as some interior support detail of the 2.5 inch shim i had to add to each side: Helmet Interior showing star foam, green lens material, chin straps and s trim: Interior of the calf showing the "hook and loop" original closure system: Helmet front right side showing how I attempted to trim the ear in the distinctive angle where it meets the face plate, as well as the asymetrical high brow (lower on right side than left): Left side showing 16 tube stripes: Right side showing 13 tube stripes, and the "crack" at the tube: Front detail showing the tilted right hovi with the interiors except the back painted black as well as the screens, off angle vocoder, and I also attempted to paint the teeth as they look on the real helmet: Mortar tube hole detail: Rivet in the top mushroom cap: Authentic tupperware Radar Dish: Radio detail with Wire, I still need to put a leatherette surround and a pair of AV connections on it: So there we are. I do not think its so bad for a first suit up, but what do you all think? Really nice Sandy Frank, you did a real great!!! job on this one. A top sandy suit for sure, enjoy your piece of art here Top modify ESB helmet into ANH, top Nice weathering on the helmet (maybe do a bit more weathering details around the joining strips, and deeper areas, maybe tone down the detail chest weathering spot). Top nice back pack (maybe fade the weathering a bit more smooth dusty out) (the move a long pack did not have the dial on the radio - it was all black, top pauldron, gun, pouches etc Quote Link to comment Share on other sites More sharing options...
Vf2112 Posted February 6, 2013 Share Posted February 6, 2013 Lol love your attitude bro That sucks about your backplate, but I'm betting you'll work something out I put a new radio on my pack last night because of my " ingenious " build method lmao, it takes forever to put 4 screws into it - then I realised it was about an inch to low, dohhh!! All your gear looks good mate Vince Quote Link to comment Share on other sites More sharing options...
rhapsodyred99 Posted February 6, 2013 Author Share Posted February 6, 2013 Just realized I did not post a back picture. Here you can see the way the stinger is tilted way wrong, and the whole back pack is sitting crooked. I was able to correct the lean on the pack after the fact by tightening one shoulder strap. The bee stinger as is is too loose and so I need to just reattach it better. trying to decide on which position it needs to live (more under the radio, or centered on the seed tray as it is now). The seed trays themselves are held on by strips of plastic that flex too much, I am planning on taking them off, and replacing them with aluminum strips. anyways here is the back: Now question: Should I just start a Hurt Locker thread with all future pics? I am used to white armor which is set up with a build section, so when I started I thought Imperial armor was the right spot, but since I am after honest critiques should I go Hurt Locker? I know I have some work ahead to get to the level I want to be at, so not worried about being crushed if people think I have made a mess of things! Thanks! Edit: Rolf do you mean the sticker I have there on the left of the radio or the actual dial that would have tuned the radio? Thanks! Edit: Nevermind I see what you mean, I can paint over that with no issues. Quote Link to comment Share on other sites More sharing options...
Vf2112 Posted February 6, 2013 Share Posted February 6, 2013 Hurt locker is swat Quote Link to comment Share on other sites More sharing options...

Recommended Posts
Join the conversation
You can post now and register later. If you have an account, sign in now to post with your account.