inglorious trooper Posted February 8, 2013 Share Posted February 8, 2013 as vince said,hurt locker is for S.W.A.T. (the highest level). if you would like to start a w.i.p.,the best thing is to put it in the "imperial issued armour" section! we all love seeing these and youll get some great advice there! Quote Link to comment Share on other sites More sharing options...
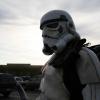
rhapsodyred99 Posted February 11, 2013 Author Share Posted February 11, 2013 Well After staring at my pics for awhile and listening to the things said I decided that even though the weathering I had done looked like it had definition up close from a distance and through a camera lens it all seemed to blend into one color. And I still needed to work on the floppy crooked back pack. So the first thing I did was take the pack all apart, and reattach the seed trays to the frame with aluminum strips to prevent the floppy trays. I then reattached the bee stinger with silver brackets that prevent the screwed up angle it was at before. Taking Rolf's advise I blacked out the dial and tried to tone down the more "in your face" weathering. Of course now I see that I mounted the upper seed tray too high which leaves a too large gap between it and the bottom one, but that will be an easy fix. I then attempted to apply some more defining weathering while not being overpowering...not sure how well I did but here are the results: Height: 6'1" Weight: 230 lbs Neckseal: trooperbay Pauldron: trooperbay Handguards: Karin Blaster: Hyperfirm ANH modded with D ring. (I am not sure I want to weather my Demilled sterling with hengstler and M38 scope...right now it is more factory fresh) Boots: TkBoots And here I tried to recreate a few scenes: I do not know how his shoulder pouch attaches, mine is on my backpack strap, and simply will NOT hang the way his does. Do I need to have a seperate strap and put it around the shoulder bell instead of the back pack? So better? Worse? Whatcha think? Quote Link to comment Share on other sites More sharing options...
Vf2112 Posted February 11, 2013 Share Posted February 11, 2013 Looks great mate nice comparison pics but yeah need to lower that tray Quote Link to comment Share on other sites More sharing options...
Smally Posted February 11, 2013 Share Posted February 11, 2013 Frank, with regards to the shoulder pouch, what I do is have a separate strap coming from the backpack frame and over my shoulder. I use a plastic buckle so that I can adjust the length. I then use press studs to attach the pouch to the step. Very easy and you can apply the press studs in a way to have the pouch at the angle you want. Hth. Quote Link to comment Share on other sites More sharing options...
Rolf Posted February 11, 2013 Share Posted February 11, 2013 SSSSssmoking!!! hot, one of the best sandy´s around. Looking top cool all the way Frank. A+ from here Quote Link to comment Share on other sites More sharing options...
rhapsodyred99 Posted February 11, 2013 Author Share Posted February 11, 2013 Thanks Guys. I Plan on redoing the trays to get rid of that gap, so i'll play with a few strapping options to get it right. This is MUCH more of a process than my 4 OT white TKs. Its funny the lengths we all go to to recreate things that were most likely tossed together accidents. But that's true devotion eh? Or insanity if you ask our wives probably! Quote Link to comment Share on other sites More sharing options...
SCRIBBLER Posted February 11, 2013 Share Posted February 11, 2013 Hi, Frank! GREAT rig you got there, my friend! This was mentioned already but yes, the top seed tray must be lowered. The top tray bottom just barely misses the bottom tray top in terms of distance/ spacing. As for everything else, it looks spot on from initial glance. You are definitely ready for the Officer Deployment process. When you do decide to follow through and apply for SWAT (Move Along Trooper, I assume?) then your shoulder pouch placement has to replicate the pic below in terms of setup (i.e. the Distance from neck and overall placement). And I may ask you to 'beat up' the pauldron a little bit more, yada, yada... But we'll cross that bridge when we reach it. Cool? VERY nice armor there, Troop! Carry on... Quote Link to comment Share on other sites More sharing options...
DirtyBoy Posted February 11, 2013 Share Posted February 11, 2013 Looks great man.....I see your already planning on adjusting the trays so that will make a big difference. The weathering looks really great as well....it's a little dark but I think that's the lighting....once you get some shots in natural lighting I think it will be perfect:) keep up the good work Quote Link to comment Share on other sites More sharing options...
rhapsodyred99 Posted February 11, 2013 Author Share Posted February 11, 2013 Thanks guys! I have submitted to my GML for official TD approval. Once it passes (confident ain't I? ) Ill start the officer deployment process. It is so hard to get sunlight pictures this time of year as when I get home from work it is already dark, and on the weekends there is always something else to do it seems. Hopefully in the next few weeks I can start the process of being Deployed. Quote Link to comment Share on other sites More sharing options...
SCRIBBLER Posted February 11, 2013 Share Posted February 11, 2013 @ Frank - We'll be here waiting for you, Brother! See you soon and Good luck! Quote Link to comment Share on other sites More sharing options...
inglorious trooper Posted February 11, 2013 Share Posted February 11, 2013 good luck with the deployment frank, not that you need it,you looking great dude!! Quote Link to comment Share on other sites More sharing options...
DirtyBoy Posted February 12, 2013 Share Posted February 12, 2013 Ya I'm really looking forward to seeing the end result Quote Link to comment Share on other sites More sharing options...
SAND DEVIL Posted February 12, 2013 Share Posted February 12, 2013 Frank, Great to see another brother come to the dirty side. You have done a great job in your mods too. Nice to have you aboard sir. You will be deployed in no time. I love your commitment. I really wish you luck, but that is more about keeping your sanity then getting deployed, because you have a great build brother. I think your weathering is great! I agree with ROLF, but don't think you should take it all off and start over. Depending on what you used, you can use a warm damp rag and lightly take a small top layer off or a little sand paper. Great part about being a sandtrooper. The more you jack it up, the better it looks. Like you said (thrown together). I also think I would only touch the top right AB and blast on your chest. Love the new look in the ridges from ROLF's advice. You did great. Your strips are fine for deployment, but may give you grief down the road for SWAT. I had the same issue. If you look at my SWAT request it has a link to my Photobucket account and you can see how I redid my strips to be more accurate. http://s1134.beta.ph... SDS Armor You can leave your current ones, they are your perfect fit. If you are brave enough to bondo and shape over them, you can then add new strips thinner. However, I learned the hard way to get more than one opinion before you rip anything up. My best advice is to keep doing what you are with looking for a screen shot to show you what is accurate. There is a lot of knowledge here, don't get me wrong. Like Nick said, if it looks right, it doesn't matter. On your weapons you can mix and match whatever you want when trooping. If it is an official LF event, just bring that one. Otherwise you should be fine. I troop with a Dewback Prod all the time and did a Move Along Captain. My garrison rarely lets us use weapons, but never cares about the prod. And it gets a lot of attention. On your shoulder pouch here is an idea (what I did). I think it is what Smally was saying, but not sure. It keeps it in place and easy to take off. I used elastic, but regular webbing straps would work too. The I used #7 snaps. I never feel them when trooping either. It puts the pouch right through the shoulder and chest plate. If your pouches are at an angle in back like mine, it also gives it that tilted look. Quote Link to comment Share on other sites More sharing options...
rhapsodyred99 Posted February 12, 2013 Author Share Posted February 12, 2013 Thanks for that Ben, I have tried a few different options based on your and Brad's suggestions and think I have something worked out. As far as my Coverstrips I went with 30MM or 3 CM on the legs, but the arms are the standard 15 mm or 1.5 cm...I think though now that I type this they may be 20 mm or 2 cm.... I chose to do it this way because RS who actually owns a suit says there is a lot of variance on their suit's coverstrips. They actually are not even uniform on each coverstrips, some starting at 20mm and going to 27 or so. Real TK/TD suits were very quickly put together to a very loose set of standards it seems. I did the strips a little larger on mine because as a bigger guy I felt it would help balance it out. I tried the smaller strips at first on one leg and the larger on the other and I liked the larger ones. If I get told it HAS to change then I can see what can be done then. The current chest is actually my 4th attempt (sad I know) and it looks better to me than the previous ones, but I may attack it and some of the other weathering spots that got a bit dark with some sand paper or water. I did the single color Raw Umber method doing layers of wash then dabbing and buffing out straight color for the darker spots but its possible the raw umber is just too dark undiluted. after I got the wash layers done I sprayed the whole thing with craft matt sealer to dull it down and lock the weathering on. I have not done that yet to the added weathering so should not be that hard to knock it down a few degrees before I spray it. I may look at getting an opaque spray to further dull it down I dunno. Thanks for the comments guys it helps us all build better sandies. (P.S. Ben, your links don't work for me?) Quote Link to comment Share on other sites More sharing options...
SAND DEVIL Posted February 12, 2013 Share Posted February 12, 2013 Frank, try this sir, sorry about that. No idea what happened. Hope they help explain better: http://s1134.beta.ph...uild SDS Armor" Quote Link to comment Share on other sites More sharing options...
rhapsodyred99 Posted February 12, 2013 Author Share Posted February 12, 2013 Thanks for the tip on sanding Ben! I do not know why it never occurred to me to try that. I attacked my suit when I got home and I think it worked great! Here are a few shots of a pile 'o TD in my garage after weathering. I know not the best photos, but it was cloudy and threatening rain outside... Here you can see where I sanded the chest and ab, not sure it did much but it did not hurt any... And here is a bit of a joke inspired by P3laton3's artwork: It is hidden by the pauldron and backpack, and I thought it would be a humorous. Here is a shot of my pauldron: my redone pack: And my side pouches From TD 8266: Quote Link to comment Share on other sites More sharing options...
rhapsodyred99 Posted February 13, 2013 Author Share Posted February 13, 2013 Also just measured the leg coverstrips are 25mm The arms are 15mm. Its my tm suit that has 30 and 20 mm strips. Quote Link to comment Share on other sites More sharing options...
SCRIBBLER Posted February 13, 2013 Share Posted February 13, 2013 Excellent mods, Frank! You are definitely on your way, Brother! Quote Link to comment Share on other sites More sharing options...
SAND DEVIL Posted February 13, 2013 Share Posted February 13, 2013 Frank, Glad it worked. When you compare yours to the screen shots you have, it looks very close and accurate now (IMHO). Great build. An I love the 'wash me' that is classic. Let us know if you need any additional help brother. looking forward to seeing you in the sand pit, very soon. Great commitment and attitude sir. Quote Link to comment Share on other sites More sharing options...
rhapsodyred99 Posted February 13, 2013 Author Share Posted February 13, 2013 Waiting for initial gml approval is so hard I am out of town for work so i wont have a tweaked suited up set of pics for a bit. Hopefully soon i will go for deployment and see how it goes. Thanks again all. Quote Link to comment Share on other sites More sharing options...
rhapsodyred99 Posted February 18, 2013 Author Share Posted February 18, 2013 Well I still need to find a sunny day to take a suit up pic of the new sanded weather job prior to going for deployment, but I got word that my TD has been approved! I thought it would be fun to do a work in progress pic: Thanks for all the help guys! Quote Link to comment Share on other sites More sharing options...
opi wan Posted February 19, 2013 Share Posted February 19, 2013 Hey Frank, You did a verry good job with your move along! I really love the RS Helmet and your weathering is verry good too! I hope you have much Fun with it Greetings Alex Quote Link to comment Share on other sites More sharing options...

Recommended Posts
Join the conversation
You can post now and register later. If you have an account, sign in now to post with your account.