SAND DEVIL Posted November 11, 2012 Share Posted November 11, 2012 I used Juan and Rolf's SWAT posts. Then took a long time looking at the ref pics and screen shots for the chest and bucket. I didn't use the auction ones for the bucket. You are right that it has been changed and cleaned up. The screen shots and other SWAT posts give great details. Watch the right side mouth corner and crack on the tube. Those are the two parts with the most distinction, the rest is just general accurate weathering. But this just my opinion, so I would wait for more ideas and Juan specifically. Also, to Daniel's point about the cistern, I used 1" Gorilla Tape (any hardware store - US). It is thick and gives you the look you want without the threads that always show with masking tape. Here is my bucket with the crack and mouth I was talking about: (good luck and looking good) Quote Link to comment Share on other sites More sharing options...
iconoclasta_88 Posted November 11, 2012 Share Posted November 11, 2012 I'll send you some in a while. Working on Sunday so I will be on my comp. just need to get to the office in an hour or two. Saludos. Quote Link to comment Share on other sites More sharing options...
iconoclasta_88 Posted November 11, 2012 Share Posted November 11, 2012 Hope this help. Saludos Quote Link to comment Share on other sites More sharing options...
Blaster 8266 Posted November 12, 2012 Author Share Posted November 12, 2012 OK I did work on the helmet but I am just not sure if this is what your looking for. Took some off but added some in spots. Let me know. Going to have to wait until tomorrow to do the armor. Quote Link to comment Share on other sites More sharing options...
Blaster 8266 Posted November 12, 2012 Author Share Posted November 12, 2012 OK I did some weathering tweaks. I have no idea if this is what your looking for. So here it goes. First pic I took down all the heavy spots and made them less thick and changed the base coat pattern a little. I also left the cleaner spot above the belt just to show no dirt there like in the pic that was sent to me. Here you can see the thick spots better as being smaller and that the dirt pattern has different textures around the whole body Here I added in the spots that were noted and took some away in other spots and tried to blend a different texture overall. Here on the side I tried to make a different texture and pattern so it did not look so uniform. Another pic different angle to see more texture and different base pattern. On this side I tried to create and different texture than the other side with a different base pattern. This is what I came up with. Let me know what to do next. I am just not sure if I am going in the right direction. Quote Link to comment Share on other sites More sharing options...
Blaster 8266 Posted November 12, 2012 Author Share Posted November 12, 2012 OK here is another pics of the shoulder bells. I tried to create a different base pattern so it looked more irregular. Here on the arm parts I took the thick layers off and tried to make it more detail with a different pattern. Let me know what else needs to be done. Quote Link to comment Share on other sites More sharing options...
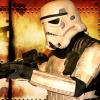
iconoclasta_88 Posted November 13, 2012 Share Posted November 13, 2012 Looking really good. I like how you have worked on your helmet, how it looks different, different amount of weathering compared to the rest of the armor. Just like the real Move Along Armor, where the bucket appears to have way less weathering... Also, I think you have done great with the chestplate. I think you could use that as a guide to other parts of the armor, cause the different shades and amounts of paint make it look very realistic in an ANH way. I marked with different colors the different textures that make it so cool. Just so you know exactly what do I mean. Next, The ab plate is looking good already, I think the front looks very cool, but there is a bit of a texture too smooth on the sides. Check the picture where I marked in red the things that are already done, and in green where you could wipe off a bit of the paint to make a more uneven texture, and even let some white show up. Shoulder bells and arms... Same story... you could wipe off a bit of paint here and there to let some white show. The red textures I think are done already. What do you think? Remember the upper body, specially ab and chest are the most weathered pieces, and the sholders, arms legs and bucket are less and less weathered. Here is a reference of another trooper so you get an idea of how they looked during the first day of shooting, just take in consideration that the roadblock scene was shot days after that. Just so you get an idea of where it all comes from... You are almost there bro!!! Saludos... Juan Quote Link to comment Share on other sites More sharing options...
iconoclasta_88 Posted November 13, 2012 Share Posted November 13, 2012 One thing I think you could do to your bucket, clean a bit of the weathering off the eyebrow. Compared to ANH buckets and it looks like they were not weathered, but look full black rubber. Yours looks a bit flat due to weathering. Saludos. Quote Link to comment Share on other sites More sharing options...
Blaster 8266 Posted November 13, 2012 Author Share Posted November 13, 2012 OK I have done more weathering and fixed the black on the bucket. Let me know what you think. Tomorrow I will be posting full pics for final look. Quote Link to comment Share on other sites More sharing options...
Blaster 8266 Posted November 15, 2012 Author Share Posted November 15, 2012 OK here are my final pics for SWAT. I hope they are good enough. It was really hard to get these pics with my 15 month old daughter slapping the armor saying daddy daddy daddy daddy. LOL Got to love them. Here you go. On this pic it looks like my belt sagged a little. My wife took this one as I was going to take a step so it looks like I am leaning lol That is it. I hope it is enough. Oh brothers of SWAT please grant my access to your world. LOL Quote Link to comment Share on other sites More sharing options...
SAND DEVIL Posted November 15, 2012 Share Posted November 15, 2012 Anthony, Since we are doing the same one, I noticed the left upper thigh. It needs the 'notch' cut out. Check out the other 5 SWAT 'Move Alongs' and you will see it. Looking great and nice details on the weathering. Quote Link to comment Share on other sites More sharing options...
SCRIBBLER Posted November 15, 2012 Share Posted November 15, 2012 Excellent progress, AB! Keep at it, Brother! Quote Link to comment Share on other sites More sharing options...
SMOKE Posted November 15, 2012 Share Posted November 15, 2012 I used this site for weathering. Look under High Definition Screen Capture Gallery. http://www.looksirdroids.com/ Quote Link to comment Share on other sites More sharing options...
iconoclasta_88 Posted November 15, 2012 Share Posted November 15, 2012 Anthony, Since we are doing the same one, I noticed the left upper thigh. It needs the 'notch' cut out. Check out the other 5 SWAT 'Move Alongs' and you will see it. Looking great and nice details on the weathering. Do you mean this notch: That even if it is desired, it is not required since most kits out there does not have it, being it more something that depends on the moulds than on the build. It would be awesome to have it thou... I have it in my own build, butu I had to do it and build an new return edge with the sealing iron. So Anthony, your are looking quiet good. Pretty much there I would say. So please, allow me to consult some stuff backstage with the rest of the command staff and I will come back with a final saying on your armor! Very well done bro! Your hard work is really paying off! Saludos. Juan Quote Link to comment Share on other sites More sharing options...
Blaster 8266 Posted November 15, 2012 Author Share Posted November 15, 2012 Thanks Juan I am waiting with very much excitement to hear the final verdict. Quote Link to comment Share on other sites More sharing options...
DirtyBoy Posted November 16, 2012 Share Posted November 16, 2012 Add the notch lol.... Quote Link to comment Share on other sites More sharing options...
Blaster 8266 Posted November 16, 2012 Author Share Posted November 16, 2012 Is the notch going to hold me up here? Quote Link to comment Share on other sites More sharing options...
DirtyBoy Posted November 16, 2012 Share Posted November 16, 2012 Lol...no it definitely wont man but I know your dedication to the trooper Quote Link to comment Share on other sites More sharing options...
Blaster 8266 Posted November 16, 2012 Author Share Posted November 16, 2012 Lol I was about to have a heart attack. Yes there are a couple of non required mods I going to do. You know how I roll man. Quote Link to comment Share on other sites More sharing options...
DirtyBoy Posted November 16, 2012 Share Posted November 16, 2012 Ya I know....so I'm sure the notch will be there in like 20 mins right? Hahahaha Quote Link to comment Share on other sites More sharing options...
rottie Posted November 16, 2012 Share Posted November 16, 2012 Omg,,,,your not swat yet Quote Link to comment Share on other sites More sharing options...
Blaster 8266 Posted November 16, 2012 Author Share Posted November 16, 2012 OK fine here you go. Based on the pic Juan posted. Hope this is ok. Quote Link to comment Share on other sites More sharing options...
Blaster 8266 Posted November 16, 2012 Author Share Posted November 16, 2012 Soon Walt I hope. Quote Link to comment Share on other sites More sharing options...
DirtyBoy Posted November 16, 2012 Share Posted November 16, 2012 Wow!!! You are dedicated man. Any chance you could just lay out the full gear in a more natural lighting? Quote Link to comment Share on other sites More sharing options...
Blaster 8266 Posted November 16, 2012 Author Share Posted November 16, 2012 Do you want it just laid out or a suited up pic outside? If suited up then It will have to wait until the weekend. I can lay it out today though. Quote Link to comment Share on other sites More sharing options...

Recommended Posts
Join the conversation
You can post now and register later. If you have an account, sign in now to post with your account.