

bigwam
-
Posts
1,694 -
Joined
-
Last visited
-
Days Won
230
Content Type
Events
Profiles
Forums
Everything posted by bigwam
-
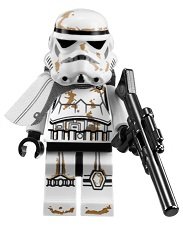
*ACTIVATED* TD-30571 Requesting SWAT Deployment II #57
bigwam replied to bigwam's topic in MEPD S.W.A.T. Program
Backpack: -
*ACTIVATED* TD-30571 Requesting SWAT Deployment II #57
bigwam replied to bigwam's topic in MEPD S.W.A.T. Program
Pauldron & RTC-97 (not easy to show the weathering on the black pauldron) -
*ACTIVATED* TD-30571 Requesting SWAT Deployment II #57
bigwam replied to bigwam's topic in MEPD S.W.A.T. Program
Helmet: -
*ACTIVATED* TD-30571 Requesting SWAT Deployment II #57
bigwam replied to bigwam's topic in MEPD S.W.A.T. Program
First the usual, necessary detailed images: Armor, Pouches, Snaps & Screws: -
Name: Thomas Herodek Legion ID #: TD-30571 Forum Name: bigwam Garrison: German Garrison Trooper Emulated: Roadblock Private with RTC-97 Deployed Police Officer: yes Deployed SWAT: yes: Ok what is there to say. I built a new Sandtrooper and if possible based on a film model. I chose the "Roadblock Private", which is next to the "Move Along" Trooper. What is special about the trooper? On the one hand he wears the "Davin Felth" helmet, wears (mostly) cheesegraters, has the as yet undefined "Roadblock Pouch" ... Those were things that didn't cause any problems. What were the difficulties? You take a troope from a scene to recreate it as true to the film as possible. There are a few problems with the Roadblock private: on the one hand, he changes gloves (once he has cheesegraters, then normal handplates in the front view) and the breastplate is different in the front view, here too the armor was changed once. What to do? Well, with the gloves I decided on the cheesegraters from the side view and with the breastplate for the front view, but with a slight transition from weathering to side view, that it just goes together. View from the back: the pouch is over the shoulder. View from the front: the pouch is under the shoulder ... Difficulties for me are the different versions of the films. Blue-Ray & 4K. Without a doubt, 4k has a sharper image and you can see more details, but a lot has also been "beautified" and other things disappear or are overdrawn. I initially decided on the Blu-ray but took over things from the 4k for certain details. Here are links to the armor and backpack build reports:
-
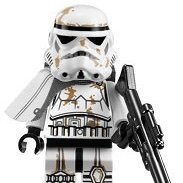
Do the rest of work: Weathering and some modifications ...
-
Do the Rest of work (weathering & chips):
-
When you will buy the Plunger (for the caps) this is the right: https://www.amazon.co.uk/Monument-Large-force-cup-Plunger/dp/B0001P0F40/ref=sr_1_121?dchild=1&keywords=plunger&qid=1613499376&sr=8-121 And the brexton: https://www.ebay.co.uk/itm/Vintage-Coll-Brexton-Food-Box-Bakelite-Sandwich-Retro-Picnic-Hamper-Caravan-MINT/254739949451?hash=item3b4faf278b:g:Ok0AAOSw2bVfexKn
-
Welcome back! Yes, Brexit is bad. Basic approval is carried out by your garrison. Pay attention to the requirements for PO (Level 2) when building - and please note, you need a backpack for PO:
-
Question about backpack requirement for Police Officer
bigwam replied to 4Runner's topic in MEPD Police Officer Program
Hi, for PO, you can build any Pack you want from the list. Regards bigwam -
Thank you. But let me say, this is no science. The Vallejo colors are great. If something is wrong, you can wipe them away and start again ...
-
I started today with helmet weathering. A basic wash with Vallejo black, heavily thinned, then applied the accents. Now let it dry and do another wash with Vallejo tierra earth.
-
Possible new TD, advice needed please
bigwam replied to HugeBadWolf's topic in Ambassador/Armorer Program
Hi Doug, Some little things to change, if you will start a PO-Request: - No more than 1/2 inch (12,7 mm) gap on either side - No canvas pouches for the hips! - A total of 6 brass split rivets with three on the Abdomen and three on the kidney. The rivets have a diameter of 8 mm and have to be painted white. Rivets are equally spaced out along the lenth of the armor and abouth 10 mm from the edge. - Look, that the straps are not visible (here they are over the armor or you can see snaps) -
Ammo Pouch photo on CRL
bigwam replied to BigBadFun's topic in Pouches, Pauldrons, and other Accessories
This is the pouch in its original color before it is colored. Indeed one could substitute ... -
Thank you !
-
The seat of the left Mictip didn't leave me alone. Once more pictures are printed out, helmet pushed into position and compared. Conclusion: Mictip moved 5 mm down, was too high.
-
Today I painted the tubestripes and attached the rubbers and mounted the mictips. With the frontal picture, the perspective is not quite right, I had to stretch the picture with my helmet a bit so that it matches the other one. That's why the left mictip is a bit downwards.
-
Some Paintjob today. A comparison with my helmet and the original ...
-
Freshly whitened and with matching flakes ...
-
And now in RAL-7034 with new ear- and Screwposition:
-
New correction: I noticed that the bottom screw is too high. Old hole filled and the ear repainted.
-
Doopy"s Electrobinoculars
bigwam replied to Bulldog44's topic in Pouches, Pauldrons, and other Accessories
If you need a lens, look at a watch glass -
Small correction, the position of the ears was not entirely correct:
-
The last job was to temporarily attach the brow. Although it runs almost evenly, it still has a small hang on the right (in the direction of view).
-
The right ear:
