sir david Posted May 5, 2011 Share Posted May 5, 2011 HERE YA GO GUYS! all done in black and white to compare with original 76' black and white reference photos my sniper plate and handplates have come,just need to sort the pauldrons now! http://imageshack.us/photo/my-images/687/swatweatheringprogress2.jpg/ hope it makes the grade guys! Quote Link to comment Share on other sites More sharing options...
kenthork Posted May 5, 2011 Share Posted May 5, 2011 seems really good bro' Quote Link to comment Share on other sites More sharing options...
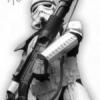
sir david Posted May 5, 2011 Author Share Posted May 5, 2011 HERE YA GO GUYS! all done in black and white to compare with original 76' black and white reference photos my sniper plate and handplates have come,just need to sort the pauldrons now! http://imageshack.us/photo/my-images/687/swatweatheringprogress2.jpg/ (just click on the "previous" to see the armour,somehow,all my albums are rolled into one! ) ???????? i'm a computer nerd! lol! hope it makes the grade guys! Quote Link to comment Share on other sites More sharing options...
nick.black Posted May 6, 2011 Share Posted May 6, 2011 Can I ask Dave, the secret of how you make the sticker mark on the pauldron? Pretty please Nick Quote Link to comment Share on other sites More sharing options...
sir david Posted May 6, 2011 Author Share Posted May 6, 2011 no worries buddy! we are all here to help each other out! the pigment i used for the pauldron and armour weathering was acrylic burnt umber(you could use raw umber too if you preffer) atists paint,i sponged the pauldron over lightly with the umber ,then got a small plastic drinks bottle, painted the umber on to the base and "printed" the circle onto the pauldron!!!.... after 15 mins i used a damp sponge to wipe/rub off pigment in the centre of the circle to make a ring,then removed excess weathering on the rest of the pauldron with a plastic bristled nail brush!!! works for me bro! Quote Link to comment Share on other sites More sharing options...
nick.black Posted May 6, 2011 Share Posted May 6, 2011 Wonderful mate that's super. I'll definitely look into that. Cheers buddy. Nick Quote Link to comment Share on other sites More sharing options...
FIVE Posted May 6, 2011 Share Posted May 6, 2011 Hey bro... as you know, I think this is looking amazing!! That blaster alone is drool worthy! Quote Link to comment Share on other sites More sharing options...
sir david Posted May 6, 2011 Author Share Posted May 6, 2011 god bless you noel! this t-21 project was the second blaster build iv'e ever done!, but terry boosted my confidence a lot, with his guides/tutorials!and i drew influence from his weathering techniques,but added my own touch too! i studied real lewis pics and tried to add as many details as i could (like the stock mount brackets etc;) ,i'll get some pics of mine,daves,ans smallys t-21's in action together, this weekend at the NSC event! :0) ...... brad, i feel a "road block" comming on in the NSC car park! thanx again bro,means a lot to me! Quote Link to comment Share on other sites More sharing options...
sandtrooper Posted May 6, 2011 Share Posted May 6, 2011 Dave, thanks for sharing your technique on the pauldron. I need to weather mine and this advice was just in time. Quote Link to comment Share on other sites More sharing options...
FIVE Posted May 6, 2011 Share Posted May 6, 2011 god bless you noel!He has. Quote Link to comment Share on other sites More sharing options...
sir david Posted May 7, 2011 Author Share Posted May 7, 2011 He has. Quote Link to comment Share on other sites More sharing options...
sir david Posted May 11, 2011 Author Share Posted May 11, 2011 just gotta add this baby though!!!! (and smally did it for me at last weekends troop! ) was an honour bro! [/img] [/img] Quote Link to comment Share on other sites More sharing options...

Recommended Posts
Join the conversation
You can post now and register later. If you have an account, sign in now to post with your account.