sir david Posted May 8, 2011 Share Posted May 8, 2011 Cheers guys! you looked awesome and played the road block captain perfectly buddy! was a proud moment for me to troop with you today although my calfs had a problem, i was allowed to go out with my old fx ones by my c.o!! didn't want to miss this bro!!!!!! Quote Link to comment Share on other sites More sharing options...
JK007 Posted May 10, 2011 Share Posted May 10, 2011 Brad well done mate Awesome job on the SWAT status well deserved mate trooped with you and the 2 Dave's at the weekend and had a blast we did use some of those famous Sandie phrases for the punters at the car park Well just waiting for my hand plates then i am off for SWAT. Quote Link to comment Share on other sites More sharing options...
TD6187 Posted May 10, 2011 Share Posted May 10, 2011 congratulation for deploy of swat Smally!!!!!! Quote Link to comment Share on other sites More sharing options...
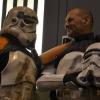
sir david Posted May 11, 2011 Share Posted May 11, 2011 brads first troop as S.W.A.T officer was awesome! was an honour to troop with my MEPD brothers! and smally looked cool too and acted the part of road block captain to perfection!!! Uploaded with ImageShack.us Uploaded with ImageShack.us [/u [/img][/url Uploaded with ImageShack.us Quote Link to comment Share on other sites More sharing options...
sir david Posted May 11, 2011 Share Posted May 11, 2011 the last pic is jk007 (left) ,smally (centre), and me (right) 2 more UK S.W.A.T contenders to follow brad!!!! Quote Link to comment Share on other sites More sharing options...
iconoclasta_88 Posted May 11, 2011 Share Posted May 11, 2011 Thx for your kind words Brad! And looking at those pictures, I can tell you look awesome not only on your deployment request, but on troops too! Congrats! There is one little thing I need to ask you. Could you please add more electricians tape to your pack. You have the two strips on the blue tray, but they are equally wide. The one on top should be wider. Check this reference. Sorry to bring this this late, but better now than never right? Thx a lot bro. Saludos Quote Link to comment Share on other sites More sharing options...
Smally Posted May 11, 2011 Author Share Posted May 11, 2011 Annnddddd done. That took me all of 20 seconds - easiest mod yet Smally. Quote Link to comment Share on other sites More sharing options...
Smally Posted May 11, 2011 Author Share Posted May 11, 2011 Thanks for adding the pics Dave. Quote Link to comment Share on other sites More sharing options...
sir david Posted May 11, 2011 Share Posted May 11, 2011 a pleasure bro! may need some S.W.A.T help ...... (pics wise from you soon buddy!) Quote Link to comment Share on other sites More sharing options...
sir david Posted May 11, 2011 Share Posted May 11, 2011 and my pauldron got squashed too!!! lol! Quote Link to comment Share on other sites More sharing options...
DaveMars Posted November 17, 2011 Share Posted November 17, 2011 Well deserved clearance Brad!! Sorry it's late! Looking forward to the troop at weekend! See ya there Quote Link to comment Share on other sites More sharing options...
Nayte Posted December 17, 2011 Share Posted December 17, 2011 Is that a rivet or what on the bottom corner? Mine does not have that.. Also is it required for SWAT? Also I had space out my three buttons evenly along the entire space provided, was I wrong? Thanks Quote Link to comment Share on other sites More sharing options...
iconoclasta_88 Posted December 19, 2011 Share Posted December 19, 2011 This is actually the correct shape '76 TD armors had. Unfortunately not all makers have added this detail to their molds. Anyway, it is quiet easy to do that, I think. I remember one thread about this and other mods done to the armor. Think it was by Pandatrooper but might be mistaken. When I get to a comp, on my phone now, I will try and dig it out for you. Sale thing with the two legs like shape under the 3 buttons. About SWAT, I think it is very desirable to have it, but don't think it should prevent you to get deployed. Not yet. . Hope this helps. Saludos. Quote Link to comment Share on other sites More sharing options...
P3laton3 Posted March 14, 2013 Share Posted March 14, 2013 there's any pic around about the rivet on the abs? Quote Link to comment Share on other sites More sharing options...
Smally Posted March 14, 2013 Author Share Posted March 14, 2013 It's not a rivet, its a small detail within the moulds. As Juan already said, some armour makers missed this little detail when making the armour (TM naturally has it as well as a few others). I added this to my old TE2 armour. It was a white plastic cap which I drilled a very slight hole into the centre. Hope this helps a little. Quote Link to comment Share on other sites More sharing options...
P3laton3 Posted March 14, 2013 Share Posted March 14, 2013 got it I just double checked the pics on my abs so it should look like melted abs with a rivet/fastener shape underneat? Quote Link to comment Share on other sites More sharing options...
Vf2112 Posted March 14, 2013 Share Posted March 14, 2013 And that's why wen I'm choosing armour, I choose TM For all the detail and a quality you just can't beat, choose TM Blasters n boots not included Quote Link to comment Share on other sites More sharing options...
iconoclasta_88 Posted March 14, 2013 Share Posted March 14, 2013 How I modified my TE2 armor was... 1. WIth a lighter, carefully heat the armor from behind in the correct place. 2. Using a AA battery, I pushed the plastic from behind with the plain end of the battery to give the correct lump shape on the front. 3. With the nipple of the battery I pushed it back giving it the little "hole" detail. Works perfect. Use protective globes cause it can get very hot. Also, do it very carefully, you dont want a molten ab detail. Saludos. Quote Link to comment Share on other sites More sharing options...
Smally Posted March 14, 2013 Author Share Posted March 14, 2013 How I modified my TE2 armor was... 1. WIth a lighter, carefully heat the armor from behind in the correct place. 2. Using a AA battery, I pushed the plastic from behind with the plain end of the battery to give the correct lump shape on the front. 3. With the nipple of the battery I pushed it back giving it the little "hole" detail. Works perfect. Use protective globes cause it can get very hot. Also, do it very carefully, you dont want a molten ab detail. Saludos. Simply genius Quote Link to comment Share on other sites More sharing options...
trooper1 Posted March 14, 2013 Share Posted March 14, 2013 Amazing indeed!! What enginuity we have here!!!! Quote Link to comment Share on other sites More sharing options...
Vf2112 Posted March 15, 2013 Share Posted March 15, 2013 Good idea Quote Link to comment Share on other sites More sharing options...
Joe Versku Posted March 15, 2013 Share Posted March 15, 2013 This is the RS original armour ab detail. Hope it helps. Quote Link to comment Share on other sites More sharing options...

Recommended Posts
Join the conversation
You can post now and register later. If you have an account, sign in now to post with your account.