ground pounder Posted July 5, 2010 Share Posted July 5, 2010 Slowly working through the TE2 armor. Helmet is done and needs to be painted and then weathered. Since my other "new" laptop bit the dust a week ago, I lost all the threads from here and FISD about building. So it has taken awhile to start combing through the forums to get the info to start getting the armor in order. Hope to keep the pics and process updated as best as I can. Quote Link to comment Share on other sites More sharing options...
FIVE Posted July 5, 2010 Share Posted July 5, 2010 Awesome man! The TE2 is a fun build for SURE! Keep the pics coming, and let us know if you can't find what you're looking for. Most of us have the boards memorized now. (not really) Quote Link to comment Share on other sites More sharing options...
iconoclasta_88 Posted July 5, 2010 Share Posted July 5, 2010 It is so cool to follow these threads. Specially with a great kit like the TE2. Wish I had a new one to start building too. Will be following your build! If you need to find any info, just ask. As Noel said, we have the boards memorized... almost! Saludos. Quote Link to comment Share on other sites More sharing options...
Darth Voorhees Posted July 5, 2010 Share Posted July 5, 2010 Woot for TE2! Have fun with the build! I had a blast building mine! Quote Link to comment Share on other sites More sharing options...
Obievon Posted July 5, 2010 Share Posted July 5, 2010 TE2 is a great choice. The Helmet ROCKS! Keep up the Pics and Posts looking forward to seeing more. Quote Link to comment Share on other sites More sharing options...
ground pounder Posted July 6, 2010 Author Share Posted July 6, 2010 Need some suggestions/input: Does anyone use velcro on the forearms (like on the calves)or does everyone assemble the forearms in one solid piece? I am thinking I can get a tighter fit if I use velcro. Then the forearm will not move around as much and I probably won't need to attach it to the bicep armor. Does anyone use the stickers for the tear drops on the helmet? Or paint them? Quote Link to comment Share on other sites More sharing options...
iconoclasta_88 Posted July 6, 2010 Share Posted July 6, 2010 Hey bro... Here is what I did. For the forearms, I just glue them together like a tube using E6000. Unless you have really big hands, you should have no problem putting them on. Even if so, you could always trim off the return edge around the wrists. It is the way it is supposed to be on the movie anyway. If you feel that the forearm moves a bit more than wanted, add some foam padding inside. This will keep it in place. About the tear drops tickers... I have done both, used decals and paint them. Depends of what look you want. For the best of both worlds, check out Mike's decals. They are made to look like handpainted, and are super good quality. You can even get a specific pattern/look for Move Along bucket. http://members.cox.net/appstronaut/tk4510_decals.html On the other hand, hand painting them will make it look more like a real prop. Some ppl like that, some ppl dont. If you want to go that way, the colors you should use are: Humbrol 5 for gray Humbrol 21 for black Humbrol 14 for blue stripes Mike also have them for sale on his site. An alternative could be Testors 1138 for gray Testors Satin black for black Hope it helps. Saludos Quote Link to comment Share on other sites More sharing options...
FIVE Posted July 6, 2010 Share Posted July 6, 2010 Mine are permanent and I slip them on then tuck my gloves into them. Velcro on them would just be one more thing to Velcro, and I try to not do that as much as possible. And yes, I used TK-4510's decals. They're amazing! You can hand paint too. Just depends on if BEING accurate or LOOKING accurate matters more to you. For me it's LOOKING. Quote Link to comment Share on other sites More sharing options...
ground pounder Posted July 6, 2010 Author Share Posted July 6, 2010 Thanks for the input on that. Left forearm is coming along nicely. Should be able to get the shoulders, chest, back, ab, kidney finished by tomorrow. It has all been trimmed, just have to sand a few spots on the kidney and start adding buttons and straps. Painted helmet yesterday morning and it should be dry - haven't checked on it today. Does the TE2 come with the 3 button piece for the ab plate? I have a 4 button piece but didn't see a 3 button. Quote Link to comment Share on other sites More sharing options...
iconoclasta_88 Posted July 6, 2010 Share Posted July 6, 2010 Thanks for the input on that. Left forearm is coming along nicely. Should be able to get the shoulders, chest, back, ab, kidney finished by tomorrow. It has all been trimmed, just have to sand a few spots on the kidney and start adding buttons and straps. Painted helmet yesterday morning and it should be dry - haven't checked on it today. Does the TE2 come with the 3 button piece for the ab plate? I have a 4 button piece but didn't see a 3 button. Cool... post some pictures if you can. We love pictures!! And, no. The Te2 kit does not comes with the 3 button strip but with a 4 button one. From that you could cut off one button and glue it. But if you aim for deployment, what I guess you do, then you will need to replace those for 3 button strip with larger buttons. TM makes them and they are really cool. Contact him over the board and he should be able to help you out. Oh! And Yes!! Mikes decals are amazing... if you want to look accurate and amazing, go for them!! I use them on my trooping bucket and leave hand paint to display one. Saludos. Quote Link to comment Share on other sites More sharing options...
FIVE Posted July 6, 2010 Share Posted July 6, 2010 Does the TE2 come with the 3 button piece for the ab plate? I have a 4 button piece but didn't see a 3 button.No, just the 3. Some people cut off one, some people (like me) order a replacement set from troopermaster. It's fast and painless. Doesn't even pinch. Quote Link to comment Share on other sites More sharing options...
FIVE Posted July 6, 2010 Share Posted July 6, 2010 Cool... post some pictures if you can. We love pictures!! And, no. The Te2 kit does not comes with the 3 button strip but with a 4 button one. From that you could cut off one button and glue it. But if you aim for deployment, what I guess you do, then you will need to replace those for 3 button strip with larger buttons. TM makes them and they are really cool. Contact him over the board and he should be able to help you out. Saludos. Dang it... you beat me again! hahaha Quote Link to comment Share on other sites More sharing options...
iconoclasta_88 Posted July 6, 2010 Share Posted July 6, 2010 LOL!! Well... its team work boss!! I didn't beat you, I just assisted you!! Saludos Quote Link to comment Share on other sites More sharing options...
FIVE Posted July 6, 2010 Share Posted July 6, 2010 LOL!! Well... its team work boss!! I didn't beat you, I just assisted you!! Saludos That's right! Quote Link to comment Share on other sites More sharing options...
ground pounder Posted July 7, 2010 Author Share Posted July 7, 2010 Ok, I can't figure out how to attach pics in here. It won't let me attach any. I tried adding from flickr but it wouldn't let me do that either. Any help with that???? My next armor question is what to trim on teh kidney plate to match the ab plate - top or bottom. If I could add a picture it would make more sense!! Quote Link to comment Share on other sites More sharing options...
iconoclasta_88 Posted July 7, 2010 Share Posted July 7, 2010 Ok, I can't figure out how to attach pics in here. It won't let me attach any. I tried adding from flickr but it wouldn't let me do that either. Any help with that???? My next armor question is what to trim on teh kidney plate to match the ab plate - top or bottom. If I could add a picture it would make more sense!! There are a couple options... The one in the forum functions is an easy one. Click the "reply" button below each post, you will be taken to the reply page, under the main text box, there is a button to attatch files. Just click it, select files and when they are attached, click the ADD button on the right. If you dont do this, picts will still appear, but at the end if the post. The other way to do it is in each thread page, at the end there is a text box, and under it, there is a button reading "use full editor". Type your message, click that button and you will be taken to the message editor page. Do the same as the first option. And thats it. Something to take in consideration is, try to save your pictures in a low-res format using photoshop or something similar. this cause the server has limited space per user and the bigger the files are, the fastest you will fill your designated space. Hope it helps. Saludos. Quote Link to comment Share on other sites More sharing options...
ground pounder Posted July 7, 2010 Author Share Posted July 7, 2010 Thanks for the photo help. I guess the 2 pictures I posted took up 89% of my limit. How do people post so many pictures if that is the case????? Anyway, here is the kidney plate picture. Do I cut the top to match or leave as is? The other pic is the front part of the armor and some strapping. Went with 2 inch elastic for shoulder straps. Quote Link to comment Share on other sites More sharing options...
iconoclasta_88 Posted July 7, 2010 Share Posted July 7, 2010 Thanks for the photo help. I guess the 2 pictures I posted took up 89% of my limit. How do people post so many pictures if that is the case????? What I do is I open pics I want to post in photoshop, crop and resize them for 600 x 800 px and 72dpi. Then save it with the save it for web and devices option. There, I optimize it down to 30% or even 25% quality. That way, picts are just 20k or even less than that sometimes. Lots of space to upload picts that size, and the appear good enough. About the kidney piece, there was a thread about how it was supposed to be cut. Don't really remember which, but if you can way for a few hours, Ill try to find it and come with a link. Saludos. Quote Link to comment Share on other sites More sharing options...
iconoclasta_88 Posted July 8, 2010 Share Posted July 8, 2010 Anyway, here is the kidney plate picture. Do I cut the top to match or leave as is? The other pic is the front part of the armor and some strapping. Went with 2 inch elastic for shoulder straps. OK, I couldn't find the thread I was talking about (yet), but here is a reference picture from a TM armor. This is the way ANH armors were. So you could cut the little square on the corner to make them match. http://forum.mepd.net/index.php?showtopic=6697&st=0 Or just make them match on the top, and leave the little extra on on the button. and then add the butt plate to the kidney. Put it in such a place that when the belt is correctly placed on the front it goes around the kidney plate, and not at all over the butt. Check the CRL for references. The armors showed there are both TE2 http://www.mepd.net/crl/ Hope it helps. Saludos. Quote Link to comment Share on other sites More sharing options...
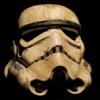
ground pounder Posted July 9, 2010 Author Share Posted July 9, 2010 Finished with the helmet. Just need to work out padding for the inside. http://www.flickr.com/photos/31303231@N06/4777658295/ http://www.flickr.com/photos/31303231@N06/4777659665/ http://www.flickr.com/photos/31303231@N06/4777660903/ Still working on the armor. Upper torso parts are all trimmed and I am in the middle of getting the straps in place. Quote Link to comment Share on other sites More sharing options...
FIVE Posted July 9, 2010 Share Posted July 9, 2010 I added the pictures to your post man... it looks awesome! To add them, all I did was right click on each image and "copy image URL". Then I clicked the little "photo" icon in the post toolbar and pasted that URL into it. Quote Link to comment Share on other sites More sharing options...
ground pounder Posted July 18, 2010 Author Share Posted July 18, 2010 Here are some pics from earlier today. Still a WIP, missing some stuff. Obviously the thing that stands out is my eyes. I assume I will have to double layer the green to hide my eyes. Is that correct? The armor straps layout so far. Close up of the shoulders. Used Nol's idea of a strap across the back, but added velcro to the bottom of the white shoulder straps and top of the black strap to better help in keeping the shoulder bells up and in place. Question about industrial velcro. While just putting this top part of the armor on and taking a quick picture, some of the velcro was already peeling off. Anyone had this problem? Wondering if I should reinforce with extra glue. Concerning attaching pics this site, I tried attaching teh links directly into this page but I always get an error that says the image type is not allowed. Any thoughts on that? Quote Link to comment Share on other sites More sharing options...
FIVE Posted July 18, 2010 Share Posted July 18, 2010 Yes, double layer the green. It looks really cool in pics that way then too! Often giving a "mirrored" look. And no... usually the Industrial Velcro sticks GREAT to the HIPS. Maybe clamp it overnight and test it. If not, E-6000 is always your friend. Great job so far btw!!! Quote Link to comment Share on other sites More sharing options...
Darth Voorhees Posted July 18, 2010 Share Posted July 18, 2010 Looks awesome bro! Quote Link to comment Share on other sites More sharing options...
ground pounder Posted July 30, 2010 Author Share Posted July 30, 2010 Well almost done. Here are some pics of the top half, finished and weathered. I have belt pouches but they were drying, so didn't want to put them on yet. Boots are weathered. Legs are 75% done. Just waiting on one more finishing strip to complete the right shin. Painted the thighs and left shin this morning. Also waiting on a right hand guard. Then done (whew)... oh wait, have to finish the E-11!!! And my girlfriend's Princess Leia costume. A couple things I noticed already while attempting to put the armor on. Very diffult to do it myself! I think it will be much easier with someone to help and make sure it is all lined up. Putting the shoulders on was difficult - not much movement allowed with all that armor on. Quote Link to comment Share on other sites More sharing options...

Recommended Posts
Join the conversation
You can post now and register later. If you have an account, sign in now to post with your account.