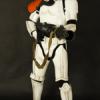
Elder Posted June 28, 2010 Share Posted June 28, 2010 Work in progress. I've actually used a dremel instead of scissors/knife to do the triming. It works like a charm once you get the hang of it. I've been vey careful not to let the dremel skid away on the shiny outside !!! The TM armor unpacked. Back pieces trimed and sanded. A tiny return edge still to be trimed on the butt plate. Front pieces trimed and sanded. Note the kidney plate - I have not trimed the sides (yet) until I've figured out if I need to shim the kidney/ab gap. Quote Link to comment Share on other sites More sharing options...
FIVE Posted June 28, 2010 Share Posted June 28, 2010 Awesome man!!! I'm watching this one! Are you going for just a TD, or for deployment? (thanks for copying the post over) Quote Link to comment Share on other sites More sharing options...
iconoclasta_88 Posted June 28, 2010 Share Posted June 28, 2010 Hey there Elder... Very nice armor. There is something about new armor coming out of the box... its just magic. Some ppl say that it makes the air fill with pixie dust!! Or tatooine dust... LOL I'll be watching this too. TM armor is amazing! Saludos. Quote Link to comment Share on other sites More sharing options...
FIVE Posted June 28, 2010 Share Posted June 28, 2010 There is something about new armor coming out of the box... its just magic. Some ppl say that it makes the air fill with pixie dust!! Or tatooine dust... I thought the saying went, "Every time an armor box is opened, a trooper gets his droid." Quote Link to comment Share on other sites More sharing options...
Rolf Posted June 28, 2010 Share Posted June 28, 2010 Congrats Henrik, you got one of the best kits world wide. Enjoy the build of this beauty! Quote Link to comment Share on other sites More sharing options...
Elder Posted June 28, 2010 Author Share Posted June 28, 2010 Cheers lads Regarding "just TD or for deployment" Im still a tad confused. There seems to be so many dif levels (501st, deployed, elite...*headspin*). I will try to build as screen acc as possible but will probably not build a backpack in a near future. I really want one but I should focus on the armor and the T-21. Where does that leave me? Quote Link to comment Share on other sites More sharing options...
pandatrooper Posted June 28, 2010 Share Posted June 28, 2010 TM build! So jealous! Looks good so far. To get your 501st legion TD number, you need to meet the CRL guidelines here. It states you do not need a pack to be a TD (not all TD’s had packs). http://www.mepd.net/crl/ If you scroll down, you can see the MEPD Deployed standards. MEPD Deployed has higher standards than 501st, among those – you need a backpack. Quote Link to comment Share on other sites More sharing options...
FIVE Posted June 28, 2010 Share Posted June 28, 2010 TN build! So jealous! Looks good so far. To get your 501st legion TD number, you need to meet the CRL guidelines here. It states you do not need a pack to be a TD (not all TD’s had packs). http://www.mepd.net/crl/ If you scroll down, you can see the MEPD Deployed standards. MEPD Deployed has higher standards than 501st, among those – you need a backpack. That's right... And, also... so you know... because it can be confusing, once you're a TD in the Legion you are officially part of the "MEPD" detachment. Becoming "deployed" just means you've met the extra elite standards. On the FISD they called it "EIB". You've gone all out to try and be as screen accurate as possible in other words. Quote Link to comment Share on other sites More sharing options...
pandatrooper Posted June 28, 2010 Share Posted June 28, 2010 I think on the FISD, they have changed the term from "Elite" to "Expert Infantry" (EIB badge). Quote Link to comment Share on other sites More sharing options...
Elder Posted June 29, 2010 Author Share Posted June 29, 2010 Ah, that clears it up. Cheers. Seems I'll be aiming for deployed then - once I build that pack Quote Link to comment Share on other sites More sharing options...
FIVE Posted June 29, 2010 Share Posted June 29, 2010 Ah, that clears it up. Cheers. Seems I'll be aiming for deployed then - once I build that pack Good man!! You've still got a day or two to nominate yourself for this... if you're so inclined. Quote Link to comment Share on other sites More sharing options...
Elder Posted July 6, 2010 Author Share Posted July 6, 2010 I was about to take some new pictures but found the batteries dead. Oh well. Anyways, there's slow but steady progress. Almost all pieces are trimed and sanded so I'll start with the glue real soon ( I just need to get my hands on some magnets). In the meantime, here's a rendering of my T-21 model (modeled by me after loads of research). Views and section cuts will be transfered to a printed drawing. I'll cut out all parts and outline them on dif pieces of wood/plastic. I've done a first dummy test and Im happy with the results. A small animation attached. http-~~-//www.facebook.com/v/412405123603 Quote Link to comment Share on other sites More sharing options...
Elder Posted July 7, 2010 Author Share Posted July 7, 2010 Recharged the batteries. All but the left shin are trimed, sanded and taped together to see how well the parts fit. I've decided to work on the return edges once the parts are glued (hence the somewhat rough edges). I will probably remove most of the return edges on the back/chest/ab plates as well. Also a new blueprint with the latest modifications to my T21 build. Quote Link to comment Share on other sites More sharing options...
Elder Posted July 12, 2010 Author Share Posted July 12, 2010 Update: Started working on the helmet. I dare not cut the teeth more using the knife. I need another tool! Shoulder bells and biceps. Biceps not yet striped. Butt and Kidney plate with elastic straps in the back. Quote Link to comment Share on other sites More sharing options...
iconoclasta_88 Posted July 12, 2010 Share Posted July 12, 2010 Hey there Henrik... Looking cool! About the teeth, I actually rather cut the teeth with an x-acto knife than with at dremmel or similar. Just be sure to wear some leather gloves. Its easier to go slow. But thats me! Saludos Quote Link to comment Share on other sites More sharing options...
Elder Posted July 12, 2010 Author Share Posted July 12, 2010 About the teeth, I actually rather cut the teeth with an x-acto knife than with at dremmel or similar. I was more thinking of a very narrow file. What exactly is am X-acto knife? Quote Link to comment Share on other sites More sharing options...
FIVE Posted July 12, 2010 Share Posted July 12, 2010 I was more thinking of a very narrow file. What exactly is am X-acto knife?Yes... I used an X-Acto (on TE2 only) to get the "bulk" out of the tooth area, but then I have a set of detail files that I use to detail them out. Quote Link to comment Share on other sites More sharing options...
iconoclasta_88 Posted July 12, 2010 Share Posted July 12, 2010 An x-acto knife is exactly a knife with a very narrow file blade (oops! I meant blade not file). Check this out. You can find them in any art, stationary or hobby shop. And many places else. http://cdn.dickblick...101-2-2ww-m.jpg Saludos Quote Link to comment Share on other sites More sharing options...
Elder Posted July 12, 2010 Author Share Posted July 12, 2010 Ah! X-acto! I have all the sharp tools one could ask for (too many depending whom you ask). I was not entirely off when thinking about detailed files then. Cudos brothers! Quote Link to comment Share on other sites More sharing options...
TK6237 Posted July 12, 2010 Share Posted July 12, 2010 I rough trimmed the teeth with a Dremel, took it one step further with a Stanley knife, and finished off with a set of jeweler's files. Looking great so far, keep up the good work! Quote Link to comment Share on other sites More sharing options...
Elder Posted July 12, 2010 Author Share Posted July 12, 2010 I rough trimmed the teeth with a Dremel, took it one step further with a Stanley knife, and finished off with a set of jeweler's files. Looking great so far, keep up the good work! Cheers Mads. Off to CO tomorrow then Quote Link to comment Share on other sites More sharing options...
TK6237 Posted July 12, 2010 Share Posted July 12, 2010 Cheers Mads. Off to CO tomorrow then Happy to be of service! Clas Ohlson is the closest thing I´ve ever found to Home Depot this side of the Atlantic. Just be careful not to remove too much when you do the teeth, if you want to preserve the illusion of the material being thicker than it is - teeth look cool with a small return edge, like the rest of the armor parts. From what reference I´ve seen, it´s screen accurate as well. Quote Link to comment Share on other sites More sharing options...
Elder Posted July 25, 2010 Author Share Posted July 25, 2010 Update: Gluing the forearms. Ears in place. Man, those were hard to trim. There are no guide marks, whats so ever, on the TM ears. All upper body parts done, including straping system. Buttons on AB not yet glued. Rivets on the left side with snaps on the back. I might use velcro to close the left side instead of snaps/elastic. On the right side (not showing) theres a single "button" (I used the bottom side of a male snap) as there should be. That side is closed using velcro. Quote Link to comment Share on other sites More sharing options...
FIVE Posted July 25, 2010 Share Posted July 25, 2010 Man... this is truly looking fantastic! Great job!! Quote Link to comment Share on other sites More sharing options...
FIVE Posted July 25, 2010 Share Posted July 25, 2010 I would love pics of the inside strapping system if you get a chance. Quote Link to comment Share on other sites More sharing options...

Recommended Posts
Join the conversation
You can post now and register later. If you have an account, sign in now to post with your account.