TD-4510 Posted July 10, 2009 Share Posted July 10, 2009 Quote Link to comment Share on other sites More sharing options...
FIVE Posted July 10, 2009 Author Share Posted July 10, 2009 Should be be OK to trim after its dry. You did primer right? The parts of the eyes that need trimming are the insides or centers by (over the nose..) and the outside edges toward the rears. Just take the lip off where the plastic starts to curve in. Use a number 2 exacto knife and just go slow. Mike No, I didn't prime it. Was that on your videos? I'm sure it will be fine though. If not, I'll fix it. Thanks for the reference pics! I always thought the move along had quite a bit of a lip... but the more I look the more I wonder. Plus I trust everyone's opinion here! Quote Link to comment Share on other sites More sharing options...
TD-4510 Posted July 10, 2009 Share Posted July 10, 2009 Oh! I didnt thik about that. yes the Move along does have more lip at the tops of the eyes. Have you looked at the helmet up close on starwarshelmets.com?? look here... Quote Link to comment Share on other sites More sharing options...
TD-4510 Posted July 10, 2009 Share Posted July 10, 2009 Quote Link to comment Share on other sites More sharing options...
FIVE Posted July 10, 2009 Author Share Posted July 10, 2009 Oh! I didnt thik about that. yes the Move along does have more lip at the tops of the eyes. Have you looked at the helmet up close on starwarshelmets.com?? look here... Yes, I had... thanks though, that's all good to revisit. Some of those pics are kind of crazy how "hacked out" the eye looks! haha... It was one thing I loved with the TE2 though. It was as if the "bumps" in the eye socket actually lent themselves to the awkward shape of the eye lip as you cut it. Very cool indeed! I'm probably going to leave it as is for now... I'm honestly really happy with the lip on it. It gives it some "character" I think. Or makes it "mine." If that makes sense... and doesn't sound too arrogant. haha Quote Link to comment Share on other sites More sharing options...
FIVE Posted July 10, 2009 Author Share Posted July 10, 2009 Thanks again for all this help Mike and everyone else!! Quote Link to comment Share on other sites More sharing options...
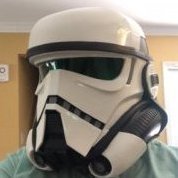
FIVE Posted July 10, 2009 Author Share Posted July 10, 2009 So trim some more or good to go for TK-8541? (I'll try and get some more / better pics on here of it too soon... that may make a difference.) Quote Link to comment Share on other sites More sharing options...
TD-4510 Posted July 10, 2009 Share Posted July 10, 2009 Well if it was me I would still trim some from the middle or inside of the eyes toward the nose. In the end you have to be happy with it. All the troopers are different so just do how you think looks good... The Move Along is REALLY a hack job. You gotta want that look pretty bad to do it all the way like they did in 76'. Quote Link to comment Share on other sites More sharing options...
FIVE Posted July 21, 2009 Author Share Posted July 21, 2009 Hey all... things are going great on the armor assembly... more pics soon - busy and all don't cha know. Couple of questions / make sure I'm going the right way based on research. Tube Stripes... Color = Humbrol #14 Number = 13 on right, 16 on left No pattern available. (?) (I'm going to hand paint them) Hovi Mic Tips... The ones that come with the TE2 are not accurate... correct? Who's good... PM? Thank. Ab Plate... 3 buttons - Do you just cut off the 4th one? Black on Helmet... Use flat black... correct? Not glossy. I think that's it. Just wanted to get some "yeses" and a bit of help before I dove in. Oh... what about fastening in the green lens? Is there a good tutorial on that? Or do you just glue it... tape it... what suggestions do you have? I've not seen anything on that particular step. Quote Link to comment Share on other sites More sharing options...
TD-4510 Posted July 21, 2009 Share Posted July 21, 2009 Tube Stripes... Color = Humbrol #14 Number = 13 on right, 16 on left No pattern available. (?) (I'm going to hand paint them) If you are painting just follow the pics on SWH Hovi Mic Tips... The ones that come with the TE2 are not accurate... correct? Who's good... PM? Thank. Keith's mic tips are pretty accurate. you just need to spray em with some flat black paint, let dry and dab the mesh a little with a damp paint thinner rag afterwards to reveal some chrome... Ab Plate... 3 buttons - Do you just cut off the 4th one? Nope you need a 3 button part. The three buttons are bigger than the four buttons. About dime size. Black on Helmet... Use flat black... correct? Not glossy. Semi gloss. It wont matter a whole lot after weathering though. Quote Link to comment Share on other sites More sharing options...
FIVE Posted July 22, 2009 Author Share Posted July 22, 2009 Excellent... thanks man! I knew I could count on ya. Quote Link to comment Share on other sites More sharing options...
FIVE Posted July 22, 2009 Author Share Posted July 22, 2009 Just to clarify... TE2 comes with Keith's mic tips... so I'm good to go on that! I have no idea why I thought I needed more accurate ones, and hadn't opened the little zip lock baggie with the mic tips until tonight (a few minutes ago) at which point I thought... "WAIT A SECOND!!!" To my delight they were the real deal! Why would I have ever doubted TE2... I do humbly apologize! Quote Link to comment Share on other sites More sharing options...
FIVE Posted August 2, 2009 Author Share Posted August 2, 2009 More done! Finished assembling and painting my TE2 bucket. I painted the frown and ears and vocoder but used Mikes decals for the traps and tube stripes. (THANK YOU MIKE!!!) The decals are amazing and look hand painted! As you know I'm basing this on the Move Along bucket, so I spent quite a bit of time making everything wonky like it should be. Now I just have to dirty it up! Oh, and I trimmed the eyes out a bit more. AND... there is no rubber track on the bottom yet. Here's a few pics... and you can see the rest on my site. Quote Link to comment Share on other sites More sharing options...
FIVE Posted August 5, 2009 Author Share Posted August 5, 2009 Some more pics... this time comparing the MR CE with the TE2. You can see them on my site too. Quote Link to comment Share on other sites More sharing options...

Recommended Posts
Join the conversation
You can post now and register later. If you have an account, sign in now to post with your account.