FIVE Posted February 23, 2009 Share Posted February 23, 2009 I like it man! I tend to like the "subtle" weathering... though I have no idea what I'll end up doing on mine yet / still. I'm sure you said, but what mic tips did you use? Stompers?? Great job! I can't wait to have my "wearable" like this. Quote Link to comment Share on other sites More sharing options...
iconoclasta_88 Posted February 23, 2009 Author Share Posted February 23, 2009 I like it man! I tend to like the "subtle" weathering... though I have no idea what I'll end up doing on mine yet / still. I'm sure you said, but what mic tips did you use? Stompers?? Great job! I can't wait to have my "wearable" like this. THX a lot bro... I did get Stomper's Hovis. They are great. I was lucky enough to get the built in speaker version so I will eventually connect them to an amplifier or something... Gracias! Saludos... Quote Link to comment Share on other sites More sharing options...
Dutch Dirty Trooper Posted February 23, 2009 Share Posted February 23, 2009 Super job bro ! I really love it ! Not to much or less weathering...just perfect ! Told you, you got great skills bro ! Grtz RAY Quote Link to comment Share on other sites More sharing options...
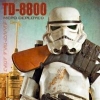
iconoclasta_88 Posted February 27, 2009 Author Share Posted February 27, 2009 Super job bro ! I really love it ! Not to much or less weathering...just perfect ! Told you, you got great skills bro ! Grtz RAY Thanks a lot bro... I must say, it was not easy but I enjoyed the whole process a lot. Building props is as much fun (and sometimes even more fun) as wearing it. Thanks everyone for all your support and comments. So, although I liked it a lot and still waiting for the weekend to get some tan/brownish "fullers earth", I was not 100% happy with one thing: the brow. I wanted to make a helmet inspired in the Move Along Helmet. I knew that this beeing my first real helmet (I used to have an FX), it would be likely that it would not come all the way as a Replica... but hoped for a very similar look. But my helmet was put together as a regular TD (or maybe more like the Stop that Ship), but since I did not wanted to take it apart, I settled for it like that. But then, I thought why couldn't I aim for a more similar move along look... therefore, I trimmed a bit of the cap's edge. Not much, just a bit to make the brow curve and rise it... Risky, I know, but it came out fine I think... This is how it used to look, and this is how it looks now:: And larger images: And well... What do you think?? Saludos. Quote Link to comment Share on other sites More sharing options...
FIVE Posted February 27, 2009 Share Posted February 27, 2009 Much better I think dude! I thought it was good before... and that was risky... but this is a lot better I think! Yep... very nice in deed! Quote Link to comment Share on other sites More sharing options...
Pappy Posted March 3, 2009 Share Posted March 3, 2009 What do you think?? Saludos. Heres what i think Great man Cheers! Quote Link to comment Share on other sites More sharing options...
Dutch Dirty Trooper Posted March 3, 2009 Share Posted March 3, 2009 Oh yeahhhhhhhhh !! Grtz RAY Quote Link to comment Share on other sites More sharing options...
iconoclasta_88 Posted March 12, 2009 Author Share Posted March 12, 2009 Much better I think dude! I thought it was good before... and that was risky... but this is a lot better I think! Yep... very nice in deed! Heres what i think Great man Cheers! Oh yeahhhhhhhhh !! Grtz RAY Thx a lot my bros! I am very happy and hearing all these good feedback makes it even better! Now I just need to get rid of this hair and go trooping... LOL Saludos! Quote Link to comment Share on other sites More sharing options...
iconoclasta_88 Posted March 12, 2009 Author Share Posted March 12, 2009 When I thought the helmet was done, there's always room for improvements. Specially if the stickers were placed wrong. hehe. So, after Mike showed me how the stickers were supposed to be placed and with a new set, I finally was able to get the bucket done. Now, I only need to work on the weathering slowly and then letting it wear out naturally. So, here are the pictures... Before and after... And other angles... Saludos Quote Link to comment Share on other sites More sharing options...
FIVE Posted March 12, 2009 Share Posted March 12, 2009 Very nice man! I didn't notice the decal errors until I had it pointed out to me as well... but this is mucho bettero! I'm ready to paint mine (white) so hopefully that will happen soon. Yay sandy! Quote Link to comment Share on other sites More sharing options...
lordvader74 Posted March 12, 2009 Share Posted March 12, 2009 I think it looks really great bro. You did an excellent job in my opinion. Quote Link to comment Share on other sites More sharing options...
Productions Posted March 12, 2009 Share Posted March 12, 2009 Truely beautiful! Wish I had enough money for one atm. Keepa troopin Luke Quote Link to comment Share on other sites More sharing options...
nice-biscuit Posted March 12, 2009 Share Posted March 12, 2009 Looking good. Quote Link to comment Share on other sites More sharing options...
TD-4510 Posted March 13, 2009 Share Posted March 13, 2009 AH!! Muy Beuno!!!! Quote Link to comment Share on other sites More sharing options...
iconoclasta_88 Posted March 24, 2009 Author Share Posted March 24, 2009 Thanks a lot for all your kind words! And special thanks to Mike for those great Decals! Saludos! Quote Link to comment Share on other sites More sharing options...
bountyone Posted March 25, 2009 Share Posted March 25, 2009 Great job on the bucket. did you get a free shirt with that purchase Quote Link to comment Share on other sites More sharing options...

Recommended Posts
Join the conversation
You can post now and register later. If you have an account, sign in now to post with your account.