trooper1 Posted March 7, 2008 Share Posted March 7, 2008 After weeks of reading, a major acquisition of parts from a friend, many hours of researching everyones threads on this forum and braksbuddys pics. I have completed my backpack, let me know what you think I will post what I used after the pics. Quote Link to comment Share on other sites More sharing options...
SethB6025 Posted March 7, 2008 Share Posted March 7, 2008 Great work! Quote Link to comment Share on other sites More sharing options...
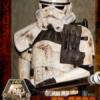
trooper1 Posted March 7, 2008 Author Share Posted March 7, 2008 Ok, now after weeks of working here is what I was able to come up with. First off I used the plastic pipe backframe idea that was listed here, second the parts came from a friend who decided a couple of years ago not to finish the pack he was going to start. I think the parts are some of SethB6025, and TK-1536 work and I dont know who else. The tutorial from TK-1536 was a great source of information. It helped out tremendously. The stinger was two of the outside fawcet insulated covers purchased at Lowes, I took one of them and cut the bottom off and glued it to the top with plastic welder, painted and added the stinger with the water line, and part of a flex drain line. Lots of plastic welder. wire tied to boxes Wire ties were a great idea also and came in handy, along with rivets and washers. Well any questions or comments, let me have it. Thanks to ALL for the great information provided on this site. If you look for it, you will find it..... Quote Link to comment Share on other sites More sharing options...
SethB6025 Posted March 7, 2008 Share Posted March 7, 2008 The formed parts are from Mike, Charlie, and myself. It was a collaborative project where we all had a hand, although Mike did most of the master sculpting. Quote Link to comment Share on other sites More sharing options...
trooper1 Posted March 7, 2008 Author Share Posted March 7, 2008 Thanks for the info, and for having a hand in such a wonderful undertaking. I now just have a few things before rendering ready for deployment. I have my MG-34 coming from hyperfirm on Monday, then weathering. I then have the last part, the Pauldron coming from Seth, someday soon I hope. I am then ready for pics, and on the road. Oh I did forget I have my RomFX coming soon and Stompers speakers to put in my lid. Quote Link to comment Share on other sites More sharing options...
TD-1536 Posted March 7, 2008 Share Posted March 7, 2008 Nice to see another back pack take shape... they have a warm place in my heart. You did a great job! Quote Link to comment Share on other sites More sharing options...
Groz Posted March 7, 2008 Share Posted March 7, 2008 looks gr8 Quote Link to comment Share on other sites More sharing options...
RemoLocke Posted March 7, 2008 Share Posted March 7, 2008 Good work. Turned out nice. Quote Link to comment Share on other sites More sharing options...
RoCKo Posted March 7, 2008 Share Posted March 7, 2008 great! Quote Link to comment Share on other sites More sharing options...
Rolf Posted March 7, 2008 Share Posted March 7, 2008 Looks fantastic trooper . Just remember to drill the holes in the radio box, then you are there . Quote Link to comment Share on other sites More sharing options...
SethB6025 Posted March 7, 2008 Share Posted March 7, 2008 Yeah, if you drill out the little indents surrounding and at the center of the radio "speaker" it gives it a bit more definition. Quote Link to comment Share on other sites More sharing options...
trooper1 Posted March 7, 2008 Author Share Posted March 7, 2008 Hummmm, did not know that. Do I drill all out of just the center ones or what. Are there any pics out there to look at. Quote Link to comment Share on other sites More sharing options...
Rolf Posted March 7, 2008 Share Posted March 7, 2008 Here is the shot of it Quote Link to comment Share on other sites More sharing options...
Burt Landcaster Posted March 8, 2008 Share Posted March 8, 2008 looks good! Quote Link to comment Share on other sites More sharing options...
freakengine Posted March 8, 2008 Share Posted March 8, 2008 I drilled out the five holes in the center and the ones around the outer ring on mine. I also mounted a small speaker inside for radio noise and chatter and ran the wires up to one of the radio box switches and on up to a radio shack amp and mp3 player in my stow-n-go. If I need someone to shut it off, they just flip the switch. Quote Link to comment Share on other sites More sharing options...
trooper1 Posted March 8, 2008 Author Share Posted March 8, 2008 Hey guys, thanks for the info. I will work on that this weekend. Jay Quote Link to comment Share on other sites More sharing options...
trooper1 Posted March 15, 2008 Author Share Posted March 15, 2008 Ok pack complete with holes drilled. I have just mounted the straps, and after reading many threads and watching Starwars 4 again and again. I have mounted my pouch to my straps and it works great. I determined that the sandtrooper never has a shoulder pouch on without the backpack and so I found it easier to mount. See pics I used a sitharmor pouch and cut the leather loop from the back and relocated it to mount to the strap. works great. Now to paint the rivets with black and put hot glue on to them to smooth up the rough end, then done. Quote Link to comment Share on other sites More sharing options...
Groz Posted March 15, 2008 Share Posted March 15, 2008 looks gr8 Quote Link to comment Share on other sites More sharing options...
trooper1 Posted March 15, 2008 Author Share Posted March 15, 2008 Thanks Groz, I have almost completed, and ready for pics end of next week. Will update asap Quote Link to comment Share on other sites More sharing options...
Rolf Posted March 15, 2008 Share Posted March 15, 2008 looks top cool . Only one thing. You have made the so called captain pack. But have paint the sergeant pack white triangles on the radio box, left corner. Here is a picture for ref . Quote Link to comment Share on other sites More sharing options...
freakengine Posted March 15, 2008 Share Posted March 15, 2008 Nice work. Rolf is right, tho. There was only one pack with the white sections on the radio dial...usually referred to as the white dial pack for some reason. It's the one with the rectangular tupperware unit on the upper right section. It just depends on what you're going for. The pack looks great! Quote Link to comment Share on other sites More sharing options...
Rolf Posted March 15, 2008 Share Posted March 15, 2008 Copy that, your pack is really good looking. Nice work trooper. Here you see i few shots of mine. (the pack is clean down in some places, new weathering job up asap) Peace out mate . Quote Link to comment Share on other sites More sharing options...
trooper1 Posted March 16, 2008 Author Share Posted March 16, 2008 Thanks for the info. I have since your info. corrected that, so any and all ideas are greatly appreciated. Thanks again Jay Quote Link to comment Share on other sites More sharing options...

Recommended Posts
Join the conversation
You can post now and register later. If you have an account, sign in now to post with your account.