DesertRat Posted February 15, 2014 Share Posted February 15, 2014 Hey guys So yesterday I received my lid kit from Trooper Master!!! its awsome....thanks for getting it to me in good time Paul!! It was like holding my daughter for the first time when she was a baby nearly 17 years ago So here it is out of the box. Spent some time with Ruggero at work yesterday going through things (thanks dude if you are reading this), and Im really stoked at getting this done. I'm looking at doing the road block captain and have been getting a lot of reference together so I can get as close as I can to the 'look' Once this is finished then I will get onto ordering my armor. Ive already started cutting off the edges and flashes on the rear of the bucket, and will post some more tomorrow once Ive done the front and sanded the edges down from the cut.... for now and moving along....best to you all Jay heres the bad boy out of the box.... Quote Link to comment Share on other sites More sharing options...
Cantina Security Posted February 15, 2014 Share Posted February 15, 2014 TM has a killer product doesn't he? My lid went together very smoothly , a bit faster than I thought it would. Just take your time, and trim a bit at a time, check and trim some more. Man, that is a good feeling... Quote Link to comment Share on other sites More sharing options...
DesertRat Posted February 15, 2014 Author Share Posted February 15, 2014 Hey Jason Yeah its just great, I looked at a few but was advised to go TM!! 'Slowly' is my mantra on this one....hope to post some more tomorrow cheers Jay Quote Link to comment Share on other sites More sharing options...
DesertRat Posted February 20, 2014 Author Share Posted February 20, 2014 Cutting off the flashing and extra ABS -tomorrow...EYES!!! followed by the teeth, sanding and finishing, then assembly by the weekend (I hope) Jay Quote Link to comment Share on other sites More sharing options...
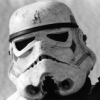
DesertRat Posted February 21, 2014 Author Share Posted February 21, 2014 Okay so...eyes are now cut out. I printed out some of the great ref found of the road block captain on the StarWarshelmets.com in order to have what I want in front of me while I work....I hope you like it thus far..... moving along.... Jay Quote Link to comment Share on other sites More sharing options...
P3laton3 Posted February 21, 2014 Share Posted February 21, 2014 Looking good Jay!!! Quote Link to comment Share on other sites More sharing options...
DesertRat Posted February 21, 2014 Author Share Posted February 21, 2014 Thanks Ruggero...more to come later!! Quote Link to comment Share on other sites More sharing options...
Cantina Security Posted February 21, 2014 Share Posted February 21, 2014 Looks good. Leaving just a bit of the flashed edge really does the trick. Quote Link to comment Share on other sites More sharing options...
P3laton3 Posted February 21, 2014 Share Posted February 21, 2014 found this one mate it might help to remind you to keep some room between the lenses and the lid Quote Link to comment Share on other sites More sharing options...
DesertRat Posted February 21, 2014 Author Share Posted February 21, 2014 Excellent!! thanks mate thats superb. Its amazing what is actually 'wrong' with these helmets. They must have been thrown together so fast!!! I will try and get hold of the main camera here at home for some nicer images, my wife always has it so I end up using my mobile.. cheers Jay Quote Link to comment Share on other sites More sharing options...
troopermaster Posted February 22, 2014 Share Posted February 22, 2014 This helmet is quite tricky to build correctly. If you notice in the photos from Christies, the helmet is assembled with a very low brow. I believe the face was pushed forward and held with gaffer tape to get the high brow look on screen, if I remember correctly. Notice the distance from the tears to the ear caps. They differ quite a bit on either side, so take that into consideration when building the helmet. Good luck 1 Quote Link to comment Share on other sites More sharing options...
rottie Posted February 23, 2014 Share Posted February 23, 2014 TM has an eye for this!...looking good so far! Quote Link to comment Share on other sites More sharing options...
DesertRat Posted February 24, 2014 Author Share Posted February 24, 2014 Thanks Paul, I dont have these so thats very useful. I did actually visit starwarshelmets.com and download a ton of Road Block Captain and printed a sheet up to reference, I will do the same for these Ruggero and I sat down at work and studied the images, the helmet is so different on the left and right side its amazing!!! One site appears to be further forward than the other. Im really taking my time to get this right. Im not rushing by any means. Im just doing a small piece a day -then study study study...marking areas, double check, then trim & study again anyways a small update....better images this time. Just marked out the teeth and also a small bit of flashing to trim off the top again as I noticed it was still a bit curved... With regard to the brow or face plate being further forward, Im actually undecided whether to run with the higher browed look, I always felt these guys looked good with a middling to lower brow like my Avatar or the images Paul has posted... thoughts??? cheers for the feedback... Jay Quote Link to comment Share on other sites More sharing options...
DesertRat Posted February 24, 2014 Author Share Posted February 24, 2014 So after more deliberation, Ive just kind of gone off the Road Block Captain...The high brow is not great and just doesnt look as good after more and more viewing of ref material.... I prefer the lower brow like that of the Captain in the Desert 'someone was in the pod, the tracks go off in this direction'....it just looks meaner and more fierce. Ive noticed alot of lids with about an inch or just under of ABS between the brow and the eyes and that looks great too ( like my avatar) so am changing direction for this ..... cheers for now Jay Quote Link to comment Share on other sites More sharing options...
iconoclasta_88 Posted February 24, 2014 Share Posted February 24, 2014 No worries bro! I think that the hight brow is very cool, but so is the lower one. Good thing is both ways are accepted and cool. Just if you want to think about it, you can have your bucket look both ways on pictures depending on how you pose your head... Saludos Quote Link to comment Share on other sites More sharing options...
DesertRat Posted February 24, 2014 Author Share Posted February 24, 2014 Thanks Juan, good to know!! best Jay Quote Link to comment Share on other sites More sharing options...
rottie Posted February 24, 2014 Share Posted February 24, 2014 What!!! Not doing the high brow??!!...i do belive you just hurt juan`s feelings......i was looking forward to it as well Quote Link to comment Share on other sites More sharing options...
DesertRat Posted February 25, 2014 Author Share Posted February 25, 2014 hehe, hey Walt no I changed my mind earlier today. I prefer the low brow of the desert captain if I were to choose. I like the way its almost a proper frown.... Anyway finished cutting the teeth out this evening.....next stop is to sand the rougher edges and then join the helmet together Jay Quote Link to comment Share on other sites More sharing options...
DesertRat Posted March 2, 2014 Author Share Posted March 2, 2014 Another update.... Am really enjoying this build, I just love it!!! Again am taking my time. So this evening consisted of cutting the brow rubber into shape and placing it. Im using velcro to temporarily fasten the front and back so I can line it all up and make some pencil marks ready to drill and put together. And so far so good. Its also allowed me to see where I have to adjust the brow line too. Ive notice I have to just lightly sand the left hand side (of pic) so the edge is a bit straighter when looking face on...anyway onwards!!! Jay Quote Link to comment Share on other sites More sharing options...
DesertRat Posted March 3, 2014 Author Share Posted March 3, 2014 bolted the lid together finally, still a couple of little bits to sand and file back, Sorting the left ear piece, temporarily taped...taking my time... more tomorrow Jay Quote Link to comment Share on other sites More sharing options...
DesertRat Posted March 12, 2014 Author Share Posted March 12, 2014 so just a quick question... whats the best way to attach the neck 's' rubber? glue it or leave it 'free' cheers Jay Quote Link to comment Share on other sites More sharing options...
DesertRat Posted March 22, 2014 Author Share Posted March 22, 2014 okay...so, its put together... ready to paint before adding the lenses and also the neck rubber.... cheers J Quote Link to comment Share on other sites More sharing options...
DesertRat Posted April 1, 2014 Author Share Posted April 1, 2014 Looking at the paint job now. I just noticed on the hi res images of the desert captain, the grey area on the left ear piece has no outer black line....just the single verticle line on one of the 'mold stripes' can someone just confirm this so I know Im not going nuts cheers Jay Quote Link to comment Share on other sites More sharing options...
rottie Posted April 1, 2014 Share Posted April 1, 2014 Nice find man! Quote Link to comment Share on other sites More sharing options...
troopermaster Posted April 2, 2014 Share Posted April 2, 2014 You're nuts! It looks like there is a border line to me. Quote Link to comment Share on other sites More sharing options...

Recommended Posts
Join the conversation
You can post now and register later. If you have an account, sign in now to post with your account.