


DesertRat
-
Posts
60 -
Joined
-
Last visited
Content Type
Events
Profiles
Forums
Everything posted by DesertRat
-
TD Lid - From Road Block to Desert Captain Lid
DesertRat replied to DesertRat's topic in Sandtrooper Armor
update: -
TD Lid - From Road Block to Desert Captain Lid
DesertRat replied to DesertRat's topic in Sandtrooper Armor
yeah thats what I was aware of. I remember you told me to do more because it whites out in the sun -
TD Lid - From Road Block to Desert Captain Lid
DesertRat replied to DesertRat's topic in Sandtrooper Armor
Hey mate, only a snippet, but the images were pretty crap, so I just went for broke and did a little artistic license -
TD Lid - From Road Block to Desert Captain Lid
DesertRat replied to DesertRat's topic in Sandtrooper Armor
okay so finally gotten back to this....been busy starting a new job of late..... So started to layer up the weathering...cheers Jay -
TD Lid - From Road Block to Desert Captain Lid
DesertRat replied to DesertRat's topic in Sandtrooper Armor
wow sorry for the delay but have an update...all handpainted stripes!!..first 13 done....more to do on the left of the lid now cheers Jay -
updates....pretty much done on this....
-
TD Lid - From Road Block to Desert Captain Lid
DesertRat replied to DesertRat's topic in Sandtrooper Armor
Updates....at last -
TD Lid - From Road Block to Desert Captain Lid
DesertRat replied to DesertRat's topic in Sandtrooper Armor
Update...paint time!!! just finished the second coat of black... cheers Jay -
TD Lid - From Road Block to Desert Captain Lid
DesertRat replied to DesertRat's topic in Sandtrooper Armor
I totally agree!! -
TD Lid - From Road Block to Desert Captain Lid
DesertRat replied to DesertRat's topic in Sandtrooper Armor
hahahaha cheers Paul, I was just talking with Ruggero too he said theres a hint of one...but if you look at my image its brighter and the entire outline is not visible. I also have on my facebook page an image header and there one trooper with a white one....so many little differences it great!!! -
TD Lid - From Road Block to Desert Captain Lid
DesertRat replied to DesertRat's topic in Sandtrooper Armor
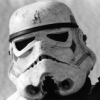
Looking at the paint job now. I just noticed on the hi res images of the desert captain, the grey area on the left ear piece has no outer black line....just the single verticle line on one of the 'mold stripes' can someone just confirm this so I know Im not going nuts cheers Jay -
Hey Felix its fine for now, its not finished...I have plenty of references...the final look is the important bit. cheers Jay
-
update.... added the brass coloring to the scope and the counter.... Jay
-
hey Cheers Craig!! Hope to have an update soon!!
-
TD Lid - From Road Block to Desert Captain Lid
DesertRat replied to DesertRat's topic in Sandtrooper Armor
okay...so, its put together... ready to paint before adding the lenses and also the neck rubber.... cheers J -
update time, spent the afternoon avoiding the showers and the windy conditions. Managed to get the body done in its 'metal' jacket paint job. I need to sand down the cap at the rear as its a bit pitted for my taste....hopefully do that tomorrow. Then its on to the brassy undercoat for the counter and the scope..... cheers J
-
LOL cheers Dude!!
-
ahh just saw this post, I have 20 years experience......nevermind, another day perhaps cheers Jay
-
Thanks Jason Its amzing how different a few coats of primer have made. Its also a godsend as well because its show a few areas that need a little lovin' so,Im just adding some extra modelling putty to act as 'welds' around the magazine housing where it attaches to the body of the gun and also just filling some small areas where the glue has quite reached. Then a bit of a sand down once thats set and another coat of primer then its off to be coated in silver..... will post more once Im happy with the next few model tweaks... Jay
-
finally the weather has let up and it was a nice day to get the undercoat on...... Jay
-
TD Lid - From Road Block to Desert Captain Lid
DesertRat replied to DesertRat's topic in Sandtrooper Armor
so just a quick question... whats the best way to attach the neck 's' rubber? glue it or leave it 'free' cheers Jay -
TD Lid - From Road Block to Desert Captain Lid
DesertRat replied to DesertRat's topic in Sandtrooper Armor
bolted the lid together finally, still a couple of little bits to sand and file back, Sorting the left ear piece, temporarily taped...taking my time... more tomorrow Jay -
TD Lid - From Road Block to Desert Captain Lid
DesertRat replied to DesertRat's topic in Sandtrooper Armor
Another update.... Am really enjoying this build, I just love it!!! Again am taking my time. So this evening consisted of cutting the brow rubber into shape and placing it. Im using velcro to temporarily fasten the front and back so I can line it all up and make some pencil marks ready to drill and put together. And so far so good. Its also allowed me to see where I have to adjust the brow line too. Ive notice I have to just lightly sand the left hand side (of pic) so the edge is a bit straighter when looking face on...anyway onwards!!! Jay -
TD Lid - From Road Block to Desert Captain Lid
DesertRat replied to DesertRat's topic in Sandtrooper Armor
hehe, hey Walt no I changed my mind earlier today. I prefer the low brow of the desert captain if I were to choose. I like the way its almost a proper frown.... Anyway finished cutting the teeth out this evening.....next stop is to sand the rougher edges and then join the helmet together Jay -
TD Lid - From Road Block to Desert Captain Lid
DesertRat replied to DesertRat's topic in Sandtrooper Armor
Thanks Juan, good to know!! best Jay