Sealsniper33 Posted October 1, 2013 Share Posted October 1, 2013 So after having this NE armor in a box in my room staring at me for a few months, I finally decided it was time to begin work. I only have the forearms, biceps, and calves assembled so far. I still have to do a little sanding on the joining strips as well as attaching the velcro to the calves and other strapping to the arm portions. I'll have more pictures up soon. Any comments are welcomed. I'm doing this build with no help and it's my first one that I'll be doing so all the input I can get the better. Thanks guys, Chris Quote Link to comment Share on other sites More sharing options...
Coffintanker Posted October 1, 2013 Share Posted October 1, 2013 I think it's coming along great! You may find that you'll want to remove the return edges on the bottom of your shin armor...but wait till you try it on with the boots and see how it feels. Otherwise you're rockin' it! Quote Link to comment Share on other sites More sharing options...
Sealsniper33 Posted October 1, 2013 Author Share Posted October 1, 2013 I think it's coming along great! You may find that you'll want to remove the return edges on the bottom of your shin armor...but wait till you try it on with the boots and see how it feels. Otherwise you're rockin' it! Thats what I was thinking too. I've seen it both ways so after I try it on with the thigh armor (once its done) I'll make that call. Quote Link to comment Share on other sites More sharing options...
Sandman Tigui Posted October 1, 2013 Share Posted October 1, 2013 If it serves bro, that is correct... I also tried them with my boots as well then the thighs and cod piece to see if I could flex and move well. Last but not least I also did the testing with my Lycra under suit that way I kept track and sense of all as one. Hope it helps Quote Link to comment Share on other sites More sharing options...
Purplehaze Posted October 1, 2013 Share Posted October 1, 2013 Hi Christopher, I have just had my TD approved & it is also NE. If you need any advise just PM me & I will see if I can help. I did cut the bottom of the shins/calves as I found it to restrictive around the ankles. I also did the same around the wrists on the forearms. Andrew. Quote Link to comment Share on other sites More sharing options...
Sealsniper33 Posted October 3, 2013 Author Share Posted October 3, 2013 More pictures of the build today. Some are from when I first got the kit. Also got myself a bin yesterday. Thighs are gluing. It's moving along. Using E-6000 is whats taking the longest as most of you know. Just not ready to use CA glue. Quote Link to comment Share on other sites More sharing options...
SCRIBBLER Posted October 3, 2013 Share Posted October 3, 2013 Very nice. Quote Link to comment Share on other sites More sharing options...
Bacta Baby Posted October 4, 2013 Share Posted October 4, 2013 Nice bro! Quote Link to comment Share on other sites More sharing options...
Sealsniper33 Posted October 5, 2013 Author Share Posted October 5, 2013 I had a question about the Ab buttons. I know I need three of them. The NE armor came with these two sets. The larger of the two is also used for the belt as the rivet covers. Which set do I use? Quote Link to comment Share on other sites More sharing options...
Sealsniper33 Posted October 5, 2013 Author Share Posted October 5, 2013 This is what I actually did. I made a set of buttons and did the best I could to get them round and angled. I also got the rear of my thighs glued and same for the calves. Next I'm going to tackle the strapping. Hopefully I don't mess that up too bad. Quote Link to comment Share on other sites More sharing options...
Bacta Baby Posted October 6, 2013 Share Posted October 6, 2013 Good work bro Quote Link to comment Share on other sites More sharing options...
Sealsniper33 Posted October 6, 2013 Author Share Posted October 6, 2013 So I tried my hand in weathering some parts that I won't need for the build. This is what came out. Any thoughts? Quote Link to comment Share on other sites More sharing options...
Sealsniper33 Posted October 7, 2013 Author Share Posted October 7, 2013 So today I completed the calves, put the velcro on the joining strip in back. The rear of the thighs are gluing and so are the snaps in the biceps. Quote Link to comment Share on other sites More sharing options...
longboard8 Posted October 7, 2013 Share Posted October 7, 2013 That is dirty as ****! Looks like it has been sitting amongst greasy tools in the back of an old auto repair garage in East Texas for about fifteen years. Quote Link to comment Share on other sites More sharing options...
Sealsniper33 Posted October 7, 2013 Author Share Posted October 7, 2013 That is dirty as ****! Looks like it has been sitting amongst greasy tools in the back of an old auto repair garage in East Texas for about fifteen years. lol So i guess the effect worked then? Quote Link to comment Share on other sites More sharing options...
Sealsniper33 Posted October 8, 2013 Author Share Posted October 8, 2013 I did a fit test with the lower pieces today: calves, thighs, and boots. Im going to have to cut down the thighs so that they don't hit me knees. Also the thighs looked too oblong when I put them together so I had to cut them on an angle to give me enough room at the upper end of the thighs while still looking more round. Im cutting along the left edge of the tape. Looked too oblong for me. Quote Link to comment Share on other sites More sharing options...
Sealsniper33 Posted October 15, 2013 Author Share Posted October 15, 2013 Ok so I decided to do up the other set of arms in the one color method. I can't decide now which way to go. If i ever wanted to do SWAT I believe the one color would be easier to modify if need be. I took side by sides of each to show the differences. They look more off white / sandy in person. The flash washes that detail out. Any thoughts on which to go with? Quote Link to comment Share on other sites More sharing options...
DavinFelth Posted October 15, 2013 Share Posted October 15, 2013 I think the ones on the left have a more sandy like complexion to them I think the ones on the right are more movie accurate. Hopefully this picture helps clear up the situation, so I rest my case with the right. http://images1.wikia.nocookie.net/__cb20121215221024/starwars/images/c/c5/Stormtrooper_Search.png Quote Link to comment Share on other sites More sharing options...
Sealsniper33 Posted October 15, 2013 Author Share Posted October 15, 2013 I think the ones on the left have a more sandy like complexion to them I think the ones on the right are more movie accurate. Hopefully this picture helps clear up the situation, so I rest my case with the right. http://images1.wikia.nocookie.net/__cb20121215221024/starwars/images/c/c5/Stormtrooper_Search.png So far thats the exact response I've been getting. Just looking at so many pictures of what everyone has been doing I got a little worried I made it too dirty. Quote Link to comment Share on other sites More sharing options...
DavinFelth Posted October 17, 2013 Share Posted October 17, 2013 Well I hope it helped. I think the color is perfect i think i would just tone down the dirtiness level a little. Quote Link to comment Share on other sites More sharing options...
Sealsniper33 Posted October 17, 2013 Author Share Posted October 17, 2013 So I need to confess something to you guys... Im a fat kid. The NE armor has extra plastic on the ab and back pieces to accomodate for the extra pounds. Where should I put the rivets on the ab and back pieces and still be able to go for police officer deployment? I need all the extra plastic so that the sides won't show through. Quote Link to comment Share on other sites More sharing options...
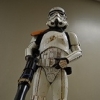
Sealsniper33 Posted October 23, 2013 Author Share Posted October 23, 2013 I did a preliminary fit test. I have all the strapping done at this point and every piece put together. I don't have the belt or thigh boxes attached yet. What my question is is how do I keep the sides together? I know the belt will help but since I need all the extra plastic on the sides its looking weird still. I also didn't have anyone around to hold the camera so sorry about the crappy focus. Also where would I attach the side rivets since I need all the extra plastic? And if there is anything else that looks off let me know. I'm going to start weathering all the other pieces tonight. Quote Link to comment Share on other sites More sharing options...
Loki Thrasher Posted October 23, 2013 Share Posted October 23, 2013 Nice Job bro its coming along nicely Quote Link to comment Share on other sites More sharing options...
Sealsniper33 Posted October 24, 2013 Author Share Posted October 24, 2013 So I finished weathering the arms, legs, and boots tonight. I toned down the dirty look a little bit but it's still quite dirty. Quote Link to comment Share on other sites More sharing options...
Loki Thrasher Posted October 31, 2013 Share Posted October 31, 2013 did u get tkboots? Quote Link to comment Share on other sites More sharing options...

Recommended Posts
Join the conversation
You can post now and register later. If you have an account, sign in now to post with your account.