mikelbrierly
-
Posts
148 -
Joined
-
Last visited
-
Days Won
6
Content Type
Events
Profiles
Forums
Everything posted by mikelbrierly
-
Possible new TD, advice needed please
mikelbrierly replied to HugeBadWolf's topic in Ambassador/Armorer Program
Looking great! I don’t think the chest is too small at all. The closer you can get your shoulder bells to the shoulder strap the less black undersuit shows, which can help diffuse the illusion that the chest is too small. Also I know on my Anovos helmet the black rubber brow gasket was not glued in well, and had a tendency to sag. I would maybe try and get your brow line pulled up a little and glued down with some dots of E6000. (There’s a general preference for higher brows round here lol. Could be the iconic roadblock trooper has a very high brow.) -
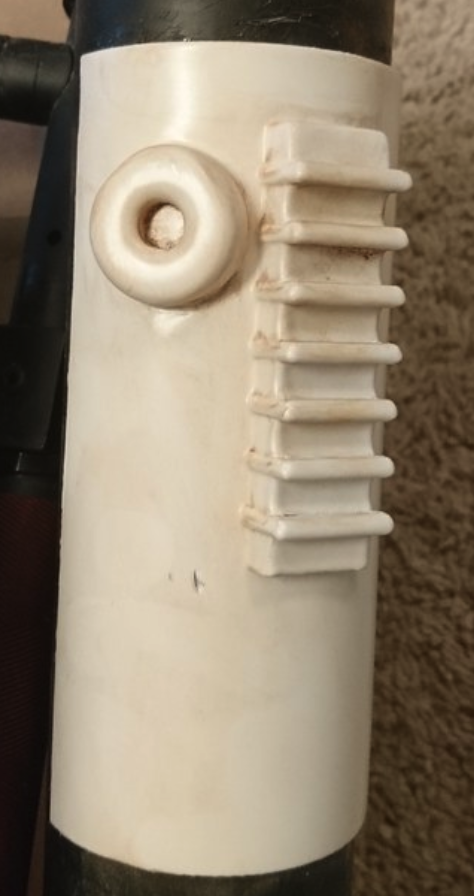
I've read on the forums that the mortar tube should be 2" or 2.5". I had some extra thermal detonator TK end caps laying around, and those seem like they'd accommodate a 2.5" mortar tube, but the caps I got in the TB kit would accommodate a 2" one. Thanks in advance for the help!
-
Hey everybody! I've been out of the saddle for the last couple years and am missing it BAD. So I figured I should get it together and actually build my backpack! Being a packless sandy has plagued me for too long. In the long run I'm aiming for SWAT with the "look sir droids" trooper, so I'd like my pack to compliment that. ^ This guy. You may know Mr. No-Stripes and Mr. No-Brow, but what about Mr. No-Shins? He's the real MVP. From what I've read, it looks like I'll need the "Pristine" Pack #3 (before it got beat up from filming and taped together). First up I want to to say thank you to the folks who have provided info and goods - @Hausi has a wonderful pack #3 writeup that is absolutely bananas. It has so much detail and is a huge gift to everyone here on the forums. I'll be referencing this a ton. Thank you @henselmonster for the 3d files on Thingiverse (exhaust, mushroom caps, ) @m4vrick is the Canteen master. Got my Lionstar (GioStyle alternative) from him Thanks to @bigwam for always answering questions on threads, I got a lot of questions answered this way Thanks to @Cricket for providing clarity on BOTH top and bottom bottle diameters. (I stumbled into her pack build while looking for bottle info and it was fortuitous and inspiring!) Thanks @ross8008 cutting a real Shires siphon in half so we can benefit from your vac-formed replicas! @Chrelle Has great details laying out the use of threaded inserts and wood blocks to attach everything to the frame. (and thanks for the idea of using chapstick tubes for the shotgun shells!) here's my layout so far: (Seed trays, radar dish, radio, and thermal detonator panel are from a TrooperBay sandtrooper backpack kit.) The big pieces I'm still missing my Brexton box, mortar tube, and shotgun shells. I have some questions about size and scale for a couple items I wanted to get clarity on before progressing too much. The TrooperBay kit came with mushroom caps, but seemed to lack some details, so I found henselmonsters files to 3D print them. My first cap printed at about the same size as the TB vac formed one. But doing a dry fit of the 3D printed cap with an 8.2 cm diameter bottle on top, the cap looks too small... What do you guys think? Before shortening bottle -
-
*DONE* TD-10404 Requesting Deployment
mikelbrierly replied to Cricket's topic in MEPD Police Officer Program
Thanks for replying and for the info!! Since I posted my question I followed your FOTK build thread link and realized you had already VERY thoroughly laid out all the steps you took! Sorry for making you repeat yourself. Also the story and video of you, Jimmy, and your son was fantastically well written and the absolute embodiment of the 501st. Thanks for being awesome! (I rarely brave FISD since MEPD is my safe space , but you guys should go check out Christine's thread for that if you have time. Totally brilliant.) -
*DONE* TD-10404 Requesting Deployment
mikelbrierly replied to Cricket's topic in MEPD Police Officer Program
Congratulations Christine!! This pack looks freakin awesome!! Also you are the Bondo QUEEN. I can't get over your thermal detonator cleanup AND that mini FO TK. I know tons of folks would love a thread on how you get such perfect results smoothing out tight places on a piece like this -
-
Also Bigwam your build is beautiful!! As is your helmet display there in the background. (I'm jealous of your magnet collection too )
-
Do folks ever paint their whole kit? I haven't seen that if so, but if ever there was a place that that kind of accuracy would happen it's here
-
Happy Holidays!! Joe have you been on Trask lately?? Looks like you and this dude have both been shopping at Tosche Station!
-
For my siphon, I got an awesome vac formed kit from [mention]ross8008 [/mention]here on the forums. Really nice lightweight repro from an actual Shires I believe. Good luck on the other pieces! Sent from my iPhone using Tapatalk
-
This is a beautiful build!! So clean and crisp! Sent from my iPhone using Tapatalk
-
Any weathering technique is allowed, just remember that level 3 (Swat) requires that you emulate the weathering pattern of a specific trooper seen on screen Sent from my iPhone using Tapatalk
-
@Sn4k3 fullers earth is a product used in train modeling and a handful of other applications. It’s basically just super finely ground rock shale that comes in different earth tones, hence the “earth” part. You can get bags of it from any hobby store. The hairspray is lightly sprayed on an armor piece and left until it’s tacky, then you sprinkle fullers earth into it and it will stick to the hairspray, but it’s easy to brush off where you do and don’t want it, then do another layer. If done right it can be really really convincing especially up close. I love the acrylic method, but on my armor for example, if you look closely you can guess how it’s done. Less so with fullers earth. But with skill either method can be incredible! Sent from my iPhone using Tapatalk
-
This is awesome! Can’t wait to see this build develop. And that last pic is great reference material. Nice and clear Sent from my iPhone using Tapatalk
-
I can’t speak too much to the fullers earth method as my kit is weathered with acrylic paints, but one nice thing is that it won’t wash off or easily smudge. I assume that would be more of a risk with the fullers earth but I could be wrong. You can always just do both too! Maybe try a few different methods on a couple pieces of scrap or a shoulder bell first Sent from my iPhone using Tapatalk
-
Can you start your sandtrooper at level 3.
mikelbrierly replied to Arch99's topic in Sandtrooper Armor
If you plan on trooping with your local garrison, it definitely makes sense to start at level 1! A lot of times there’s big adjustments that need to be made for comfort and practicality, and if you need to make cuts/modifications to your armor so it’s wearable, it’ll hurt less if you haven’t spent all the time bringing it to swat status already. Just my thoughts! Best of luck!! Sent from my iPhone using Tapatalk -
Good luck with everything! Should be fun! And feel free to post any questions you have here, If you're embarrassed to ask something you think might have been asked before, just use the search bar to look for it real quick then feel free to post away! Or you could DM me if you like, I am more than happy to answer any questions I can!
-
Good luck! It's a fun process, and it never ends! haha Make sure to take your time, shooting for a high caliber of accuracy can be really fun. I found a video over on trooperbay.com about weathering that was really helpful for me in the beginning (It's the acrylic paint method)
-
Welcome! Fresno county is part of the Central California Garrison, and their garrison roster is here - http://www.501st.com/members/garrisonroster.php?garrisonId=26. Looks like they have 2 GML's (Garrison Membership Liaison), and you could email either of them. PS. This page has a lot of these leadership acronyms and their meanings on it - https://databank.501st.com/databank/OperationsProtocol#Section_3:_Elections It gets confusing and we love our acronyms here lol PPS. This too - https://www.whitearmor.net/forum/topic/9510-common-acronyms/
-
Welcome Broden and everyone else! Glad you're here, it's the best part of Vaders Fist, that's for sure
-
Bobby you're killing it! And talk about being behind on projects, you're further along than I am with my own pack!! Darn life getting in the way of our MEPD builds lol. This community rules, and its so fun to see all these sandy's working together and sharing ideas. It's what it's all about.
-
Henselmonster DLT-19 Bapty - 3D Printed
mikelbrierly replied to henselmonster's topic in T-21, DLT-19, RT-97c Heavy Blasters
Dude you are AWESOME for sharing the file. Thanks so much! You did a killer job too! Sent from my iPhone using Tapatalk -
What fantastic weathering!! I love it! Do you have a build thread on here? Sent from my iPhone using Tapatalk
-
Man that twin suns patch is rad. Which garrison is that? Sent from my iPhone using Tapatalk
-
What can I do with a real sterling? My Bapty Project!
mikelbrierly replied to bigwam's topic in E-11 and Bapty Blasters
So amazing. Wow. Any pics of the weathering process? Sent from my iPhone using Tapatalk -
Maybe I’ll give it a shot then! Sent from my iPhone using Tapatalk