

Allerg3n
-
Posts
55 -
Joined
-
Last visited
Content Type
Events
Profiles
Forums
Everything posted by Allerg3n
-
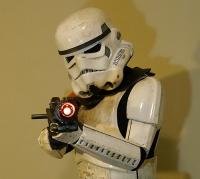
Approved over the weekend! TD 31285. Huge thanks again to everyone for all your insight and comments. Looking forward to putting my backpack together in the coming months for MEPD deployment!
-

TrooperMaster TD WIP : First Ever Build : Input More Than Welcome
Allerg3n replied to millenium1's topic in Sandtrooper Armor
Woohoo! Almost there now! Looking great! -
Thanks Sean! Interestingly I think it's more the shoulder bells in my case - the ATA breastplate is a bit narrow and I didn't have to trim much at all with regard to width. I think I may have trimmed about a half inch too much off my shoulder bells when I was working on the arms. Not too worried though since pouches/backpack will cover up most of the black. If I ever decide to clean up and convert to TK, I may order new bells and re-trim.
-
Thanks guys! It's kinda remarkable how much the light washes out the dirtiness in photos - I may take some in natural daylight to compare, but I was too eager to take pics in order to get 501st approved. This winter's projects: newborn baby girl, and Dirty Boy's backpack for MEPD approval
-
Thanks Ricky! I'll let you know how it goes. :-)
-
Party went well - no real pics because my wife was busy corralling kids who wanted photos - that was awesome. I submitted pics for 501st membership tonight - here's the album: http://imgur.com/a/NgQKJ I do have a few minor things to clean up...my left shin keeps popping under my boot, which gets annoying fast.
-
Hey Eric! You'll hopefully be getting a set of submission pics for me soon. :-D I trimmed mine to about half an inch thick, just going anecdotally based on guesstimates from other peoples' build threads and what I could find online. Mine came out a bit sloped - it's thicker towards the bottom and thins out on top. I initially trimmed the piece I got from my ATA kit, which was hollow, then filled it with two layers of foam board and cut an ABS back for it. Can take pics if you'd like. It's not the slickest knee plate out there, but it looks banged up and dirty. Some more experienced members here may have a more precise answer, though. Best of luck! Hope to meet you at a troop soon.
-
Brothers! Going to a friend's daughter's birthday party tomorrow - their whole family are huge Star Wars fans. Should be fun, and I figured it'd be a good "trial run" for the armor. The only thing I'm missing is Darman's neck seal and then I'll be ready to take pics for 501st acceptance. I'll have my wife take some pics tomorrow though and share them - will be good for critique on the build. One glaring error is bothering me - I can't seem to get the gap on my left side to close properly. I accidentally stiffened the elastic with glue (whoops) and now it doesn't pull back anymore, which sucks because I have it all riveted in. I suppose I may have to cut it and use snap plates to tighten the sides up. I don't really need to shim because the ab probably isn't as tight on me as it should be anyway. (I left a little room for "growth" when I my 30s in two years ) But regardless, I'll post up with some pics soon. Thanks again for all your help!
-
Was just reading this thread on FISD - it's not too old and may be relevant. I thought it was pretty interesting: http://www.whitearmor.net/forum/topic/25018-compare-tm-rs-and-ata-armor/ Best of luck with the purchase, Sean!
-
ATA bucket is a bit smaller than others though - just be ready for a tighter fit. I have to put mine on sideways first and twist it straight. Not a dealbreaker by any means, just a quirk.
-
*DONE*TD-42020 Requesting Deployment
Allerg3n replied to bigkilo's topic in MEPD Police Officer Program
Looking great! Hoping to join you soon. -
Great trooping, Michael! I can empathize somewhat with the heat - I'm almost done with my armor and I still don't have any fans installed. I put my armor on for 10 minutes in my apartment the other day and busted into a sweat in no time. Now I've got 4 fans on the way to help keep me cool. :-) Looks like you did a spectacular job. Hope it was fun!
-
MEPD is the most valuable trooping resource this side of the galaxy, and I'm honored to help keep it going in my own (small) way.
-
Almost there...
-
So I ended up splitting the difference on the back of the left thigh with a 1" strip. Doesn't look too bad. I also installed my thigh pack on the right leg - need to work on strapping and then I'll post up another round of pics as a test fit.
-
Looking great! I ordered one of Dirty Boy's kits but I'll be referring to as many pack builds as I can in the coming weeks. I'll definitely follow this one. Keep it up!
-
Question - I'm putting my thighs together and I noticed that after measuring, I have a huge space between the ridges on the back of my left thigh. Like 1.5 inches. (It does taper towards the bottom) Is that a dealbreaker? Do I leave the cover strip at 7/8ths inches? The right thigh didn't have this issue so I'm not sure if maybe it's a quirk of ATA armor. I do a lot of cycling (yay, thighs!) but they're both about the same size. I have the fronts of the thighs sized appropriately at 7/8ths inch cover strips: Progress pics! Torso is done. Here's the strapping system: Waiting for the glue to dry on the greaves: Electronics for the helmet come this week - should have legs done by Friday and then it's down to the belt and neckseal.
-
Brothers! Time for an update! Here's my layout: And here's how it all fits currently: Apparently I have a long neck I haven't done the crotch strap yet, which is why the butt plate is a bit wonky. Also I need to fix straps between my shoulder bells and shoulder straps to keep them pulled tighter on my arm; once that's done I'll have less undersuit showing. Comments welcome - thanks for your feedback everyone!
-
On the left you can use whatever to fasten the sides; just make sure you've got the 6 rivets in the right spot (3 on ab, 3 on kidney - they don't need to be functional). On the right you can also do whatever but I installed the "Han" rivet and use some elastic to snap the right side on/off. Your belt should help keep the bottom pieces together, and the whole thing is held up by your chest and back pieces. Imagine a set of overalls that you get into by opening the right side, not unstrapping the top straps. That's basically what you're building. (Or at least what a lot of people seem to build after their strapping is done.)
-
The "Spirit" of a Bapty and an intention to join.
Allerg3n replied to TrainWreck's topic in E-11 and Bapty Blasters
I love that weathering! Should've thought of the peach color for my DLT-19 build. I think it looks great. -
TrooperMaster TD WIP : First Ever Build : Input More Than Welcome
Allerg3n replied to millenium1's topic in Sandtrooper Armor
Cool beans - thanks for the info man. I will be following your build with great interest. -
TrooperMaster TD WIP : First Ever Build : Input More Than Welcome
Allerg3n replied to millenium1's topic in Sandtrooper Armor
Sorry, should've been more clear - Ab/kidney rivets are supposed to be 8 or 9mm, correct? Does it matter what size to use for belt/thigh ammo pack? It looks from your pics like the thigh ammo rivet is a bit smaller, but it could just be me. -
TrooperMaster TD WIP : First Ever Build : Input More Than Welcome
Allerg3n replied to millenium1's topic in Sandtrooper Armor
Look great, Ricky! I'm in the middle of putting my armor together as well - this is a helpful reference. I've been making my snap plates out of excess flashing as well Just out of curiosity, what size rivets are you using? I've got some on hand but I think they're only 4 or 5mm. -
Hey all, Couple more questions for you. First up, return edges - from most threads I've read, it seems like people don't leave a lot of return edge on the biceps/forearms. Here's mine so far: (Right arm is on the right side; left arm is on the left) (Left arm is on the right side of the picture) I also started trimming down the torso pieces. DroidHunter's ATA thread has been really helpful, but I'm not sure if I'm still leaving too much return edge on my kidney/front pieces. Top of the kidney piece: Bottom of kidney: For the kidney I basically followed mold lines...Does all that look OK? Last question - I bought a Tekton rivet kit but apparently the rivets aren't large enough. I've been reading that rivets (those to attach elastic on the left side) should be 8mm or 9mm, or 3/8" equivalent. Are all the rivets in the build supposed to be this size? I may be able to return the Tekton kit but I just want to be sure before buying another one. Thanks everyone!
-
Thanks everyone! Got my bucket done (but not weathered). I had another helmet thread back when I was first assembling, but I seem to have lost it. Anyways, here be pics: Right Side Front Left Interior I created a post a few weeks ago on FISD about the Rustoleum rubber liner I used - the smell wouldn't go away. The solution was to hook the helmet up to a box fan and let the thing run for 2 weeks. Most of the smell is gone now, so I decided not to recoat with Plasti-Dip. The lenses are hot glued in with some spare black foam around the rims to preserve appearances. The pads are military helmet pads from Amazon. Supremely comfortable, and fits my head like a glove. Started assembling biceps as well. Here's a shot of one assembled with the shoulder bell attached (via a strap). It's pretty snug on my arm and there's not much return edge - is that about how it should look? The other strap/snap plate is there for the forearm piece. That's curing on my floor right now, along with the left bicep: Once I get them on they're pretty comfortable, and while movement is restricted it's actually not as bad as I'd expected initially. I just didn't want to take off all the return edge if there's supposed to be some left.