

Old Trooper
-
Posts
65 -
Joined
-
Last visited
Content Type
Events
Profiles
Forums
Everything posted by Old Trooper
-

Old troopers T-21 Build
Old Trooper replied to Old Trooper's topic in T-21, DLT-19, RT-97c Heavy Blasters
Oh Look old school. just for inspiration. -
T-21 barrel details
Old Trooper replied to nick.black's topic in T-21, DLT-19, RT-97c Heavy Blasters
They are just add on put the Lewis for the film to make it look different. This can be achieved but making them up out of nuts & cut to size & shaped styrene. have a look at my build on the next page. -
Hi guy was post on the patrols section. went to post pic's via my usual means and ways(from Photo Bucket) can't seem to do so. But am able to so on other boards through the various 501st forums I'm on. any help would be appreciated.
-
T-21 Courtesy Review Please...
Old Trooper replied to OnlineJeff's topic in T-21, DLT-19, RT-97c Heavy Blasters
Yep Panda's Template is the one that certainly has got many of us to say yep that seems easy enough & really it is. I Used them. -
Dazutos T21 Scratch Build
Old Trooper replied to Dazauto's topic in T-21, DLT-19, RT-97c Heavy Blasters
Hard work but it pays off end the end & Wow looks great. -
My newly weathered T-21 :-)
Old Trooper replied to Cantina Craig's topic in T-21, DLT-19, RT-97c Heavy Blasters
very nice job there. be proud of it. -
Request 501st or Sandtrooper Section Access
Old Trooper replied to SethB6025's topic in The Barracks
Request Sand-trooper access http://www.501st.com/members/displaymember.Php?user=13764&costumeID=2 TD-4746 Old Trooper Chris Mcloughlin -
Thanks Guys That been a help
-
your construct feed back is surly welcome.
-
Belt pack, Paluton & ammo pack
-
Thighs & Lower legs Yes i'm aware that there is scratching on the lower left thigh that needs fixing.
-
Abb & Kidney & butt Plates
-
Bells, Biceps & forearms
-
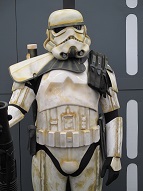
Ok guys I've been busy my armour together and I given the left out in the sand storm look on my TD build. Please note that I'm aware that certain parts of the build are not complete ie lenses, aerators, Stud right side but i'm wanting feed back on the weathering. Helmet Chest & back plate
-
Hi guys been doing work on my armour and have come to a issue that needs clarification. question: I require to ad a sim between the ab & kidney plates, I know where the studs go on the ab plate but do I place the studs that sit adjacent to those on the kidney plate which gives a looks rather a large distance apart & some what wrong or do I put them on the sim forward part of the section and a line the sim as if like the kidney ought to whilst a lining or laying the back section of the sim flush with the kidney plate thoughts or advise would be helpful amour is ATA.
-
Another DLT-19 Build (Finished!)
Old Trooper replied to Allerg3n's topic in T-21, DLT-19, RT-97c Heavy Blasters
well I must say this is looking mighty fine. I bow to your skill & creativity. -
Wire Around DLT-19 Barrel Fins
Old Trooper replied to pashnak's topic in T-21, DLT-19, RT-97c Heavy Blasters
But you know they are there & that all that matters -
Another DLT-19 Build (Finished!)
Old Trooper replied to Allerg3n's topic in T-21, DLT-19, RT-97c Heavy Blasters
Matie! excellent work so far. If ever get around in doing mine I'm certainly using your build & template as a inspiration. Keep it up. I believe the end result will be the envy of many. -
Great Garrison Shot, Looks awesome
-
Old troopers T-21 Build
Old Trooper replied to Old Trooper's topic in T-21, DLT-19, RT-97c Heavy Blasters
You know when the ground work is right & it works why should any one re-invent the wheel, I thank you for your inspiration as none of my work would be possible or as good & self rewarding with out it -
Quoted from Dirty Boy It looks like 3 screws. The only problem with that method is it won't work for SWAT. The cistern has to be angled out. It provides more security and was a standard way for a while but now as we get closer to the screen caps assembly has changed. From Old trooper. Any Suggestion on how best to get the look you high lighted. I'm looking at only achieving police officer, I don't think I'll be able to get my armour to SWAT standard due to my weight size Vs type of kit (ATA) But I'm looking to make it the best grade of police officer.
-
Old troopers T-21 Build
Old Trooper replied to Old Trooper's topic in T-21, DLT-19, RT-97c Heavy Blasters
View of the right side breech, cooling fins Looking down over the rear sight Mid Sight Fore Sight So all I need to do is attach a 303 sling & a little wear & tear wheathering -
Old troopers T-21 Build
Old Trooper replied to Old Trooper's topic in T-21, DLT-19, RT-97c Heavy Blasters
Breech /Pistol grip Views of the Butt showing the cleaning kit housing Looking at the blast from the Right side -
Old troopers T-21 Build
Old Trooper replied to Old Trooper's topic in T-21, DLT-19, RT-97c Heavy Blasters
So here are some more pic's of My T21 Look at the T21 from the left side of the weapon prop. Front end of the Barrel mid section Rear of the Barrel Couplers & cooling finns -
Old troopers T-21 Build
Old Trooper replied to Old Trooper's topic in T-21, DLT-19, RT-97c Heavy Blasters
One bends the tubbing to this form Then Fit it to the barrel like so