pandatrooper
-
Posts
896 -
Joined
-
Last visited
-
Days Won
3
Content Type
Events
Profiles
Forums
Everything posted by pandatrooper
-
The SE pauldrons look like they almost have black plastic sheet glued and curved applied on top of the pauldron. The edge seam is not the same as ANH ones. Mark, if you watch the whole "Anatomy of a Dewback" series (you probably have) there's a few good looks at some of the SE TD gear. http://www.starwars.com/video/view/000322.html
-
Check out the high res SE screen caps here http://www.looksirdroids.com/hd_caps/index.htm And the SE backpack if you plan to make one http://www.looksirdroids.com/backpacks.html
-

Droid Evidence
pandatrooper replied to The Dirty Trooper's topic in Pouches, Pauldrons, and other Accessories
Check out the original used in the film from the Kurtz Joiner archive (upper left pic). http://www.kurtzjoinerarchive.com/starwarsarchive.html Its actually not as cone shaped as I thought. Looks a lot like a bearing seat of some kind. -
10-66 For "blast the Jedi in front of you"
-
Posting Recognition.....How do you guys feel about it?
pandatrooper replied to DirtyBoy's topic in MEPD.net Feedback
I personally don't care much about post count. Quality and content of posts are more important to me than quantity. I've seen other boards use rep points which are given by your peers. I think thats a better approach than post count, but thats just me -
New addition to my weapons - T21
pandatrooper replied to redcoat's topic in T-21, DLT-19, RT-97c Heavy Blasters
Looks very nice, glad the tutorial was helpful can't wait to see it painted up / weathered. -
I think this illustration is clearly based on fan costume photos. Look at the TD on the left, his electrobinocs are the Radica sub game plastic toy, modified to be binocs!
-
I approached the detachable radio face plate 2 ways: On a recent backpack commission build, I simply made an aluminum bar that ran across the width of the inner radio box, and attached to the insides of the box with L brackets and rivets. The bar was positioned just under the radio faceplate. The middle of the bar was tapped with a threaded hole where it lined up with the radio knob on the outside (the knob on the left). The customer was in a bit of a rush so for the knob I simply used a bottle cap (the green ones shown here are caps from a pump paintball storage tube), but you can easily drill a hole and glue the threaded bolt to whatever knob you are using. Now simply screw the knob into place over the radio faceplate and it will be held securely in place. This knob with the bolt glued in place is shown in the first photo, threaded end pointing up resting on the bar. There is no way the faceplate will come off unless you unscrew the knob. One my personal pack, I used a slightly different method. I bent an aluminum L bracket and bolted it to the inside of the radio box. The bolt is hardly seen as it's up against the cistern and the bolt is painted black. At the end of the L bracket is a steel washer bolted in place. This is one half of a "rare earth magnet cup and washer" set. This amplifies the clamping power of the rare earth magnet by quite a bit. The magnet and washer are simply bolted in place through the faceplate and into the knob on the outside. This setup takes slightly more time to line everything up, but it's rock solid. You need to pull the face plate off with both hands with effort, and it has never every fallen off. It's that strong! I use it to store legion PR flyers and giveaways for kids.
-
I use a longer strip of green welders shield plastic held in place by the ear screws. Use the resistance of the curve of the plastic to hold it in place
-
Very nice work!
-
I think the toolbox was just named "toolbox", much like the bee stinger etc. I have a theory that the "exhaust port" part was either an interior engine part (like a fuse box or the like) since it has tabs for mounting to some surface, and the tube sticking out is likely for wiring. I think it could also be an electrical conduit box. Check out this modern one.
-
Unlikely you will find all the parts you need separately made from the same color / finish in plastic. I would buy it together from a reputable maker and avoid ebay.
-
Using bondo to remove extra seams from shims
pandatrooper replied to murdock's topic in Sandtrooper Armor
Bondo won't work. It will crack. The best you can do is have a support piece glued behind and have your shim sit flush with the surface of the ab / kidney armor. -
Hey, our Rolf...the Sandtrooper monster...has Birthday
pandatrooper replied to DarthChridan's topic in Off Topic Cantina
All the best Rolf, I hope you had a great day! -
I would think for deployment and trooping its ok. But for swat it should be the proper way.
-
Get cracking sandy bros and sistas! http://www.501st.com/forum/viewtopic.php?t=65426&highlight=
-
The filter rows are vertical in the rectangular filter.
-
Thats a totally different pack / filter. One pack has the round filter, the other has a flat square filter.
-
RT Mod is based in BC, and AP is based in Montreal (I think). I'm in BC and I currently have ATA armor. I have dealt with RT-Mod before. Great service, great guy. He is an airline pilot and makes armor for fun, so he does them in batches and it might take some time to respond, but he always does. His stuff is ABS, slightly bigger in size for bigger troopers and ABS. AP is derived from the TE / ROTJ / tour suit lineage and also in ABS. I have purchased an AP helmet before and while the helmet was decent, the rubber trim, mic tips and lens were not the best quality, plus I got destroyed on shipping (even though it was within Canada). He was also quite slow with delivery. You can read some points re: armor suppliers http://forum.whitearmor.net/index.php?showtopic=11538&st=0 My personal opinion: if you are of typical trooper height (5'8" - 5'11" and 140 - 180 lbs), get ATA ABS armor. Cost effective, great service and supplies accurate accessories. If you are a slightly bigger build, go for RT mod.
-
I use old backpack padded straps. They are comfy, complete with sternum strap. Just cut them off the pack (undo the upper stitch seam to utilize the full length of the strap material), then wrap the straps around the upper pack frame and pop rivet the strap shut. The lower end of the strap can wrap around the lower side of the frame. Make sure the strap sits under the lateral flat bars for the seed trays so that it supports the weight of the pack.
-
No weapons? The Tantive IV was clearly shooting back at the Star Destroyer in ANH.
-
you can use regular testors or testors Model master http://forum.whitearmor.net/index.php?showtopic=8117&pid=191395&st=0entry191395
-
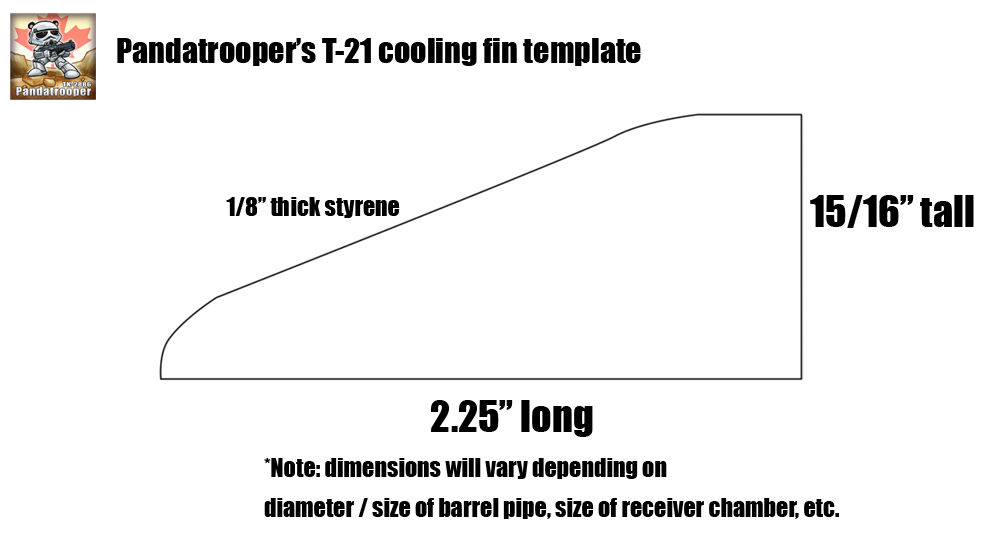
How to: T-21 Blaster scratch build
pandatrooper replied to pandatrooper's topic in T-21, DLT-19, RT-97c Heavy Blasters
My "fins" are 2 1/4" long and just under 1" tall (approx 15/16"). The exact size will vary depending on what materials you have used for the receiver and the large outer barrel. The rear sight is 4" long including the coins / knob on the front end, and is about 3/4" wide.
-
Personally, I would take the front of the shins apart, and use a slightly wider cover strip to join the halves, thus expanding them. Tape some temporary ones in place to see if they will wrap around. You could extend the backs too. If it's too much work, I would suggest getting new shins or bigger ones (RT mod or AM are bigger).
-
Let's be clear: Andrew Ainsworth did NOT design the Star Wars Stormtrooper. Ralph McQuarrie did (there are dated sketches), along with sculptors Liz Moore (who died in a car accident before ANH came out) and Brian Muir sculpted the armor. John Mollo (costume designer) also contributed to the creation and design. AA did the vacuforming, that's all. Let's prevent misinformation and don't give credit to where it's not due. Thank you.