

firebladejedi
-
Posts
214 -
Joined
-
Last visited
Content Type
Events
Profiles
Forums
Everything posted by firebladejedi
-
Original TD belt material.
firebladejedi replied to iconoclasta_88's topic in Pouches, Pauldrons, and other Accessories
If your're going to bleach it i would suggest you use thin bleah and dilute it in plenty of water or you will most likely ruin the cargo strap. Fill your bath with about 6 inches of water and add a litre of thin bleach to the water and make sure that the whole of the strap is under the water. Leave for a couple of hours and it should be good to go, just needing a rinse in fresh water. -
Blimey thats pretty full inside there, but looks the biz
-
Well done Dave it was nice to meet you the other week at the Space Centre
-
I feel for those guys who lost their weapons, they are not cheap.. Im trooping in Belgium next month and will be driving through France and Belgium, i think i will leave my blaster at home now
-
Star Wars and LFL official presentation at Mexico.
firebladejedi replied to iconoclasta_88's topic in Tours of Duty
Awesome i bet you had a great time -
Hey Rolf being brave and adding those extra details really pushes the bar on accuracy dont you think
-
Some of my suits i glue the strap at the rear and use snaps at the front and some i put snaps both front and rear.
-
Your builds just keep getting better and better Rolf. Awesome work here dude
-
Here he is with his ANH cousin and my small collection of helmets
-
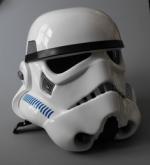
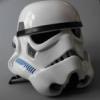
Ok you dirty lot i know this belongs at the FISD but i know you can appreciate a nice looking tk lid I got this helmet kit from my good friend Rolf aka TD 252 a while back and have finally got around to finishing it in ESB style. I had a bit of help from my other good buddy StukaTrooper aka Pete, thank you very much and ps it was nice to see your clone progress.. that is going to look totally awesome Anyway back to the helmet, i finished this using ESB decals from Mike TK 4510 and Keiths hovi mic tips replica's and painted the frown and vocoder satin black. The inside is finished in the usual sparce fashion with star shaped foam, green welders lens and elastic chin strap..
-
Bloody well done mate, thats excellant
-
I look forward to seeing your armour all dirty, it will be a work of art, thats for sure
-
Your helmet looks totally awesome there brother
-
Following the instructions i let the dye dry in between coats and carried on adding coat after coat. The shoe dye still did not cover the boots very well. This is after 4 coats, not much change. In total i used 2 full shoe dye kits and that equates to about 10 - 12 full coats of this dye over the time frame of about a week or so. This is not a quick process. After i used all the dye the elastic in the boots were not totally covered by the white and to be honest neither were the boots. So i used a little white shoe whitener which was slightly better. I also gave the boots a quick going over with this too. Here are the finished results. Now when i removed the masking tape from the soles of the boots the shoe dye started to peel off with it. It was like a latex covering which was a top layer on the leather rather than actually dying the boots. After all the time and effort i was not so impressed. Overall i was not that impressed by this particular brand of shoe dye and would not recommend using it, there must be a better product on the market to use to convert black leather Chelsea boots in to Positive Grip Stormtrooper boots. I may yet remove as much of this as i can and try spray paint. They do however look very close to the real deal and some of the dye rubbed off after a 4 hour troop where the armour rubbed and so for accuracy sake they turned out really well. My boots are the top picture and the original costume boots are the bottom picture.
-
Ok whilst making my new TK costume i wanted to go all out and get as close to screen accurate as possible. This obviously involved getting an old pair of black Chelsea boots and painting or dying them white. After a little searching and research the closest boots i could find that would be up to the job were these British made boots by Jones the Boot Maker. They are not 100% due to the toe being more rounded than the originals which were more square, but they are really close. I have seen people use white spray paint and shoe dye and i thought to myself, do these shoe dye kits really work on black boots turning them white? So i thought the only way to find out is to give it a go. Here are my results. I decided to use this brand of white shoe dye, widely available on the internet. Tarrago Self-Shine Color Dye and preparer. It comes with everything you need, colour dye, preparer, a little brush and a small sponge. And of course instructions. I followed the instructions to the letter, first using the preparer to remove any shoe polish and dirt and grim. It states to do this use a scourer pad to agitate the surface. Next up is to mask off the sole of the shoes. Then following the instructions i started to apply the shoe dye. In the instruction it suggests using the small brush included to dab the colour dye onto the small sponge and work in small circles slowly working around the boot. At first this did not seem to work very well, the shoe dye just did not want to take to the black leather. This photo is after 2 coats.
-
Nice mic tips Keith
-
You have some cool projects on the go there my Dutch friend
-
As everone else said, your looking really good there Steve
-
EVO did a version with the cut outs, although i an not sure if he made them widely available?
-
Just spotted this one Happy Birthday Mike, i hope you had a great day
-
5 sets of Keith's tips???? You must have a lot of helmets to build up hey Rolf?
-
Is that a MP44 canvas hip pouch?
firebladejedi replied to RoCKo's topic in Pouches, Pauldrons, and other Accessories
Great spot i needed to add some bodge tape to my tm armour and this is it Well done Rocko on finding another pouch for us to search for. I guess prices will be rising soon -
Wow Rolf your build threads are always great to see. I learned a lot from watching your threads. So i shall open a Carlsburg or 2, and sit back and enjoy your artwork Cheers mark.
-
Every time i see pics like these i think, wow I will have to see how much air tickets to Hawaii are lol..
-
Those Jedi you were with looked a bit wooden