
Leaderboard

Popular Content
Showing content with the highest reputation on 07/21/2020 in all areas
-
List of components: "shotgunshells"/"capacitors" mortartube radardish backing plate radardish greyish-blue bottle toilet plunger cap Shires UP 90 vintage toiled syphon "beestinger" Gio´Style bottle - I think most people believe this to be a canteen sold by the Italian company Gio´Style in the seventies, it´s called the "Safari 600" and original vintage bottles can still be found for a reasonable price on ebay. If you are too lazy too go for a treasure hunt, there´s also a modern version by a company called "Lionstar" which looks almost identical, here´s a comparison pic: These Lionstar canteens are available through our own member of the command staff M4vrick, feel free to contact him. The best way to attach the beestinger is to take the outer shell apart and remove the inner bottle, be aware that the styrofoam inside, which is meant to keep stuff warm and cold, will be quite messy to remove. Use a screwdriver and gentle force to take it apart, a heat gun might be useful too, to loosen the glue. The canteen will be attached to the lower grey seedtrays via an aluminium bracket, this is easy enough to make yourself. Look at the dimensions carefully to get the adjustment right. I have used a threaded rod of the size M4, drilled holes into the bottle and attached it to the bracket using some lock nuts. I guess the paint scheme of the bottle itself is quite clear. The bracket should be painted satin/matte black with some of the paint being scratched off. Please look at the reference pics again.2 points
-
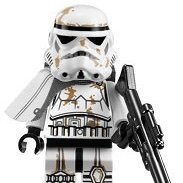
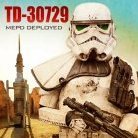
Brian, let´s go! Application Review: Part 2 Name: Brian Hannah Legion ID: TD-35500 Forum Name: Lukris Garrison: UKG ISS Helmet a. Green lenses: check b. Paint color of traps / tears: check c. Correct number of teeth: check d. Mic tips: check e. Vocoder color: check f. Tube stripes: check g. Rank bar on ears: check h. Brow: check i. Side screws (ears): check j. Weathering: check k. no mesh behind teeth: check *additional comments* RESULT ON HELMET Checked & Cleared Armor details a. elastic straps shoulders: check b. neck seal: check c. black undersuit: check d. shoulder bells: check e. biceps: check f. forearms: check g. pauldron: check h. chest / back plate: check i. kidney / butt plate: check j. ab plate / side rivets / cod: check k. strapping system: check l. thighs: check m. shins / calves: check n. sniper plate: check o. boots: check p. gloves: check q. hand plates / guards: check r. ammo belt (waist): check s. ammo belt (right knee): check t. canvas belt: check u. pouches: check v. weathering: check RESULT ON Armor Checked & Cleared Backpack a. details: check b. weathering: check *additional comments* RESULT ON Backpack Checked & Cleared Weapon a. details: check b. weathering: check *additional comments* RESULT ON WEAPON Checked & Cleared Brian, this was you’re second and final review, great work, congrats brother! You have successfully followed the guidelines in regards to the MEPD CRL and have met the requirements, be proud of yourself. Now, you are a member of the Police Officers, the Elite Troopers of Tatooine! Please send the pic you want to use to Luis (Sandman Tigui) and we'll get you squared away. We will have your updated information uploaded into the MEPD system very soon. Congratulations on becoming a Deployed Officer of the MEPD! Now please report to the Mos Eisley Mess hall where you'll serve the troopers until the next newbie gets cleared. Bigwam - MEPD Deployment Officer2 points
-
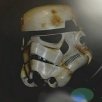
The fourth helmet i had built in the last few weeks is the "stop that ship" helmet aka "Docking Bay 96 V2 - Tuck & Roll". For this helmet there are good pictures, that can help to built them. Some Detail Pics: Some Film Pics: And a Link to the original helmet: http://www.starwarshelmets.com/original-stormtrooper-stop-that-ship-helmet.htm1 point
-
Amazing work Wayne, down to the tiniest little detail. After having this one finished, you can still build the Bapty variant... would probably be a piece of cake for you compared to this.1 point
-
List of components: "shotgunshells"/"capacitors" mortartube radardish backing plate radardish greyish-blue bottle toilet plunger cap Shires UP 90 vintage toiled syphon "beestinger" - this part hasn´t been identified yet, but feel free to use whatever you want as long as it looks right, cable or tube... The outer diameter should be around 1,5 cm. The lower end seems to be cut at an angle as I have done with my own pack: How you want to attach it to the Gio´Style bottle is up to you, with my second pack, I have used thick EVA foam, punched out a hole with the same diameter as the tube and glued the "beestinger" in. I then cut the remaining foam to the right size to fit into the lower part of the canteen, which I had freed of its innards previously. See more on that in the next point about the canteen.1 point
-
Well then... Congrats Brian!1 point
-
List of components: "shotgunshells"/"capacitors" mortartube radardish backing plate radardish greyish-blue bottle toilet plunger cap Shires UP 90 vintage toiled syphon Unfortunately prices are going sky-high for these vintage toilet parts at the moment... There were two variants of these syphons used in the film, one being the UP100 and the other one which you will find on this particular pack is the UP90, which is a tad bit shorter, this is what they look like: Inexpensive replicas of the UP100 can be bought from Ross Walmsley from RWA Creations, they are made of HIPS, very light and sturdy but can be a handful to assemble. They have to be cut down to match the shape of the UP90 on this particular pack. Some of the original syphons had "Made in England" written on them but the version on pack#3 doesn´t, either it was the version without the writing or they just covered said writing with some tape in order not to spoil the illusion. Remember to get the angle right and by any means, don´t cut off the threaded section at them bottom as it is visible in the film.1 point
-
Yeah mate, looks great and suits you well. I think I´ll be congratulating very soon.1 point
-
Hi guys Here is the new pics with pack #5. Sent from my SM-G975F using Tapatalk1 point
-
Bit more done today... Sent from my iPhone using Tapatalk1 point
-
Looks good!1 point
-
Nice Blaster! When I‘m finished with my Sandtrooper I‘ll definitly build one myself! Cheers1 point
-
List of components: "shotgunshells"/"capacitors" mortartube radardish backing plate radardish greyish-blue bottle toilet plunger cap made of rubber (it´s also possible to use a vacformed cap, it just has to look the same and shouldn´t appear too shiny.1 point
-
List of components: "shotgunshells"/"capacitors" mortartube radardish backing plate radardish greyish-blue bottle If you look at the screen references you may notice that the lower bottle looks slightly wider in diameter that the upper bottle. Such bottles are easy to find, I always source them from my local diy store in the car section, mine are bottles containing dashboard wipes. In the following picture you can see the lower bottle with the larger diameter on the left and the upper bottle on the right. These bottles should look rather grey than blue, I recommend using RAL 7031 in a satin finish to paint them, in the states you should be able to find some battleship grey colour. Note that the right one has already been weathered, thus the difference in colour.1 point
-
List of components: "shotgunshells"/"capacitors" mortartube radardish backing plate radardish: Lid from Pitcher, Mod. 874 (Tupperware) - transparent In the following picture, you can see the transparent one on the right and the white one on the left.1 point
-
List of components: "shotgunshells"/"capacitors": the source of this particular greeblie isn´t completely clear yet, however, as long as it looks right, it will work, this can easily be self-built, you just need some kind of plastic tube - with a diameter of around 2cm - and fill it with epoxy or putty adding a little "antenna" at the front, for this you can use wire. Here are some screen references. and this is what mine look like: there´s obviously a black plastic plate between these shells and the seedtray, it was probably easier for the prop department to attach them this way.1 point
-
So here are two pictures showing the components of this pack: In the next post you will find the list of components.1 point
-
Allright, let´s get this started. By no means do I consider this to be complete nor without certain grey areas that can be lively discussed in this thread by you all as soon as I have finished this and it´s open to the public to be discussed. First of all it has to be noted that there are different versions of this pack. These are worn by the following troopers (in order as they appear in the movie), here come the screen references: 1 Davin Felth in the "Look Sir, droids"-scene. Pack is still flawless in factory fresh shape/no tape/everything still holding together 2 The "Move along"-captain, portrayed by the great Anthony Forrest in the roadblock scene. The pack is already starting to come apart, tape is used to hold it together. 3 possibly also used by "Mr No-Brow"??? (he´s standing behind the trooper wearting pack#2) I think it´s possible because of the angle the radardish is mounted. 4 The Cantina Captain. Tape is used and a labpipe has been added. 5 The Captain in the Falcon-take-off-scene (spinning around). Looks like there´s even more tape used to hold the lower seed tray together, note that to me it seems that there is no more blue-grey visible on the right side of said tray. Next post will be a breakdown of the the components of this specific pack. Cheers mates1 point