Wook1138 Posted August 19, 2018 Author Share Posted August 19, 2018 A few mor things done. Finished off the helmet interior and some final sewing. Thigh garter done. Shoulder straps. Elastic. I had my wife sew up these little white nylon tabs with a loop. I added Velcro to the backs of these and to the inside of my belt. Wired the nylon tabs to the small Spanish pouches. For the helmet I lined most of the interior with Velcro and added fans. The fans are Henry’s fans from Trooperbay. I didn’t bother with the switches and I don’t need the extra long wire. I added some weather stripping to help dampen sound (they kind of rest on the hovi mic bumps). Sent from my iPhone using Tapatalk Quote Link to comment Share on other sites More sharing options...
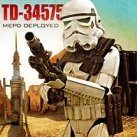
Wook1138 Posted August 19, 2018 Author Share Posted August 19, 2018 So, still waiting for my pack and I have a couple of other little things I’m waiting for. I also have to finish that T-21. But I went ahead and submitted pics for basic approval. Here are some pics. I have a few dressing issues and perhaps some strap fine tuning that I will revisit for upper level pics (arms keep riding up for one and my one pouch slide around), but I’m pretty happy with it. Let me know if I missed something. Quote Link to comment Share on other sites More sharing options...
Hausi Posted August 20, 2018 Share Posted August 20, 2018 Hey Greg, why aren't your pics visible in this thread anymore? I can only see them if I follow the link. Anyhow, everything looks great and I'm keeping my fingers crossed for a swift approval mate. 1 Quote Link to comment Share on other sites More sharing options...
Wook1138 Posted August 20, 2018 Author Share Posted August 20, 2018 7 hours ago, Hausi said: Hey Greg, why aren't your pics visible in this thread anymore? I can only see them if I follow the link. Anyhow, everything looks great and I'm keeping my fingers crossed for a swift approval mate. Thanks. Not sure about the pics. They show up fine when in edit mode, then disappear when I submit the post. Maybe I’ll try a repost to see if that helps. Edit: the original post works in tapatalk. I’ll assume there is/was an issue with tapatalk not playing friendly with the forum. Sent from my iPhone using Tapatalk Quote Link to comment Share on other sites More sharing options...
Wook1138 Posted August 20, 2018 Author Share Posted August 20, 2018 Sent from my iPhone using Tapatalk Quote Link to comment Share on other sites More sharing options...
TheSwede Posted August 20, 2018 Share Posted August 20, 2018 Verdict on approval: It’s a slamdunk! You look awesome 1 Quote Link to comment Share on other sites More sharing options...
Wook1138 Posted August 20, 2018 Author Share Posted August 20, 2018 And approved!! 1 Quote Link to comment Share on other sites More sharing options...
henselmonster Posted August 20, 2018 Share Posted August 20, 2018 Woo! Congrats! 1 Quote Link to comment Share on other sites More sharing options...
Hausi Posted August 20, 2018 Share Posted August 20, 2018 Great! Congrats! 1 Quote Link to comment Share on other sites More sharing options...
TheSwede Posted August 20, 2018 Share Posted August 20, 2018 Easy peasy welcome to the core Troopers in the Empire Quote Link to comment Share on other sites More sharing options...
DarthStevius Posted August 22, 2018 Share Posted August 22, 2018 Congratulations Greg welcome to the sandpit 1 Quote Link to comment Share on other sites More sharing options...
bigwam Posted August 22, 2018 Share Posted August 22, 2018 Congratulation!! 1 Quote Link to comment Share on other sites More sharing options...
CrookKnight Posted August 22, 2018 Share Posted August 22, 2018 Congrats. Looks awesome.Sent from my iPhone using Tapatalk 1 Quote Link to comment Share on other sites More sharing options...
Wook1138 Posted August 26, 2018 Author Share Posted August 26, 2018 Getting going on the T-21. It is a 3D print so I’ve been busy sanding and spraying filler primer. The kit doesn’t include all the greeblies so I ordered these from shapeway. The base part didn’t fit the arm so some trimming was needed. Glued together. This shows the difference between the finished surface and the original with print lines. I’m using the print lines to simulate the ribbed texture of the original Lewis guns. Original I had to remove some plastic to accommodate the rear swivel. Most of the parts are glued and ready for black primer. You can see where I didn’t filler primer the barrel for the ribbed effect. This is a version of the original Lewis gun. Some seem to have the texture extend further back, some don’t. I think it is the same as what is used in the movie based on how the light is reflecting in this shot. I’ll do black primer followed by gloss aluminum and a clear coat. This is my base. I’ll spray gunmetal and black on layer in light coats and rubbing it off a bit between coats. This gives a nice worn look. 1 Quote Link to comment Share on other sites More sharing options...
Wook1138 Posted August 26, 2018 Author Share Posted August 26, 2018 Sorry about the images - tapatalk has changed something so I will have to change how I post. I'm not good with change. Quote Link to comment Share on other sites More sharing options...
Hausi Posted August 27, 2018 Share Posted August 27, 2018 Looking great already Greg only thing I would change is add some fuel line instead of the corrugated tubing around the barrel. But maybe that's not possible anymore as I assume you printed it as one part? Quote Link to comment Share on other sites More sharing options...
Wook1138 Posted August 27, 2018 Author Share Posted August 27, 2018 Thanks man. Yeah, unfortunately it is printed as one part. Sent from my iPhone using Tapatalk Quote Link to comment Share on other sites More sharing options...
Wook1138 Posted September 1, 2018 Author Share Posted September 1, 2018 Painting T21 wood parts. sorry, the pics will probably only show in tapatalk. So I guess a person has a choice with the grips and butt of the T-21. black, or bakelite look, or wood look. I like the wood look so that is what I'm going to do. at the end of the day, it will be very dark so it doesn't stand out as wood - like most of the reference pics. I use a method of applying many washes of acrylic paint to make it look like wood. So starting, mask the area off. The black is primer. Paint white strips with various amounts of water. By the way, I'm using vallejo acrylic paints so water is the thinner. I even used my finger to run the white in to make the streaks. This base layer will dictate the direction and look of the wood grain. Now,this looks crazy but it works. I paint a bunch of different, bright colours in washes. I just slap it on any way, following the brush stroke direction of the white. This will give the brown washes, that I will add later, some more life and variation. I took 80 grit sandpaper to it and scratched it down to the primer and occasionally down to the black plastic below. I add a layer of light brown to neutralize things a bit. Then I sanded again very lightly. I started added washes of brown. Starting with brown mixed with red, and then brown mixed with black. Keep on adding washes of brown with various tones. My final wash was pretty much black to give the wood a nice aged look. then I removed the masking tape. ready for the next step - darkening the metal parts. Quote Link to comment Share on other sites More sharing options...
Wook1138 Posted September 1, 2018 Author Share Posted September 1, 2018 Backpack. So to get PO approval, a trooper needs a pack. Although the Docking Bay captain does not have one, the Cantina Capt does, so I purchased a #3 (standard) backpack from CrookKnight. He had a May 4th sale that made it too hard to pass up on. Anyway, the pack arrived today. The pack came very well... packed. Took me awhile to get to the actual pack. However, as impressive as the packing efforts were - it was no match to the brutality of the Post. The plunger head came off - which is fine since it should be mounted at a bit of an angle anyways (which I was going to do if not done so already). One of the seed trays was cracked on the bottom. Again - a little black tape and it will look probably even more screen accurate. A screw for the canteen fell out. I found the screw in the packing, but realized it was probably a little too short anyways - so I'll put in a longer one. I do have another canteen to replace the 3D printed one at some point down the road. So anyway, the pack is pretty sweet. It saved me a ton of work of finding and putting this stuff together. That said, I might make a few changes to make it more screen accurate. I'm not taking this pack to SWAT (if that happens), so I won't go really crazy. I have no idea what is actually required of the pack for PO but I guess I will find out. The changes I might make are: add small disc to top of lab pipe (upper left circle in pic) mount the plunger at an angle (dashed line showing exaggerated orientation) cut the mortar tube down a bit or lower the whole thing if possible. the white caps are 3D printed, I have ABS ones if needed. I might augment the bee stinger and make it a bit shorter (lower mid of pack) the radar dish (?) or tupperware lid needs a black backing to it and should sit a little lower on the mortar tube. As you can see, a few things are a little high or a little low compared to the reference pic. But I really can't complain, I could just weather this guy and go. Quote Link to comment Share on other sites More sharing options...
TheSwede Posted September 1, 2018 Share Posted September 1, 2018 9 hours ago, Wook1138 said: sorry, the pics will probably only show in tapatalk. Quote Link to comment Share on other sites More sharing options...
CrookKnight Posted September 1, 2018 Share Posted September 1, 2018 Sorry the pack got a little beat up during shipment. I appreciate the feedback on the pack. I did just start making the mortar tube a little shorter. Is there really some sort of disc on top of the lab pipe?I am starting to get a constant shipment of actual canteens from Vincent that I am using on the packs. It just takes a while for them to be shipped to me.As for the end caps I am finally getting around to making a mold so I can vacform them from ABS . Your armor looks great. I have almost finished mine.Sent from my iPhone using Tapatalk Quote Link to comment Share on other sites More sharing options...
Wook1138 Posted September 1, 2018 Author Share Posted September 1, 2018 5 minutes ago, CrookKnight said: Sorry the pack got a little beat up during shipment. I appreciate the feedback on the pack. I did just start making the mortar tube a little shorter. Is there really some sort of disc on top of the lab pipe? No worries - not much one can do about the shipping. You packed it about as well as anyone could. That is great news about the mortar tube. Yeah, someone recently got called on the shape of the lab pipe. Thanks Shawn. Looking forward to seeing the finished armor! Quote Link to comment Share on other sites More sharing options...
jcalus Posted September 1, 2018 Share Posted September 1, 2018 That is a cool idea for painting the butt stock. Sent from my SM-G930W8 using Tapatalk Quote Link to comment Share on other sites More sharing options...
Wook1138 Posted September 1, 2018 Author Share Posted September 1, 2018 On 8/27/2018 at 5:58 AM, Hausi said: Looking great already Greg only thing I would change is add some fuel line instead of the corrugated tubing around the barrel. But maybe that's not possible anymore as I assume you printed it as one part? Hey Urs, I meant to ask - would the corrugated tubing look be ok for SWAT or would I have to use fuel line (or similar tubing). Quote Link to comment Share on other sites More sharing options...
Hausi Posted September 2, 2018 Share Posted September 2, 2018 Hi Greg, corrugated tubing is good for PO but not for SWAT, although we cannot say what they really used, whether it was fuel line or some other rubber tube, it seems like the shape of corrugated tubing is not right as the gaps between the wraps look too big. Furthermore in the screencaps you can see that it doesn´t look as evenly spaced, you can also see that the wraps aren´t completely straight but rather sloping as it naturally would be if you wrap something around the barrel. In this last picture I believe to identify a bulge where the tube was wrapped around the black cable that runs along the sides and has the blue wire wrapped around it at the front. Quote Link to comment Share on other sites More sharing options...

Recommended Posts
Join the conversation
You can post now and register later. If you have an account, sign in now to post with your account.