IronTusk Posted August 15, 2014 Share Posted August 15, 2014 Same color I used. I think it looks really good. Here are my results: Quote Link to comment Share on other sites More sharing options...
Baron Posted August 15, 2014 Author Share Posted August 15, 2014 Yea, that does look good. I would suggest using a flat black on all your stuff though. I had originally used gloss to, but it looks better, especially when you weather it, to be flat black. But judging by your one picture here, it is looking awesome!!! Quote Link to comment Share on other sites More sharing options...
IronTusk Posted August 15, 2014 Share Posted August 15, 2014 Well I'm doing an, gulp (starts sweating), HWT. So that's why I used gloss. Quote Link to comment Share on other sites More sharing options...
Baron Posted August 18, 2014 Author Share Posted August 18, 2014 Another small update. I modeled and printed the three knobs and the side strap mount. I am going to cast them so I can make them available as kits for those who don't have them. They are made to fit on the Trooperbay faceplate. They need a little clean up, but after being cast and poured, they should look pretty clean. I only printed one Strap mount. Slowly trudging along...... Quote Link to comment Share on other sites More sharing options...
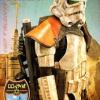
Baron Posted August 21, 2014 Author Share Posted August 21, 2014 A radio update. I have modeled, printed and cast the knobs and strap mounts. The paint is still a little wet here in these pictures, but I think they turned out alright. Most of the imperfections will not be noticeable from a short distance, especially after weathering. These were originally cast in white Easy Flow 60 then painted flat black. However I poured a set last night in Smooth-On Black Onyx resin and they look pretty good. Pictures to follow. If anyone is interested in a knob and strap mount kit, lemme know. I know there are a few guys here who sell this stuff also so not trying to take away from them, but if you guys are out of stock or not doing a run, I usually can And here are my back pack straps. I went to Doughboys, it's a modern military and hunting accessory type place, and bought some nice padded back pack straps. Had my wife sew in some 1" slide clips. I added snaps around the top bar. Doing my best to not make them permanent and the snaps hold really well. For the bottom, I punched a little hole in the end of the strap and put a small steel eyelet that I had from some old leather stuff I used to do to add strength, then used two of the bolts that I attach my seed tray to the frame and it fits perfect! The safety pin is there cause I am gonna put a small piece of Velcro there to help keep the Pauldron down and not stick up. I hate that!!!! So aside from the Bee Stinger part, I am nearly done with the pack. I am working on modeling it in two parts so it should be easier to pull on a table. Also trying to make it with the taper that can be seen in all the Hi-Def pics of it. I will post pics of the progress once I have some to show. Move Along, Move Along.... Quote Link to comment Share on other sites More sharing options...
TazVader Posted August 21, 2014 Share Posted August 21, 2014 Loving your build mate. The strap setup looks especially comfy! Well done Regards T A Z Quote Link to comment Share on other sites More sharing options...
OnlineJeff Posted August 22, 2014 Share Posted August 22, 2014 Please send me a price for the knobs - I may replace mine at some point. Quote Link to comment Share on other sites More sharing options...
Baron Posted August 22, 2014 Author Share Posted August 22, 2014 Cool. Knob kit will be $20.00, with strap mounts will be $30.00. Thanks! Quote Link to comment Share on other sites More sharing options...
Baron Posted August 24, 2014 Author Share Posted August 24, 2014 And another little update. I more or less have the radio done. Need some switches, but I think that is it. I think the knobs and strap mounts turned out good. I have some sets almost ready to go. I have poured a few in black onyx so you don't really have to paint them. From here on out though, they will be smooth-on 300 resin. And here is the pack. Just waiting for my bee stinger to get here, but I still plan on modeling one at some point. In the very least, I may print a tapered top to put on it to better match the movie used one... Quote Link to comment Share on other sites More sharing options...
IronTusk Posted August 24, 2014 Share Posted August 24, 2014 Looks great! Did you have trouble with your lower wipes bottle not being sturdy? Mine would move around a lot so I ended up cutting a small diameter piece of PVC pipe to go between the top of the bottle and the inside bottom of the mushroom cap. Worked perfectly! Quote Link to comment Share on other sites More sharing options...
Baron Posted August 24, 2014 Author Share Posted August 24, 2014 No, not really any problems. I have the original cap on there and the bottle pushed up in it. I considered doing it a little different, but so far so good. Quote Link to comment Share on other sites More sharing options...
IronTusk Posted August 24, 2014 Share Posted August 24, 2014 That's how I had mine too. Followed scootch's tutorial with the little plastic "plate" plus the washer and nut, but the bottle would swivel around on the carriage bolt. Not anymore though with that pipe to prevent it from moving. I also had to relocate my mortar tube further back on the frame because my bottom bottle was coming into contact with my radar dish. Quote Link to comment Share on other sites More sharing options...
Baron Posted August 25, 2014 Author Share Posted August 25, 2014 I will snap a picture of mine, although it sounds like we did the same thing. Mine does not move. You can spin it if you grab it and turn it, but it is snug as long as your not futzing with it Quote Link to comment Share on other sites More sharing options...
Baron Posted September 4, 2014 Author Share Posted September 4, 2014 I did some weathering on the pack. I used the same GZ method for the most part and my wet rag, but for the radio and other corner areas around the pack I used the "dry brush" method. Like my armor, I was going for more of a Dusty, gritty sandy look, not so much "dirty" Let me know what you guys think! Quote Link to comment Share on other sites More sharing options...
ukswrath Posted December 18, 2014 Share Posted December 18, 2014 I know I'm a bit late to this party but great job on the back build Quote Link to comment Share on other sites More sharing options...
Dough Windtaker Posted May 27, 2015 Share Posted May 27, 2015 Awesone Quote Link to comment Share on other sites More sharing options...

Recommended Posts
Join the conversation
You can post now and register later. If you have an account, sign in now to post with your account.