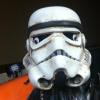
Orall Posted August 25, 2012 Share Posted August 25, 2012 So I've been haunting the forums for weeks now, and I've finally "finished" my build. I'm looking for everyone's constructive criticism. I can provide additional photos upon request. I'm going for a "Move Along" stormtrooper, for your reference. The armor is ATA-based, and it is a Dirtyboy pack. Does everyone else dirty up the gray traps? I had to repaint the lines better, but I did this after the weathering. Should I get them dirty again? I will also retake photos for application with a flat background. Disclaimer: Hip pouches are to be replaced with a special run of leather MP40 pouches. Biceps have can be easily lowered down the arm (if too far up). Front: Sides: Back: Backpack: Helmet: Inside Helmet: Ab Plate Button: Shoulder: Left-Side Ab: Gloves: No bucket and a happy me! Quote Link to comment Share on other sites More sharing options...
iconoclasta_88 Posted August 25, 2012 Share Posted August 25, 2012 Great armor Orall. Looking really good. And I really like how you have added many of the accurate details already like the rivets and snaps. Very good job! There are 3 things I can see from here: -looks like you put the tube strip stickers on the wrong side. The curve on them look weird cause they are on the wrong side of the bucket. That is no big deal to fix. Just need more decals. -You could cut in diagonal each corner of the belt. Looks a bit like rounded corners and they should be cut in diagonal. -the knee ammo belt is also cut in square angles on every corner. Tds have a rounded edge on both lower ends. I can send you a reference but not till Monday. And a final comment, that you can follow or not. The move along trooper has the handplates on the wrong side. Meaning the left on the right and the other way around. If you want and can do it, it would ad some more accuracy to your build. That's what I can see from my phone. Hope it helps. Saludos. Quote Link to comment Share on other sites More sharing options...
DirtyBoy Posted August 25, 2012 Share Posted August 25, 2012 Whoooo whoooo!!!!looking good man!!!! Quote Link to comment Share on other sites More sharing options...
SCRIBBLER Posted August 25, 2012 Share Posted August 25, 2012 Nice rig, Blake! Excellent attention to details. A few tweaks and you're there! Looks like it's paying off scouting the forums, right? What Garrison are you looking to hook up with? (If you aren't in the legion already, that is) Good luck with your legion designation and eventually MEPD deployment! Quote Link to comment Share on other sites More sharing options...
iconoclasta_88 Posted August 25, 2012 Share Posted August 25, 2012 So, none of us 3 went to Celebration, right? Lol!!!! Saludos my brothers. Quote Link to comment Share on other sites More sharing options...
SCRIBBLER Posted August 25, 2012 Share Posted August 25, 2012 @ Juan - lol Um...I was reprimanded for letting some wanted droids get past our roadblock, So yeah, I wasn't able to go. Hopefully we'll all get to go to the next one and take an MEPD Command Staff pic! Quote Link to comment Share on other sites More sharing options...
Orall Posted August 25, 2012 Author Share Posted August 25, 2012 @iconoclasta_88 I'm actually irritated at myself with the helmet. Quick backstory (and a bit embarrassing). I painted with a non-testors paint initially, using a template. Well lucky me, the template came undone halfway through painting, and the stripes became garbled. Stupidly, I let it dry. After a few days seeing my botched attempt, I began to remove the paint. To my horror, the paint didn't come off clean, but actually began staining the nearby white ABS. Badly. It looked so horrendous on the nearby area, that I had to end up sanding the tubes down to remove the paint. I lost the sheen, and no amount of buffing could bring it back. I tried to repaint the tubes with Testor's this time, and still did not like my results. Chock up to a few other irritating factors (to me) on my helmet, I will probably end up buying a new ATA helmet in the future to redo it. Sob story over. On the belt, I had never noticed that until just now for closer inspection. Evening project! I'll wait for your reference on the thigh ammo belt. I think I understand what you are saying, but I'm having difficulty finding reference. I learned about the hand plates being backwards after I had zapgapped mine a few weeks prior. If I pull the rubber plates off, it would probably destroy the rubber gloves, correct? Not a big deal, but for the time being I am going to let it slide...for now. @Dirtyboy I owe you thanks. Your pack looks so much better. For laughs, this is what I was going to roll with originally. I made it while I was waiting for my ATA armor to arrive, and looking back, I don't know why I thought the "extra" stuff was a good idea. I salvaged what I could use, and the rest is in the recycle. @Scribbler I'll be shacking up with Garrison Titan (Seattle area). I live about 20 miles outside of Seattle proper, but it's definitely the closest. I'm actually debuting my sandy at PAX Prime next week. I've submitted my approval to my local garrison, and hopefully it's enough time. If not, I'll be happy blasting Rebel scum by myself. Quote Link to comment Share on other sites More sharing options...
SCRIBBLER Posted August 25, 2012 Share Posted August 25, 2012 @ Orall - You can still save the bucket! Or just leave it so it has character. I would just prep it again with primer and repaint, buff and shine if you aren't happy with it. After I weathered my helmets, I just shot them with a glossy clear coat to give a little shine to it as well as seal in the weathering details. Works for me! Good luck again with your application to Garrison Titan and hope to see you in the Officer's Club here soon! Quote Link to comment Share on other sites More sharing options...
Orall Posted August 25, 2012 Author Share Posted August 25, 2012 I so love free weekends from the girlfriend. I already made some slight adjustments, after snooping more. Belt - 1" straight corners, sanded. Thigh Ammo Belt - 1" rounded corners, sanded. Here is a close up on the helmet damage. I can reprime and paint the helmet after PAX. I am not going to try and rush/redo it in 6 days. What is the thought on stickers vs handpainting? I wanted the painted look, but my hand isn't steady enough I feel. What are people's experience re-priming sections of the helmet? The rest I feel looks well enough. Just the tubes are really irritating to me. Last question, because honestly I've seen several ways. Shoulder bells still have a bit of a lip on the edge. I have seen no edge, and some edge. Is there a calling either way? I'm worried how it will sit on my should if I alter it. Right now, with the lip, they are sitting great. Quote Link to comment Share on other sites More sharing options...
SCRIBBLER Posted August 25, 2012 Share Posted August 25, 2012 @ Orall - Why don't you try this... CLean off the stripes again. If the area is too stained for your liking still, you can paint over the tube stripe section white once more, prep (mask off) and re-weather it then apply these decals: http://trooperbay.co...-helmet-decals/ I use them on my ATA and my CAP buckets. Your traps look fine, by the way. You can always tweak them a bit later. Hope this helps a bit! Quote Link to comment Share on other sites More sharing options...
Orall Posted August 25, 2012 Author Share Posted August 25, 2012 I'm house sitting all next week, which means I have plenty of "just me, myself and armor" time. I'll try it then. Does Testor's come off with soap and water, or with paint thinner/goof off? Quote Link to comment Share on other sites More sharing options...
SCRIBBLER Posted August 25, 2012 Share Posted August 25, 2012 Give the paint thinner a try. Not too much, though. Hope that works for you! Quote Link to comment Share on other sites More sharing options...
Sandman Tigui Posted August 25, 2012 Share Posted August 25, 2012 Looking good Orall, with a bit more patience you still can rescue the bucket and make it thru. Don't loose your cool keep the good work up. Quote Link to comment Share on other sites More sharing options...
DarthAloha Posted August 25, 2012 Share Posted August 25, 2012 Looking good dude.... Here's a good shot of the curve of the knee pack. Looks like you nailed it. And here are some non Sandy reference photos for knee pack placement. Oh and a handful of sandy screen caps... but not enough/all. By TK standards your knee pack should be lowered a bit so that the fastener is in the bottom ridge of the thigh. I'm not sure what the MEPD standards are (but they're generally more strict than the clean white world) but over on FISD we require for Centurion that the fasteners that hold the knee ammo pack (whatever its called) be a cap or split rivet with a flat head with no hole in them. You could fill in your rivets or redo with plit rivets. I'm pretty sure the shoulder bells had very little return edge on screen used suits. They sit nicer over your bicep if you trim them. Here's a photo from the lucasfilm archive (the bell on the left) of an actual bell: Aloha, -Eric Quote Link to comment Share on other sites More sharing options...
DarthAloha Posted August 25, 2012 Share Posted August 25, 2012 You know... I might very well be wrong about the return edge for a TD bell... at least not for all... check this out from the bluray bonus material: However... move along looks like his bell sits flat on the bicep. Aloha, -Eric Quote Link to comment Share on other sites More sharing options...
DirtyBoy Posted August 25, 2012 Share Posted August 25, 2012 Im honored to be part of the process man....love seeing my packs on so many troopers I would go with the decals for the tube stripes....at least for now. You can always change later on if you wanted. Sometimes you gotta just cut your losses and repaint using the appliance epoxy. Then start over...looks like you can get it fixed though Quote Link to comment Share on other sites More sharing options...
Orall Posted August 25, 2012 Author Share Posted August 25, 2012 So here is what I decided on "stripemegedon". I ordered move along stickers from trooperbay today. If I'm very lucky, I may get them mid next week. Dirtyboy's comments spoke true for now. Until they get here, I'm not going to touch it for now, because I want it still viable for PAX. If they show, I'll attempt it. @darthaloha That's funny, because that is the same reference photo I went to. What is the calling for shoulder bell lips on the "move along" trooper? It's not a hard alteration by any means, but if it isn't broken, I don't want to fix it...yet. What is the viability of removing the hand plates after being zap gapped? With it destroy the rubber? Quote Link to comment Share on other sites More sharing options...
iconoclasta_88 Posted August 25, 2012 Share Posted August 25, 2012 Hey Orall. Seems that you are movimg foward fast and in the right direction... Using the trooper bay decals ias a great choice. I have ghem in several of my buckets and used thme in some others i have constructed. Even when I go hand painted, I try to use their masking templates. The mistake you did on your tube stripes was just not masking it correctly. I can see now the detail and although they are not bad, they could made to look better. For removimg the paint, I normally use testors thinner in a cotton swab. Just get a wet papel tower besides so you can use some thinner, remove some paint and quickly remove the thinner from the plastic. Should be mo problem. Being a perfectionist I have had to remove and repaint tube stripes, vents and teeth dozens of times and never have I had a problem. About the return edge on the shoulder bell, there might not me an exact way to do it that applies to every single armro on screen is you want to replicate it. Cause they all were trimmed and assembled by hand. But if you really want to replicate the move along trooper, ill send you some references on monday (I have the file at my office's computer). It does seem that you could sand a bit off from the return edge, and it will sit better around your bicep, but so far is not a big deal. About the knee strap, it is looking fine. But Eric is right, if you want to go more accurate, you should bring it a bit lower and use fla headed rivets or even split rivets. Anyway, unless you are going for SWAT that is no big deal, neither the placement or the rivets. But it would look awesome. About the handguards, same thing,unles going for swat or beeing an accuracy freak like some of us, ou are fine. Removimg them from the rubber gloves would most likely distroy the rubber. So, if you are going to try that, just get a new pair of gloves.gloves being around 5 usd and handplates around 30, i would say it is bettter to just get new gloves. Unless you dont want to fix that just now. Actually, as far as I know, there are only 3 troopers in the whole legion with the handgards in the correct placement for the move along trooper. Again, AFAIK. hope this helps. It is very exciting seeing the push you have to make your armor better from the start. Keepit that way! Let me know if I can be of any help. Saludos. Juan Quote Link to comment Share on other sites More sharing options...
SCRIBBLER Posted August 26, 2012 Share Posted August 26, 2012 @ Orall - What Juan said... lol Quote Link to comment Share on other sites More sharing options...
Orall Posted August 26, 2012 Author Share Posted August 26, 2012 I'll shoot for that after PAX. I'll be the fourth Quote Link to comment Share on other sites More sharing options...
Daetrin Posted September 11, 2012 Share Posted September 11, 2012 Sorry I don't post as much as I used to back in the day...I think Juan's comments were spot on. The tube stripes will need to be re-done, but I'd not be so picky to hold you back for that as they are an easy fix. The one item I will hold you up for is the fitting of the forearms. They look very Popeeye and this is not unheard of when people try to put them together as-is from ATA. Alas the right one is not the same as the left, and one really needs to trim both down to look correct if you have regular/small forearms. The biceps also look a tad big, but I'd almost want to see them in person or via different pix. You're friendly neighborhood GML... Quote Link to comment Share on other sites More sharing options...
Orall Posted September 11, 2012 Author Share Posted September 11, 2012 How do you know I'm not Popeye...yeah no sweat. I'll trim them down. Quote Link to comment Share on other sites More sharing options...

Recommended Posts
Join the conversation
You can post now and register later. If you have an account, sign in now to post with your account.