

Beren
-
Posts
361 -
Joined
-
Last visited
-
Days Won
5
Content Type
Events
Profiles
Forums
Everything posted by Beren
-
Yes, great idea. Perhaps we could begin each thread with the diagram that Rolf and Terry did, and then supplement the thread with details that we have each used and incorporated. I've got some material to include for my "unique" version.
-

*ACTIVATED* TD-3677 / LORD TRISTE / SWAT OFFICER # 020
Beren replied to Lord Triste's topic in MEPD S.W.A.T. Program
Congratulations!!! Your dedication and talent are commendable! I really enjoyed following your progress. -
Rick, Thanks for updating the CRL's. One thing I noticed (only because it relates to my SWAT build) is that the comment about allowing the cheese grater hand plates is listed beneath the "Gloves" section. Can it be easily relocated to the "Hand Plates" section to avoid confusion?
-
*ACTIVATED* TD-11038/ RHAPSODYRED99 / SWAT OFFICER # 019
Beren replied to rhapsodyred99's topic in MEPD S.W.A.T. Program
Omg, congrats!!! Well done! (I've replaced my "emptiness" by researching how to build an astromech! Hopefully, I will soon build the droid we've all been looking for). -
Grappling hook?
-
Quartermaster makes a nice LED display for his radios. Most radios have moving switches and knobs, but they are typically non-functional. And with a smart phone, you can play a loop of "radio chatter" which can be found on the 501st forum.
-
*DONE* TD-86079 Requesting Deployment
Beren replied to opi wan's topic in MEPD Police Officer Program
Wow! You guys in the German Garrison have a talent for Sandtroopers. Looks terrific!!! -
Great looking stuff! Definitely worthy of SWAT consideration. See you in the sandbox soon!!!
-
Great job posting the pictures! The build is coming along nicely. There are a few things you could change... the paint could be extended at the top of the vocoder, and the large return edges on the tops of your biceps could be removed. Don't forget to paint the rank stripes on your ears. I too have an AP kit if your looking for something to compare to.
-
I'm sure someone out there can provide actual "screen shots" for you, but I'll try my best to walk you through it... 1) While in Photobucket, click "Get Links" on the photo you want to upload. Next, single click the box beneath "Direct Link". You will notice a message that says "Copied". 2) Now, back on your MEPD post, click the "Image" icon. Paste (Ctrl V) the link into the box. You must do this for each photo. Try this out and let us know if you still need more (better) help!
-
Lars, Most of us upload our photos using a sevice like photobucket. Should be easy to do... and it's free.
-
We're all happy to help out here. Can you post a few more pictures and some close-ups? I think you'll find the support here very constructive. Good luck and enjoy your first build!
-
Great looking submission. The weathering may be washed out due to the photography, but your diamond knee looks a little too clean. I really like the chipped paint look on your helmet. Overall, really nice job... you should be proud! Looking forward to seeing the backpack.
-
*DONE* TD-6538 Requesting Deployment
Beren replied to Havoc6538's topic in MEPD Police Officer Program
Welcome to the cool-kids table! Awesome job!!! -
TD-4510- How to Build Accurate Stormtrooper Armor Series
Beren replied to TD-4510's topic in Sandtrooper Armor
What a great resource! Thanks for sharing Mike. -
*REVIEW IN PROGRESS* TD-8640 Requesting Deployment
Beren replied to Ardkorian's topic in MEPD Police Officer Program
Great looking build Glenn! Should be an "easy pass". See you in the cantina soon... -
Hoping the "coward" label doesn't stick since this is the trooper I have emulated, lol! I would like to suggest the following alternatives: 1) the evasive trooper, 2) the smart trooper, or 3) the live-another-day trooper. Notice, he's not alone back there! Your lab pipe, by the way, is looking nice. The center of my dish lines up with the button on the panel.
-
*DONE* TD-11038 Requesting Deployment
Beren replied to rhapsodyred99's topic in MEPD Police Officer Program
Great job Frank! I really like the detail work on your helmet. You've got a nice collection of builds in your signature and now can proudly show off your MEPD approved Sandy! Welcome to the sandbox. -
*DONE* TD-21112 Requesting Deployment
Beren replied to Vf2112's topic in MEPD Police Officer Program
Congrats!!! Welcome to the MEPD! -
*ACTIVATED* TD-3677 / LORD TRISTE / SWAT OFFICER # 020
Beren replied to Lord Triste's topic in MEPD S.W.A.T. Program
Wow! You're making great progress. Rosco seems to be enjoying this experience too. -
*ACTIVATED* TD-10072 / SAND DEVIL / SWAT OFFICER #018
Beren replied to SAND DEVIL's topic in MEPD S.W.A.T. Program
Congrats to come Ben! Awesome job... your armor looks terrific. Can't wait to see your profile pic next to mine! -
*ACTIVATED* TD-3677 / LORD TRISTE / SWAT OFFICER # 020
Beren replied to Lord Triste's topic in MEPD S.W.A.T. Program
I must admit, I find the props in your pictures very entertaining! Good luck with your SWAT application... you've got the support of the MEPD behind you! -
*ACTIVATED* TD-9389 / BEREN / SWAT OFFICER # 017
Beren replied to Beren's topic in MEPD S.W.A.T. Program
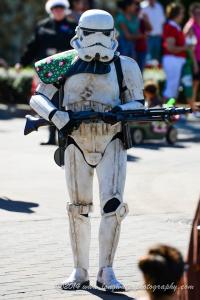
As promised Mike, here is my "extra credit" photo. I could have shifted my pauldron down a bit more to match the screen shot, but my photographer (wife) was getting eager to wrap things up! I did however twist the left shin, tilt the head, and get the blaster upside down. *Extra Credit: Would love to see a pic of you with the pauldron brought down in the front a bit and carrying the DLT-19 updside down as well! Screen Shot: Signing off and gearing up for the ready room. -
*ACTIVATED* TD-10072 / SAND DEVIL / SWAT OFFICER #018
Beren replied to SAND DEVIL's topic in MEPD S.W.A.T. Program
We're all rootin' for you brother! The stripes look MUCH better. Keep up the good work! -
*ACTIVATED* TD-9389 / BEREN / SWAT OFFICER # 017
Beren replied to Beren's topic in MEPD S.W.A.T. Program
Thanks Juan for your nice comments, and thanks for the guidance and help along the way. As I said in the beginning, I expected this journey to be a learning experience. Thanks to you and many others here on the MEPD, it has been a fun adventure!