

EDLITMUS
-
Posts
81 -
Joined
-
Last visited
Content Type
Events
Profiles
Forums
Everything posted by EDLITMUS
-
I'd also like to know what the latest word on this part is, I have heard so many options that I find myself wondering what the latest and greatest option is.
-
I'm in the same boat, just got the jello cups and now I find out they are too **** small...
-
Okay! I finally got the butt painted: I ended up trying for more of a bakelite look than the woodgrain. I like it, but I'd love some feedback!
-
It's a Hyperfirm. My scratch built one looks like rubbish and need a LOT more work.
-
Thanks! It has been fun working on all this stuff, and the MEPD has been a fantastic resource. Thank you all!
-
I just need to paint the butt and add a charging handle. I couldn't have done it without all the fine work all of you have done before me! More pics when it's finished!
-
That is simply amazing work!
-
I could swear I had access before... TK4544 requesting access, thanks!
-
Looks good, I just hope it helps people out!
-
Not at all, please do!
-
Okay, here's some pics of what I did. It's not the prettiest hack job, but it works great. Here's a pic of the first box, it's unmodded. Note that this box has the on/off switch: Here is a pic of the second, modded, box: I removed the on/off switch from the second box and soldered the red wire from the first box into the point where the on/off switch was connected in the second box (it's the little metal tab on the left of the pic). Then I connected the black (ground) wire from the first to the red from a 9V connector wire, and the red from the second box to the black from the 9V connector. That gives 12V output that I can hook up to the ROM/FX: No more changing batteries after 2 hours of trooping! Heck, I have been using the same batteries for the last 3 troops! It helps to have a volt meter to check the output, in case you wire up something backwards (like I did the first time I tried this ), that way you can make sure you got it right and not risk frying your ROM/FX.
-
I use the Testors 1138 also. Just because of the 1138.
-
I found some jodhpurs but they were all overseas and with the weak dollar they were more that I was willing to part with. I found a pair of these on ebay that are my size and are a good price. The elastic isn't as square as the ones on the product page I linked to, so I'm thinking they are a slightly different boot. Here's a pic: The only thing is they might be a little short, but I figure if they don't work for trooping I can just keep em black and have a new pair of boots.
-
After searching ebay for a good pair of boots I could paint to replace my CABoots (which I really don't like, they make my feet hurt something fierce!) I managed to find a pair of these: http://www.bananarepublic.com/browse/produ...id=514545&vid=1 They seem like the perfect boots! They need a paint job, but the price doesn't seem too bad for a good pair of boots. Anyone ever tried these?
-
Here are pics from the last day of the MSI Chicago Star Wars Exhibit. It was great fun having the exhibit in town and the crowds loved it all, especially the 501st and Rebel Legion involvement: http://www.flickr.com/photos/24078248@N00/tags/msi162008/ At one point we had a woman comment that she and her kids came out only to find the exhibit sold out, but it was okay because she and her children felt like they got to experience it all anyway because we were there! That is high praise indeed in my book!
-
I recently got off my lazy *** and took two 4xAA battery boxes and wired them up to make the output 12V DC. This fits nicely in the back of my RT bucket and provides the perfect amount of juice for the ROM/FX board. If anyone wants pics let me know and I can show you how it was done. Just some changes are needed to get it set up.
-
I got one of the last batch of ROM/FX kits (after having used a skullworx with a hyperdyne) and I am so happy with it! The ROM/FX replaces both the skullworks and hyperdyne, making my bucket a lot less crowded. One thing though: the ROM/FX works best using 12V DC. It'll burn through a 9V battery in no time flat, but with, say 8 AAs (12V) my unit has been used on several trooping events with the same batteries and with no problems at all. I will be looking into using AAA batteries in the future however, as getting 8 AAs in a RT/Mod bucket isn't easy! Great product, if pricey.
-
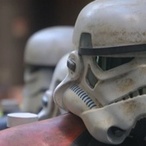
It was great fun to troop, I can't wait to go back as a civilian, if only so I can see it without a green tint.
-
My wife took this picture of me at the Chicago Museum of Science and Industry trooping event for the Star Wars exhibit and I thought some of you might get a kick out of it.
-
Thanks! I am reworking the shoulder pouch placement, not sure how I'm going to do it yet though. I repainted the mouth so it's not so dark and the proper color. Makes a huge difference, especially in photos. Now I just have to get that pesky pack going...
-
Thanks for the kind words! I put a lot of time on getting things just right. I'm glad it paid off! The 'teeth' on my helmet are grey, but they always come out dark in pictures. I guess I should repaint them, they are a bit dark. Now, on to collecting bits for the pack!
-
I just finished weathering my suit. I'd love to know what you all think! It was a lot of work but I think it paid off. Now I just need a pack...
-
Looking good bro! I'm getting close to finished with my armor, it'll be good to troop together as TDs!
-
I'd love to see a tutorial for this!
-

MP40 pouches ???
EDLITMUS replied to Captain4434's topic in Pouches, Pauldrons, and other Accessories
The leather was toast on my pouches after dying. Note to self: don't use stovetop method to dye stuff with leather attached. I got some leather strips from Hobby Lobby and a leather sewing kit and made new ones. There's an image at this link: http://www.flickr.com/photos/24078248@N00/540901539/ I managed to get some leather ones on eBay, but these will have to serve until they arrive.