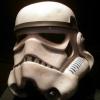
TrainWreck Posted November 4, 2014 Share Posted November 4, 2014 So while I'm waiting on my ATA armor to come in (late February/early March) I decided to go ahead and get my bucket. I eventually want to start a build thread but just haven't gotten around to it. Any hoo I'm working on recreating the "stop that ship" bucket. This one: I've almost finished the "basic" painting on the face though I'm still in the middle of shaping the tube stripes. I know I'm not going to match the screen used one stripe for stripe but have to admit that I'm getting pretty frustrated with it. I started off using Pandatrooper's " hand painted" shaped stencils but this entire paint job I've been plagued with bleed through issues with my taping and stencils so have just bit the bullet and have literally started hand painting everything. With the fact in mind that the tube stripes are still a work in progress I was wondering if I could get some feedback on what I've done so far (please don't mind the Swiss cheese look on the right side of the helmet, I had some fitting issues that have since been resolved). Thanks! Quote Link to comment Share on other sites More sharing options...
kayelbe Posted November 4, 2014 Share Posted November 4, 2014 Might be too late but did you start your tube stripe painting with white? It will seal the mask so the follow up blue won't bleed. Quote Link to comment Share on other sites More sharing options...
TrainWreck Posted November 4, 2014 Author Share Posted November 4, 2014 No I haven't but I was just thinking that if I cleaned up that area and painted it over with white and restart that I would have a rougher surface for the paint to stick to. That's awesome. Thanks! I just might take that route. Quote Link to comment Share on other sites More sharing options...
kayelbe Posted November 4, 2014 Share Posted November 4, 2014 What kind of paint did you use? If you used an acrylic, rubbing alcohol on a cotton ball or whatever will wipe it off easily. No painting over required. I had to redo mine a couple of times before I remembered the old model-building trick with the mask. Quote Link to comment Share on other sites More sharing options...
TrainWreck Posted November 4, 2014 Author Share Posted November 4, 2014 I've been using the basic Testors paint which I believe is enamel. The French blue is testors model masters which I know has an acrylic line but I'll have to go look. Unfortunately I'm pretty sure the white I've been using to clean up the lines I'm pretty sure is enamel. I enter these projects with the understanding that I will be redoing parts of it. In reality I have four to five months before I see the rest of my armor so I have time to play with this. In some ways these "hard lessons learned" can be the most rewarding part of the experience. I had planned on doing all of my weathering in acrylic though. Thanks for the advice Quote Link to comment Share on other sites More sharing options...
kayelbe Posted November 4, 2014 Share Posted November 4, 2014 I haven't tried it on armor, but you may be able to do the same exact thing with good mineral spirits. I'd test it on scrap ABS for compatibility, but you'll be happier wiping it off and starting over than painting over the mistakes with white. I took another look at your pics and I can see how you tried to "cut down" the blue with white. It invariably won't match the plastic and in this case, the blue is showing through anyway. Lucky for us, a little "dirt" can hide any mistakes! Quote Link to comment Share on other sites More sharing options...
TrainWreck Posted November 4, 2014 Author Share Posted November 4, 2014 Well as far as the blue showing through yeah. It's requiring about 3 layers of paint to get the shaping right without bleed through. The white not matching the armor is a second debate I'm having with myself. I am adding approximate paint drips to match the screen used helmet which has left me wondering if I should just go over all of the white with a base coat (something that should have been done before all of the other painting but as stated above hard lessons learned). It's not very noticeable from about 3 feet away but any close inspection will show where the paint vs plastic lines are. Luckily I am good with taping (present issues I'm have not withstanding) so it wouldn't be too much for me to tape over my painted parts and the do a single white spray coat to add a little consistency to the overall appearance. Then ultimately when I het the rest of my armor I can start off with that coat. I've been making extra work for myself for as long as I've been cognizant. 😉 Quote Link to comment Share on other sites More sharing options...
TrainWreck Posted November 4, 2014 Author Share Posted November 4, 2014 ...and yeah I'm pretty decent at blending my mistakes into weathering... Quote Link to comment Share on other sites More sharing options...
kayelbe Posted November 4, 2014 Share Posted November 4, 2014 I've been making extra work for myself for as long as I've been cognizant. Get in line...forms behind me! Quote Link to comment Share on other sites More sharing options...
TrainWreck Posted November 4, 2014 Author Share Posted November 4, 2014 Yes sir. 😁 Quote Link to comment Share on other sites More sharing options...
TrainWreck Posted November 14, 2014 Author Share Posted November 14, 2014 OK. So this is what I've gotten done so far (I ended up redoing the stripes 3 times before I was happy with them). I'll probably start the weathering tomorrow. Quote Link to comment Share on other sites More sharing options...
TrainWreck Posted November 14, 2014 Author Share Posted November 14, 2014 BTW I've found rubbing alcohol works pretty well with clean up. Quote Link to comment Share on other sites More sharing options...
TrainWreck Posted November 15, 2014 Author Share Posted November 15, 2014 ...and for the most part I think I'm done with the weathering. Not an exact copy of the docking bay helmet really but a good approximation I hope. Any thoughts? Quote Link to comment Share on other sites More sharing options...
TyWebb1075 Posted November 16, 2014 Share Posted November 16, 2014 I'm going for the same look with my bucket. How did you replicate the crack in the right tube? Also, what paint did you use for the drips and what technique did you use? Quote Link to comment Share on other sites More sharing options...
TrainWreck Posted November 16, 2014 Author Share Posted November 16, 2014 So you need to be committed to the crack for my technique. I basically sketched it out in pencil, lightly etched it out with a wood screw, then first used the same gray paint as the traps but wiped it off almost immediately so it would sit in the etching and then I used pandatrooper's weathering tutorial for the weathering but as you apply and wipe away paint more and more of it gets left in the etch which gives it that look of depth. For the paint drips I used testor gloss white enamel paint (note that it is not the same white as the plastic but that gets blended with weathering and also note that all of the detail painting was with enamel and the stripes and weathering with acrylic) and I literally just let a drip fall on the face from my brush. you have to keep the surface of where you want the drip pretty flat so the paint doesn't run off and then let it sit at that angle for a few minutes to set. Then don't touch the drip at all for 24 to 48 hours while it completely drys. You can always wipe and redo if you don't like how it looks but the reason I mentioned the color matching issue with the white enamel is because if you don't wipe immediately you'll end up with patches a different color than the helmet. not a huge issue since your weathering but just take note that those areas will "hold" the weathering differently than bare plastic. My helmet had a variety of different white paints applied and sanding done before I weathered which is how I got the patchy look on some of my helmet but those techniques aren't necessarily recommended because you can ruin the helmet pretty quickly. I just happen to be decent at turning my mistakes into weathering (which is one of the reasons I'm going TD firs). Hope this helps. Quote Link to comment Share on other sites More sharing options...
dutchy Posted November 19, 2014 Share Posted November 19, 2014 Good result on the helmet!! Quote Link to comment Share on other sites More sharing options...
TyWebb1075 Posted November 20, 2014 Share Posted November 20, 2014 So you need to be committed to the crack for my technique. I basically sketched it out in pencil, lightly etched it out with a wood screw, then first used the same gray paint as the traps but wiped it off almost immediately so it would sit in the etching and then I used pandatrooper's weathering tutorial for the weathering but as you apply and wipe away paint more and more of it gets left in the etch which gives it that look of depth. For the paint drips I used testor gloss white enamel paint (note that it is not the same white as the plastic but that gets blended with weathering and also note that all of the detail painting was with enamel and the stripes and weathering with acrylic) and I literally just let a drip fall on the face from my brush. you have to keep the surface of where you want the drip pretty flat so the paint doesn't run off and then let it sit at that angle for a few minutes to set. Then don't touch the drip at all for 24 to 48 hours while it completely drys. You can always wipe and redo if you don't like how it looks but the reason I mentioned the color matching issue with the white enamel is because if you don't wipe immediately you'll end up with patches a different color than the helmet. not a huge issue since your weathering but just take note that those areas will "hold" the weathering differently than bare plastic. My helmet had a variety of different white paints applied and sanding done before I weathered which is how I got the patchy look on some of my helmet but those techniques aren't necessarily recommended because you can ruin the helmet pretty quickly. I just happen to be decent at turning my mistakes into weathering (which is one of the reasons I'm going TD firs). Hope this helps. Thanks Brian for the detailed reply. I thought about painting the entire bucket white, as the original was done, but realize it would be impossible to recreate the drips that way. I too have some sanded areas that I'm not sure how they are going to hold the weathering as opposed to the shiny areas, hence another reason I was leaning to painting everything white with a base coat and starting my drips and weathering from there. I'm using Humbrol enamels for everything, including the drips. Quote Link to comment Share on other sites More sharing options...
TrainWreck Posted November 21, 2014 Author Share Posted November 21, 2014 The thing is if you don't sand with an incredibly fine sandpaper you end up with a bunch of micro scratches that pop right out when you weather. Ultimately I like how it looks but had to go over some of those areas with rubbing alcohol to tone them done. I'll see if I can get a close up of one of those areas. I would recommend doing the details with enamel and the weathering with acrylic as it is far more forgiving than enamel once it starts drying. I just bought some cheap tubes of acrylic from walmart. Good luck and I can't wait to see what yours looks like! Quote Link to comment Share on other sites More sharing options...
TrainWreck Posted November 21, 2014 Author Share Posted November 21, 2014 This is what it ends up looking like which I know a lot of guys really don't like. Quote Link to comment Share on other sites More sharing options...
Piper211 Posted November 29, 2014 Share Posted November 29, 2014 Wow looks like its coming along great, cant wait till my kit gets in, I dont know if I want docking bay or move along yet Quote Link to comment Share on other sites More sharing options...
TrainWreck Posted November 30, 2014 Author Share Posted November 30, 2014 Thank you sir! Quote Link to comment Share on other sites More sharing options...

Recommended Posts
Join the conversation
You can post now and register later. If you have an account, sign in now to post with your account.