TyWebb1075
-
Posts
67 -
Joined
-
Last visited
Content Type
Events
Profiles
Forums
Everything posted by TyWebb1075
-
I've never used grout but Fuller's Earth works great. Finish off with hairspray and hobby sand for that authentic textured look. Sent from my SM-N910V using Tapatalk
-
This is from the ANH Stormtrooper CRL and is a requirement for Level 3 only. I do not see the notch listed as a requirement for Sandtrooper, but you should add it anyway, in my opinion. For level three certification (if applicable): Squared cut-out sections at the lower left and right corners of the Kidney Armor. The cut out is roughly 22 mm tall from the bottom and 22 mm in from the side. Sent from my SM-N910V using Tapatalk
-
http://forum.mepd.net/index.php?/topic/4934-Trooper1-Pauldron-ongoing-orders Sent from my SM-N910V using Tapatalk
-
I know it doesn't specify in the CRL, but I thought the canvas pouch was only seen in the film as a shoulder pouch, with only leather pouches worn on the belt. I don't recall in my research ever seeing canvas pouches on the belt. The back straps were originally sewn on that way to attach to the backpack straps easier. Maybe someone with more knowledge can chime in...
-
-
Luckily, I took a screen shot before the post was deleted. Here you go.
-
Perfect. Thanks!
-
My apologies if this is posted in the wrong section. Could someone tell me what size bolts are used in the chest plate that create the look of the original strapping? Also, is there a specific distance apart from each other they need to be placed? Thanks!
-
I added two chest straps, each one connects to a shoulder strap, which in turn clips together via a plastic side release buckle under my chest armor. This takes some of the tension off of the shoulders.
-
3rd Annual Star Wars Literacy Program / Palm Springs Library
TyWebb1075 replied to SCRIBBLER's topic in Tours of Duty
Dewback skin pauldrons. Awesome! -
Pros/Cons of the Different BFGs
TyWebb1075 replied to LoveMonkey's topic in T-21, DLT-19, RT-97c Heavy Blasters
T-21 Pros...it's sexy Cons...none, unless EVERYONE wanting a photo with you is a con. -
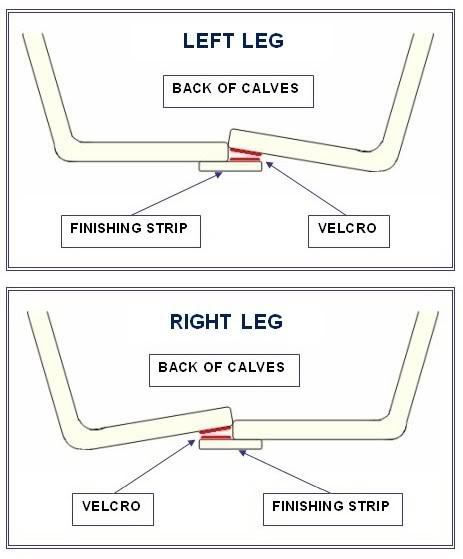
If you do decide to add a cover strip, using a wider strip will allow for more area to apply velcro. And definitely use industrial velcro as it stands up to trooping much better.
-
You want to add the cover strip, NOT overlap one side over the other. The velcro will attach to one side of the cover strip as seen in the pic. I'd sand down the top and bottom a bit to bring them closer together and use a somewhat larger cover strip if need be.
-
New Shiny Pauldron by Trooper1
TyWebb1075 replied to Big_Sarge's topic in Pouches, Pauldrons, and other Accessories
http://forum.mepd.net/index.php?/topic/4934-Trooper1-Pauldron-ongoing-orders -

-
I would tone it down a bit. Too much brown and not enough white in my opinion. You're on the right track as far as getting a darker look in the nooks, crannies and recessed areas but I would clean up the raised areas surrounding those. Use screen shots of film used armor as a guide.
-
It depends on the specific Trooper that you're attempting to emulate, if that's what you're looking to do. Check here to see the different variations: http://www.starwarshelmets.com
-
John Fahey TD-71121 Requesting Sandtrooper Access http://www.501st.com/members/displaymemberdetails.php?userID=19817
-
LoveMonkey's Alley Check Captain Build (AM 2.0 Armor)
TyWebb1075 replied to LoveMonkey's topic in Sandtrooper Armor
It looks like you may have your sniper knee plate mounted on the wrong shin. -
Looking for an Orange Pauldron
TyWebb1075 replied to Shadowfax821's topic in Pouches, Pauldrons, and other Accessories
http://forum.mepd.net/index.php?/topic/4934-Trooper1-Pauldron-ongoing-orders -
TrainWreck's Docking Bay 94 (Stop That Ship, Tuck and Roll) WIP
TyWebb1075 replied to TrainWreck's topic in Sandtrooper Armor
Yup, that's the updated back plate. Start building! -
TrainWreck's Docking Bay 94 (Stop That Ship, Tuck and Roll) WIP
TyWebb1075 replied to TrainWreck's topic in Sandtrooper Armor
Post a pic of the plate. I just ordered the new one for my AM kit. I'm almost done with my build. Let me know if you need a hand. -
TrainWreck's Docking Bay 94 (Stop That Ship, Tuck and Roll) WIP
TyWebb1075 replied to TrainWreck's topic in Sandtrooper Armor
Nice. Does that kit have the updated back piece? Hard to tell from your pic. -
I would suggest strapworks.com as its elastic is far superior to anything you will find in the chain craft stores. I had purchased the elastic on the left in your photo and it doesn't even compare. They also carry nylon webbing and side release buckles for backpack shoulder straps, garter belt setups, etc. Prices are great and shipping is fast! Hope this helps.
-
TrainWreck's ATA "Docking Bay 94" helmet painting
TyWebb1075 replied to TrainWreck's topic in Sandtrooper Armor
Thanks Brian for the detailed reply. I thought about painting the entire bucket white, as the original was done, but realize it would be impossible to recreate the drips that way. I too have some sanded areas that I'm not sure how they are going to hold the weathering as opposed to the shiny areas, hence another reason I was leaning to painting everything white with a base coat and starting my drips and weathering from there. I'm using Humbrol enamels for everything, including the drips.