clonecollector Posted March 13, 2014 Share Posted March 13, 2014 Hi all! I've finally been able to begin a TD in the last few weeks. As I progress through the build I'll post up pics for comments and critiques from the members. I decided to try and replicate the Roadblock Captain because of his unique look. Although I'm trying to look like a specific TD, I'm not sure I will go for SWAT status. Still I'm going to to attempt getting as close as possible using the screen caps and WIP pics posted by SWAT members here. List of parts: Armor/ helmet - NE 3 button ab detail - TM Belt - Tkittel Split rivet set - Echo Brackets - Mr. No Stripes Rubber hand guards - TKbondservant Pauldron - Trooper1 Backpack - Quartermaster Boots - black Chelsea boots dyed white E11 - not yet purchased (trooperbay?) Pouches - Blaster 8266 (also making a T21 for me too!) Quote Link to comment Share on other sites More sharing options...
clonecollector Posted March 13, 2014 Author Share Posted March 13, 2014 First up is the helmet. I got the NE helmet with the armor thinking of going clean TK and I wanted to have the plastic match. Had I known I'd go back to doing a TD I would have gotten a more accurate helmet like the ATA I briefly owned last year. It is what it is... so I tried to do the best I could with it. I cut the front of the dome to better mimic the high brow look of the Roadblock Captain. I thought I wouldn't care but eventually the 3 pc design bothered me so I used abs sludge to fill in the gap. I used finer and finer sandpaper to smooth it all out. I finally polished it up with Novus. I figure that I can always get another helmet in the future if I need to. The ears are not finished yet but hope to get them painted up this weekend. After that I will pain the eardcrews white. I counted 16 tubestripes on the left and only 13 on the right... I need to still remove one more on the right. More WIP pic to follow soon! Quote Link to comment Share on other sites More sharing options...
Cantina Security Posted March 14, 2014 Share Posted March 14, 2014 Cool. I remember this trooper having one of his mic tips askew. Check up on that. There are a few cool builds for this trooper on here . Lots of good reference material. Good luck. Nice work. Quote Link to comment Share on other sites More sharing options...
clonecollector Posted March 14, 2014 Author Share Posted March 14, 2014 Cool. I remember this trooper having one of his mic tips askew. Check up on that. There are a few cool builds for this trooper on here . Lots of good reference material. Good luck. Nice work. Hey Jason!I didn't realize you were the same guy who made that Shocktrooper on ct.net! lol! I will look at some more images of the captains face to see where the mic tips should be located. I will need to take them out one more time to weather the inside of tube anyway. Quote Link to comment Share on other sites More sharing options...
Cantina Security Posted March 14, 2014 Share Posted March 14, 2014 Yes sir, good to see you over here. This captain has some specific details to obtain to capture the "look" . You seem to be on the right track. Check your reference photos, and you will knock it out of the park. Good luck. I am about to go for SWAT with the Cantina Sergeant. So, I feel your pain bro... Take care. Quote Link to comment Share on other sites More sharing options...
tk5144 Posted March 15, 2014 Share Posted March 15, 2014 one of the best looking NE helmets I have seen built... well done! Quote Link to comment Share on other sites More sharing options...
tk5144 Posted March 15, 2014 Share Posted March 15, 2014 are those the tube stripe decals that came with the NE helmet? do the tube stripes look a little thin? Quote Link to comment Share on other sites More sharing options...
clonecollector Posted March 15, 2014 Author Share Posted March 15, 2014 Yes sir, good to see you over here. This captain has some specific details to obtain to capture the "look" . You seem to be on the right track. Check your reference photos, and you will knock it out of the park. Good luck. I am about to go for SWAT with the Cantina Sergeant. So, I feel your pain bro... Take care. Good luck! Quote Link to comment Share on other sites More sharing options...
clonecollector Posted March 15, 2014 Author Share Posted March 15, 2014 are those the tube stripe decals that came with the NE helmet? do the tube stripes look a little thin? Thanks! I've been looking at pics of the real helmet from starwarshelmets.com and the real ones seem a bit thicker. I didn't feel the left side was bad but I think its more noticeable on the right side were there are three less stripes. Quote Link to comment Share on other sites More sharing options...
clonecollector Posted March 31, 2014 Author Share Posted March 31, 2014 Little update here: This is one of Anthony's T-21 blasters. I know the trooper I want to do doesn't use this blaster but I wanted to have a BFG anyway. (I'll get an E11 later on hopefully from Darth Voorhees) It has great detailing and a nice feel in the arms! Quote Link to comment Share on other sites More sharing options...
Quartermaster Posted April 1, 2014 Share Posted April 1, 2014 Looking good Paul! Quote Link to comment Share on other sites More sharing options...
clonecollector Posted May 12, 2014 Author Share Posted May 12, 2014 Update! I assembled the armor using accurate brackets and elastic loops. The screen used suits used this and it really helps keep everything all lined up every time. The parts hang nicely too. For the shoulder bells I used one long piece of elastic that connects the bells together. I tread this is the setup used in ESB but it was easy and works for me. The biceps will use homemade hooks to connect them onto the shoulder bell elastic. This is what can bee seen on the Han Solo suit in the film. Everything seems to line up well using this method too. Quote Link to comment Share on other sites More sharing options...
clonecollector Posted May 12, 2014 Author Share Posted May 12, 2014 Orange Captain's pauldron by trooper1. MP40 leather and canvas pouches made by TD 8266 Quote Link to comment Share on other sites More sharing options...
clonecollector Posted May 18, 2014 Author Share Posted May 18, 2014 Bapty e11 has begun. It's in black primer now. I will give it another sanding in some rough spots and then begin painting. Later this week I'll work on the mag clip and cut it so I can insert a wooden block. Thanks to those members who researched this particular blaster and posted numerous comparison and WIP pics! I could not have come to this point without your diligent work! Quote Link to comment Share on other sites More sharing options...
clonecollector Posted May 19, 2014 Author Share Posted May 19, 2014 Here it is! Painted and weathered! Quote Link to comment Share on other sites More sharing options...
clonecollector Posted May 19, 2014 Author Share Posted May 19, 2014 Quote Link to comment Share on other sites More sharing options...
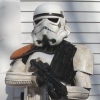
clonecollector Posted July 15, 2014 Author Share Posted July 15, 2014 July update! I'm still chugging along with this. I've finished the helmet assembly and have begun to tackle the weathering. Since it's my first TD I chose to apply the base layers with acrylic paints. First I added khaki spots to simulate the paint chipping on the "move along" helmet. Then I applied a base of grey with a coat of raw umber. I'm not sure I like it but I can wipe some more weathering off with a damp towel. (We'll see what the experts here recommend) Maybe what I'll do is tackle a more accurate helmet after I get experience doing this one . The "move along" trooper has dark mic tips. Hard to tell in this pic but the right mic tip is slightly askew as per photo reference. I still need to paint on the rank bars for the ears. I'll do that later tonight. Quote Link to comment Share on other sites More sharing options...
CC5707 Posted July 15, 2014 Share Posted July 15, 2014 Nice, nice job! Where did you get the 3 buttons for the ABD? Quote Link to comment Share on other sites More sharing options...
clonecollector Posted July 15, 2014 Author Share Posted July 15, 2014 Nice, nice job! Where did you get the 3 buttons for the ABD?Thanks!Troopermaster helped me out with the 3 button detail. Give him a PM! Quote Link to comment Share on other sites More sharing options...
Jancelot Posted July 16, 2014 Share Posted July 16, 2014 Coming along very nicely! I have the T-21 as well. Weighs a ton. Heh. Quote Link to comment Share on other sites More sharing options...
clonecollector Posted July 17, 2014 Author Share Posted July 17, 2014 Coming along very nicely! I have the T-21 as well. Weighs a ton. Heh. Thank you! Yeah it's heafty, but it looks cool to carry. Lol! I thought someone might find this interesting. The inside of the helmet is not cannon but made to be roomy with enough room for fans/ airflow. I couldn't get a hard had liner to sit in the helmet so I cut out the entire frame from the hardhat and made a frame that mounts using the ear screws. Its very solid now. The eye lenses are from Quartermaster (of the ECG) They are separate so I screwed them together with a plastic tab. They can be shifted into a good position this way. Right now they are set in using 3M hooks. These hooks are good for use in clone helmets, but not so much for a TK. Clone helmets are flatter on the inside and the visor is one piece. I will use these clips to hold the lenses in place while I use a more permanent glue to affix the lenses to the helmet. Quote Link to comment Share on other sites More sharing options...
clonecollector Posted July 17, 2014 Author Share Posted July 17, 2014 Since I'm trying my best to replicate the "move along" captain I used screencaps and a couple of SWAT wip threads from MEPD. I opted to use several colors layered to really get a sense of used armor while trying to get close to the screencaps. I used soft black, gray, raw umber, tan, and a few spots of yellow ocre. The rear of the armor is not really seen so I winged it. Quote Link to comment Share on other sites More sharing options...
clonecollector Posted July 19, 2014 Author Share Posted July 19, 2014 Are no comments good? Lol! I worked on this yesterday.I opted for a few yellow ocre highlights to give it a sun discoloration. I'm trying to use my colors in roughly the same order. Maybe fewer were actually used onset but I want it to look real in person. I will eventually add Fuller's earth once I'm OK with the base weathering patterns. That will be the icing on the cake. Quote Link to comment Share on other sites More sharing options...
Vf2112 Posted July 20, 2014 Share Posted July 20, 2014 Looking good mate Quote Link to comment Share on other sites More sharing options...
clonecollector Posted July 20, 2014 Author Share Posted July 20, 2014 Thanks! I hope to work a little more this week. Quote Link to comment Share on other sites More sharing options...

Recommended Posts
Join the conversation
You can post now and register later. If you have an account, sign in now to post with your account.