


Hausi
-
Posts
1,511 -
Joined
-
Last visited
-
Days Won
120
Content Type
Events
Profiles
Forums
Posts posted by Hausi
-
-
Hi mate and welcome to the MEPD,
your armor seems to be a set of FX (which is quite rare and rising in value if unaltered) or Shepperton, these types of armor use the so called overlap method to join the halves of the thighs (probably other parts as arms and shins as well). This is approvable at basic 501st level but for level 2/Police Officer, you would have to change it to the butt-joint and coverstrip method (the thighs for example would be completely glued together and there wouldn't be any opening remaining) , as it was used with the screen-used sandtrooper suits. Now you could of course adjust your armor which would be quite a lot of work or you could try to sell it and get some more screen-accurate armor.
This being said, you can use your existing armor for basic level approval, just contact your local garrison's gmo to ask for the requirements.
As for your question, I have bought white ABS sheets from Amazon, just be sure not to buy acrylic capped sheets as those tend to be more prone to cracking.
Cheers mate
-
I'm not so sure if you will be happy with the quality, it seems to be molded and cast as one piece, hence some missing details, e.g. the scoperail, the front sight. In addition the triggerguard is like a mixture of regular E-11 and Tunisian Bapty E-11.
I would recommend going for other makers products, like Imperial Warfighters or Sheartech (you can find both on FB). Those are way more accurate.
-
 3
3
-
-
Weathering looks much better now in my opinion as it is a little more subtle.
Making ABS Sludge is easy enough, just cut some ABS left-overs into little pieces put it in a jar and pour acetone over it so it's completely covered, then just give it some time and a little stir every now and then. After two days you should be fine putting it on. Don't put on too thick of a coat at once but just a thin coat and then the next day add the next coat. After sanding it down you might still want to paint it. Use some plastic primer first and then spray paint it with ral 9016,at least that the colour I always use here in Germany.
-
Have a look at this build thread, it might be helpful. The trooper is a friend of mine who also had to add shims to the back of his thighs.
-
I would definitely recommend trying to remove the strips, worst case would be using a dremel to sand them down and then you can start shimming the thighs and finally add a brand new coverstrip. For shimming, use ABS sludge (ABS bits dissolved in acetone, I'm pretty sure you know it).
I like the weathering but it still is a little too solid for my liking,with too much white in between. I always recommend going the black and sand-wash-way. Applying watered down acryllic paints and dabbing it off with a paper towel delivers amazing results in my opinion. But that's all up to personal taste.
-
What glue was used to attach the coverstrip? If it was E6000, it should be pretty easy to remove the coverstrips, just gently apply some heat with a heat gun and then carefully use an exacto blade to remove the strip. Not sure if just filling it up with bondo is such a good idea as these parts always move and bend and twist when you wear it...
One more thing, you know that you don't need the shoulder bridges for a TD?
")
I assume you are just using that part for testing.
-
Hey mate, welcome to the MEPD, good decision to dirty that armour up! Your build looks already very promising.

For the weathering, try to keep it looking natural, dirt would of course accumulate in recessed areas but not so much on flat surfaces, that's why I would recommend toning it down in these areas. I like the look you have achieved on that scrap piece of ABS on the right in the above pic.
One more thing, I can see that you have strong legs, that's probably why you have chosen to have such a wide coverstrip at the back of the thighs which might be okay for basic approval depending on your Garrison's deployment officer, but should you decide to go for level 2/Police Officer, they would be too wide. They way to go here would be to shim the thighs to get that extra girth without having to use such a wide coverstrip.
Cheers mate
-
To me, even the original main part/box looks like wood. But who knows..
-
Aaaaaalright , so this is it and now it´s open for you guys to discuss. Looking forward to hearing some of your ideas!
-
List of components:
- "shotgunshells"/"capacitors"
- mortartube
- radardish backing plate
- radardish
- greyish-blue bottle
- toilet plunger cap
- Shires UP 90 vintage toiled syphon
- "beestinger"
- Gio´Style bottle
- Karrimor aluminium backpack frame
- Sonix Victory 75 radio
- Seedtrays
- Brexton Box
- Toilet plunger cap (same as number 6)
- greyish-blue bottle
- exhaust port
-
two red support straps
These were on the original Karrimor frames if you can remember the pictures:
These are about 55cm long and 10 cm wide and made from red synthetic fabric (not canvas).
I was never lucky enough to find the correct shape of frame with those red support straps, so I bought a different frame with the wrong shape only to get the support straps.
This is it: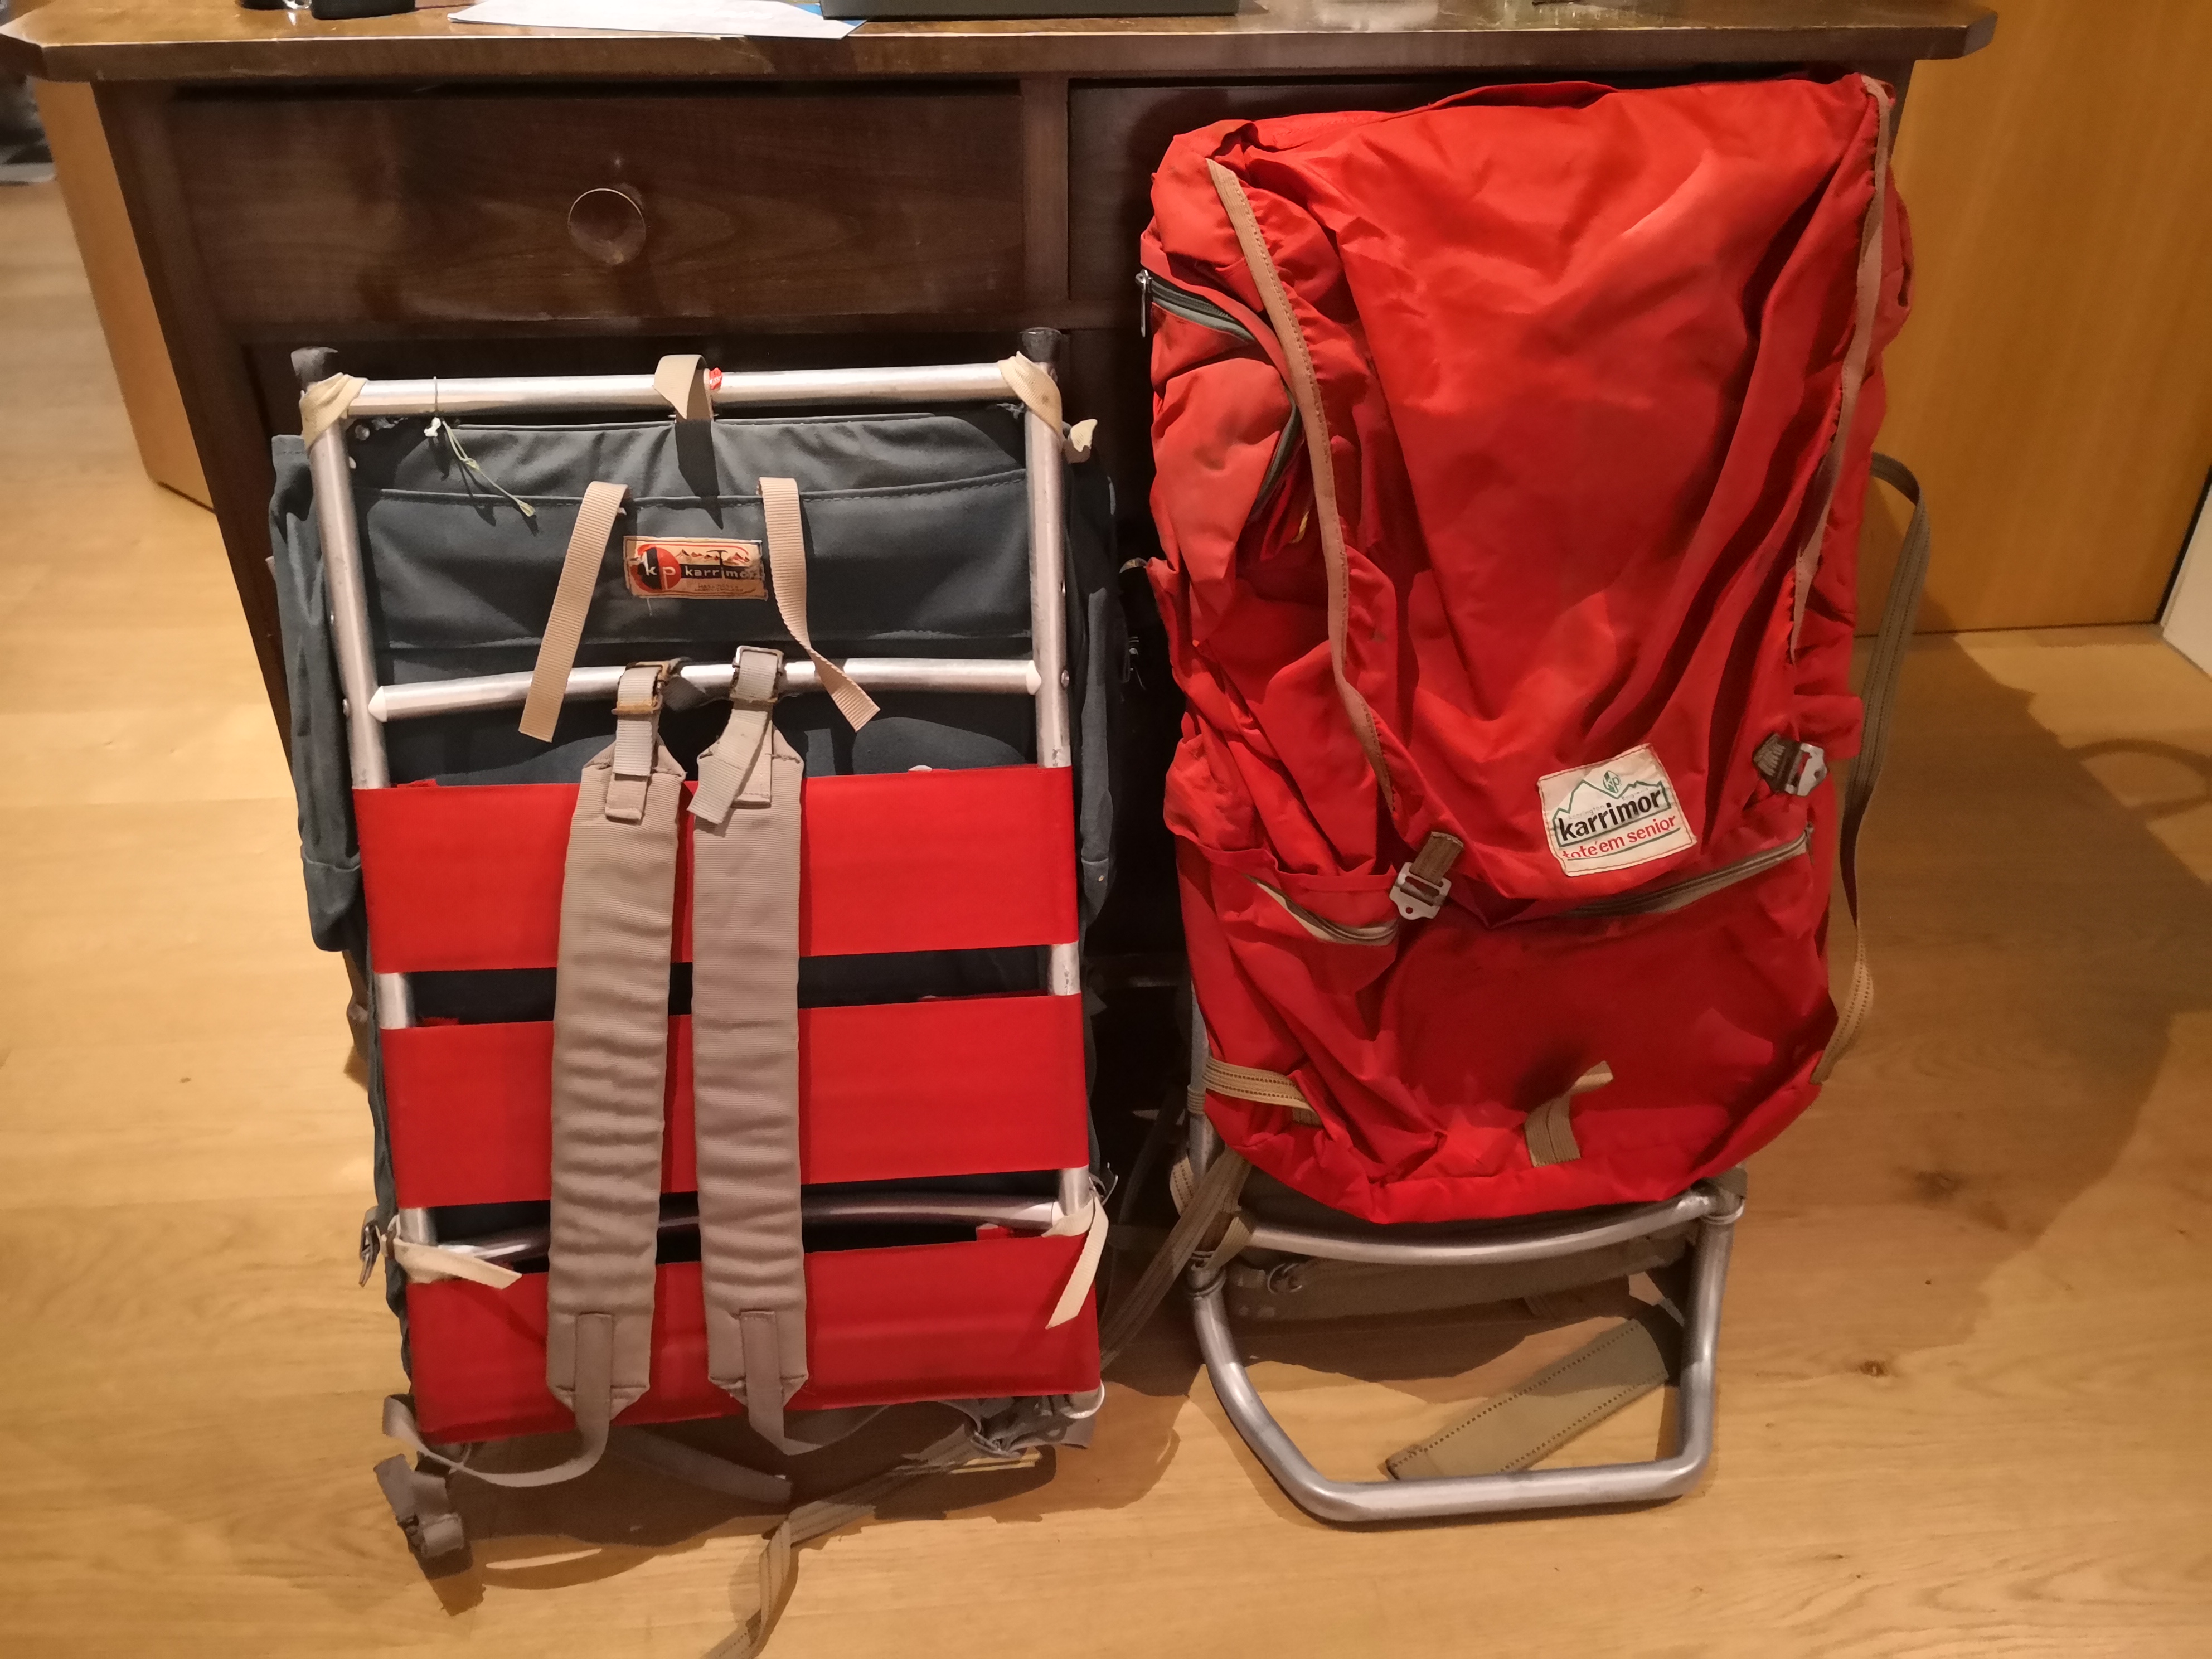
This is the original vintage support strap, there are two aluminium bars at each end and some white shoelace is used to tie it together: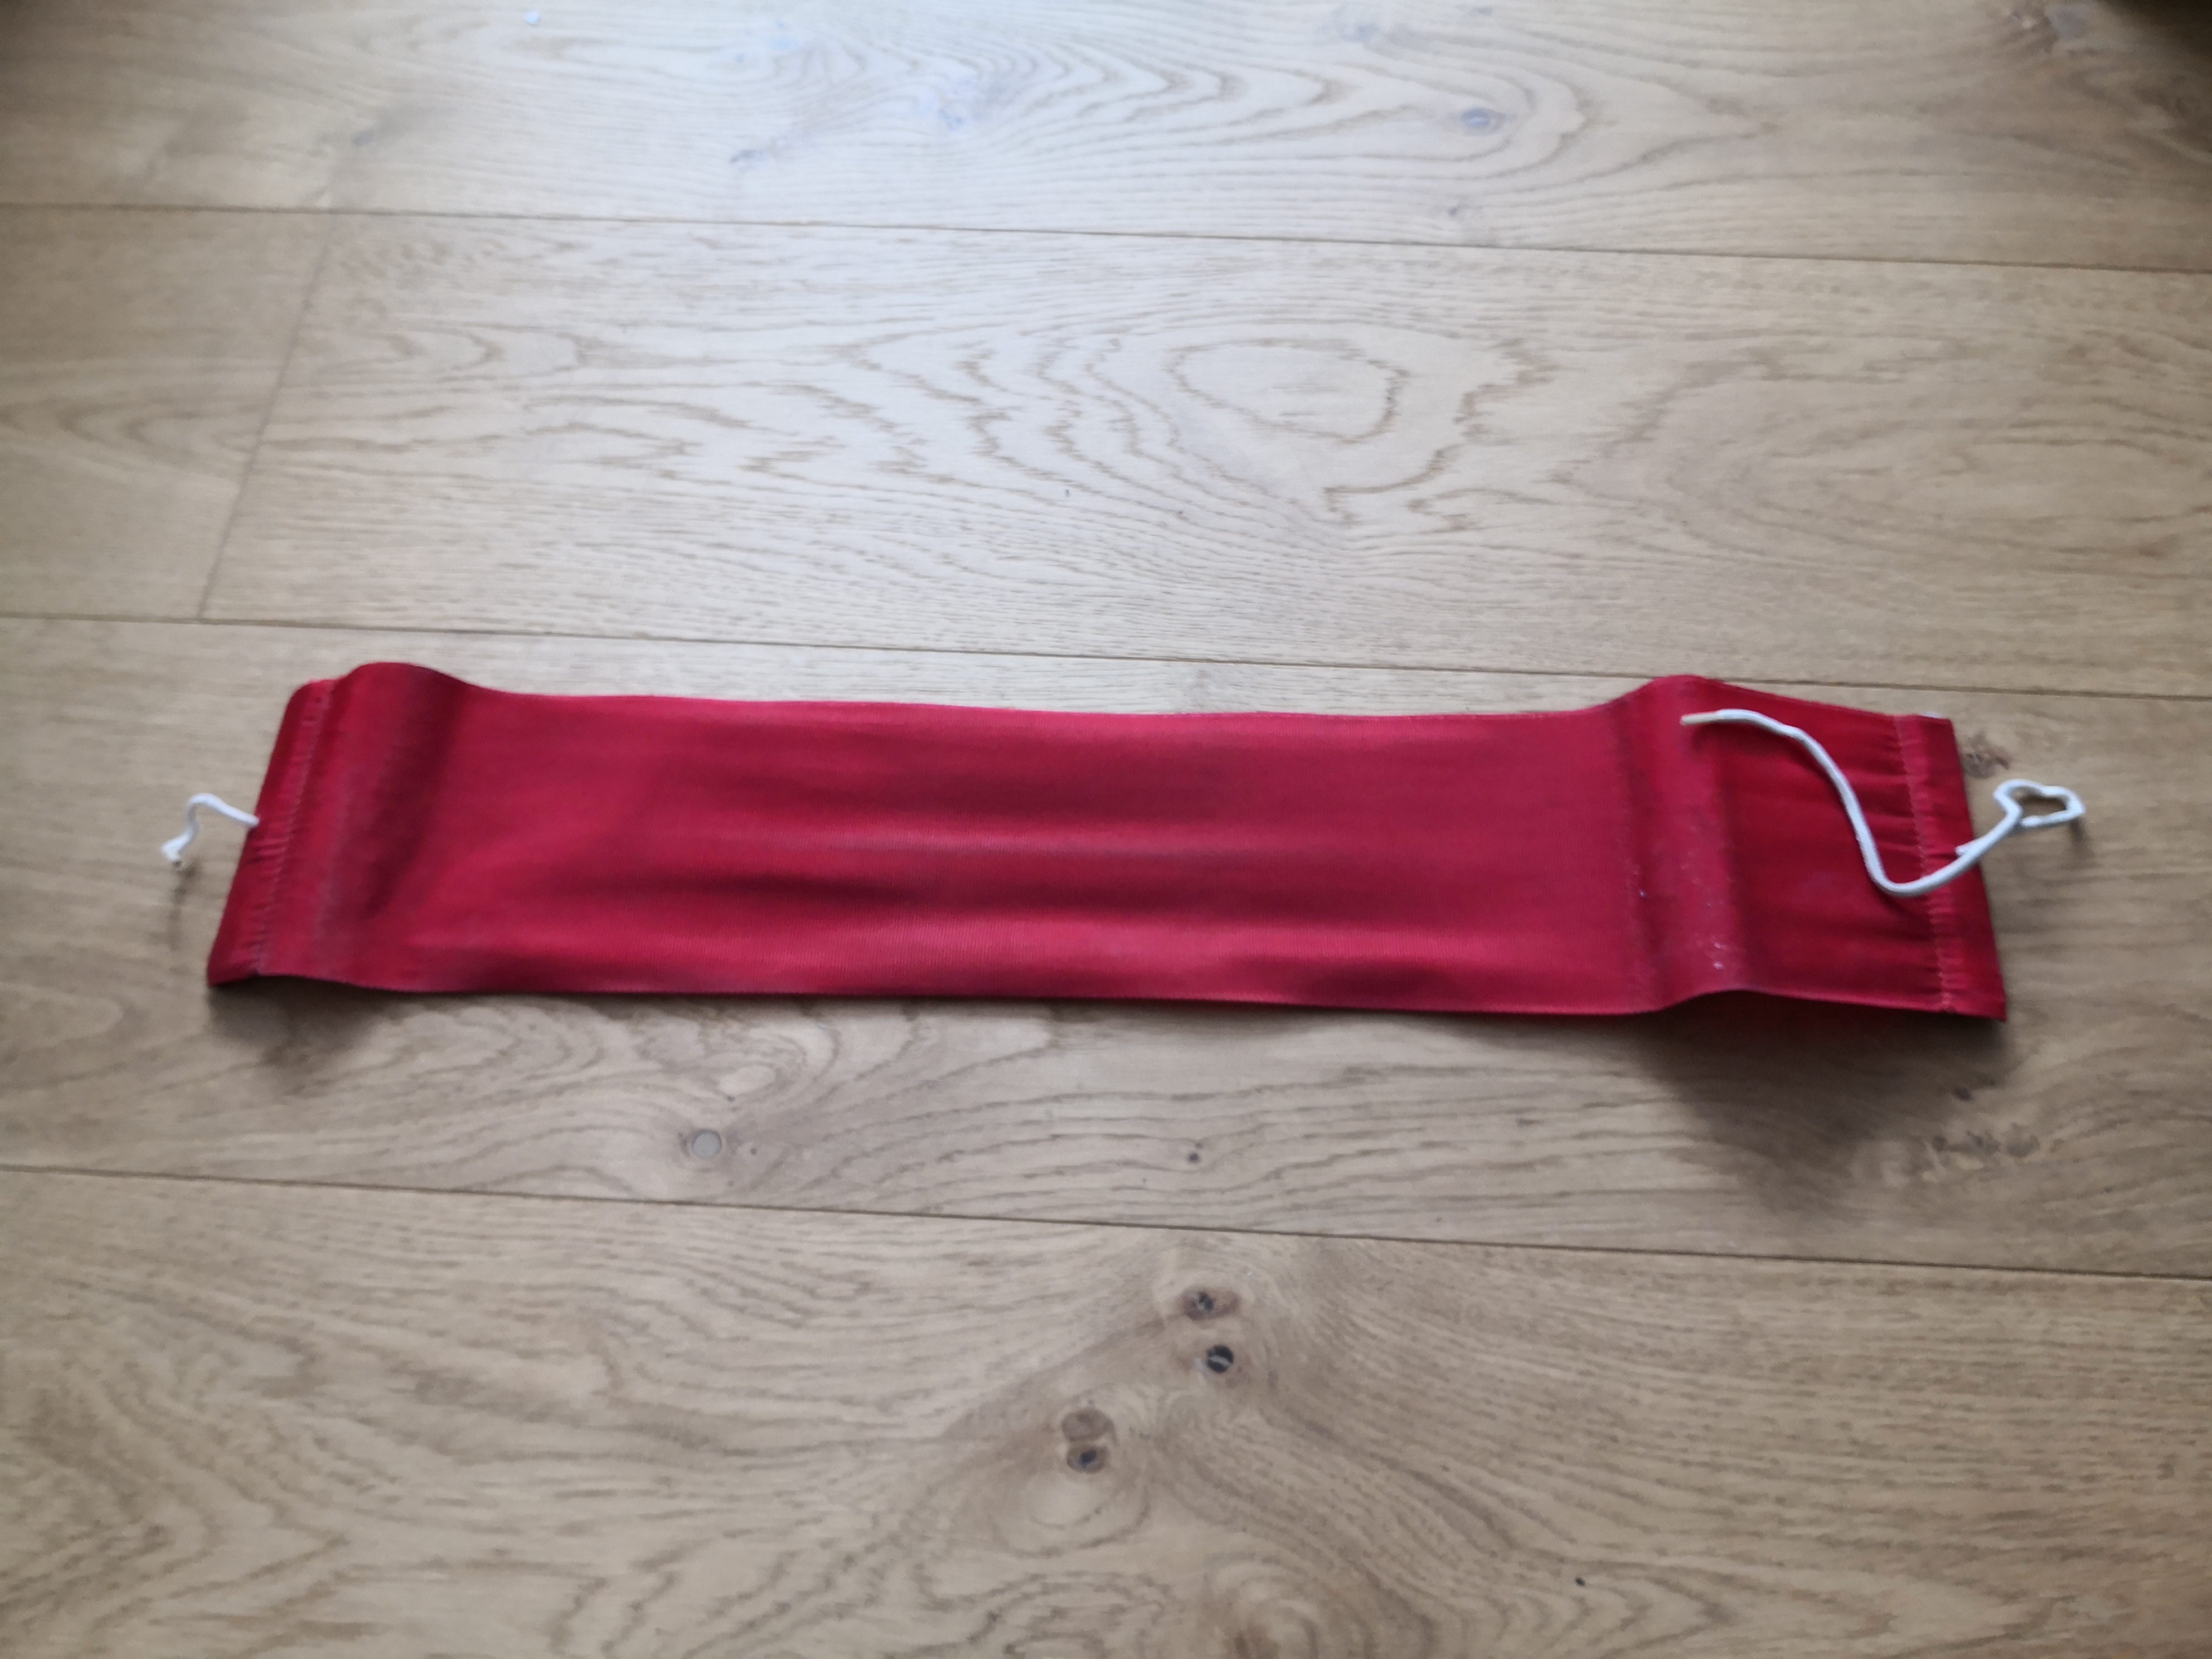
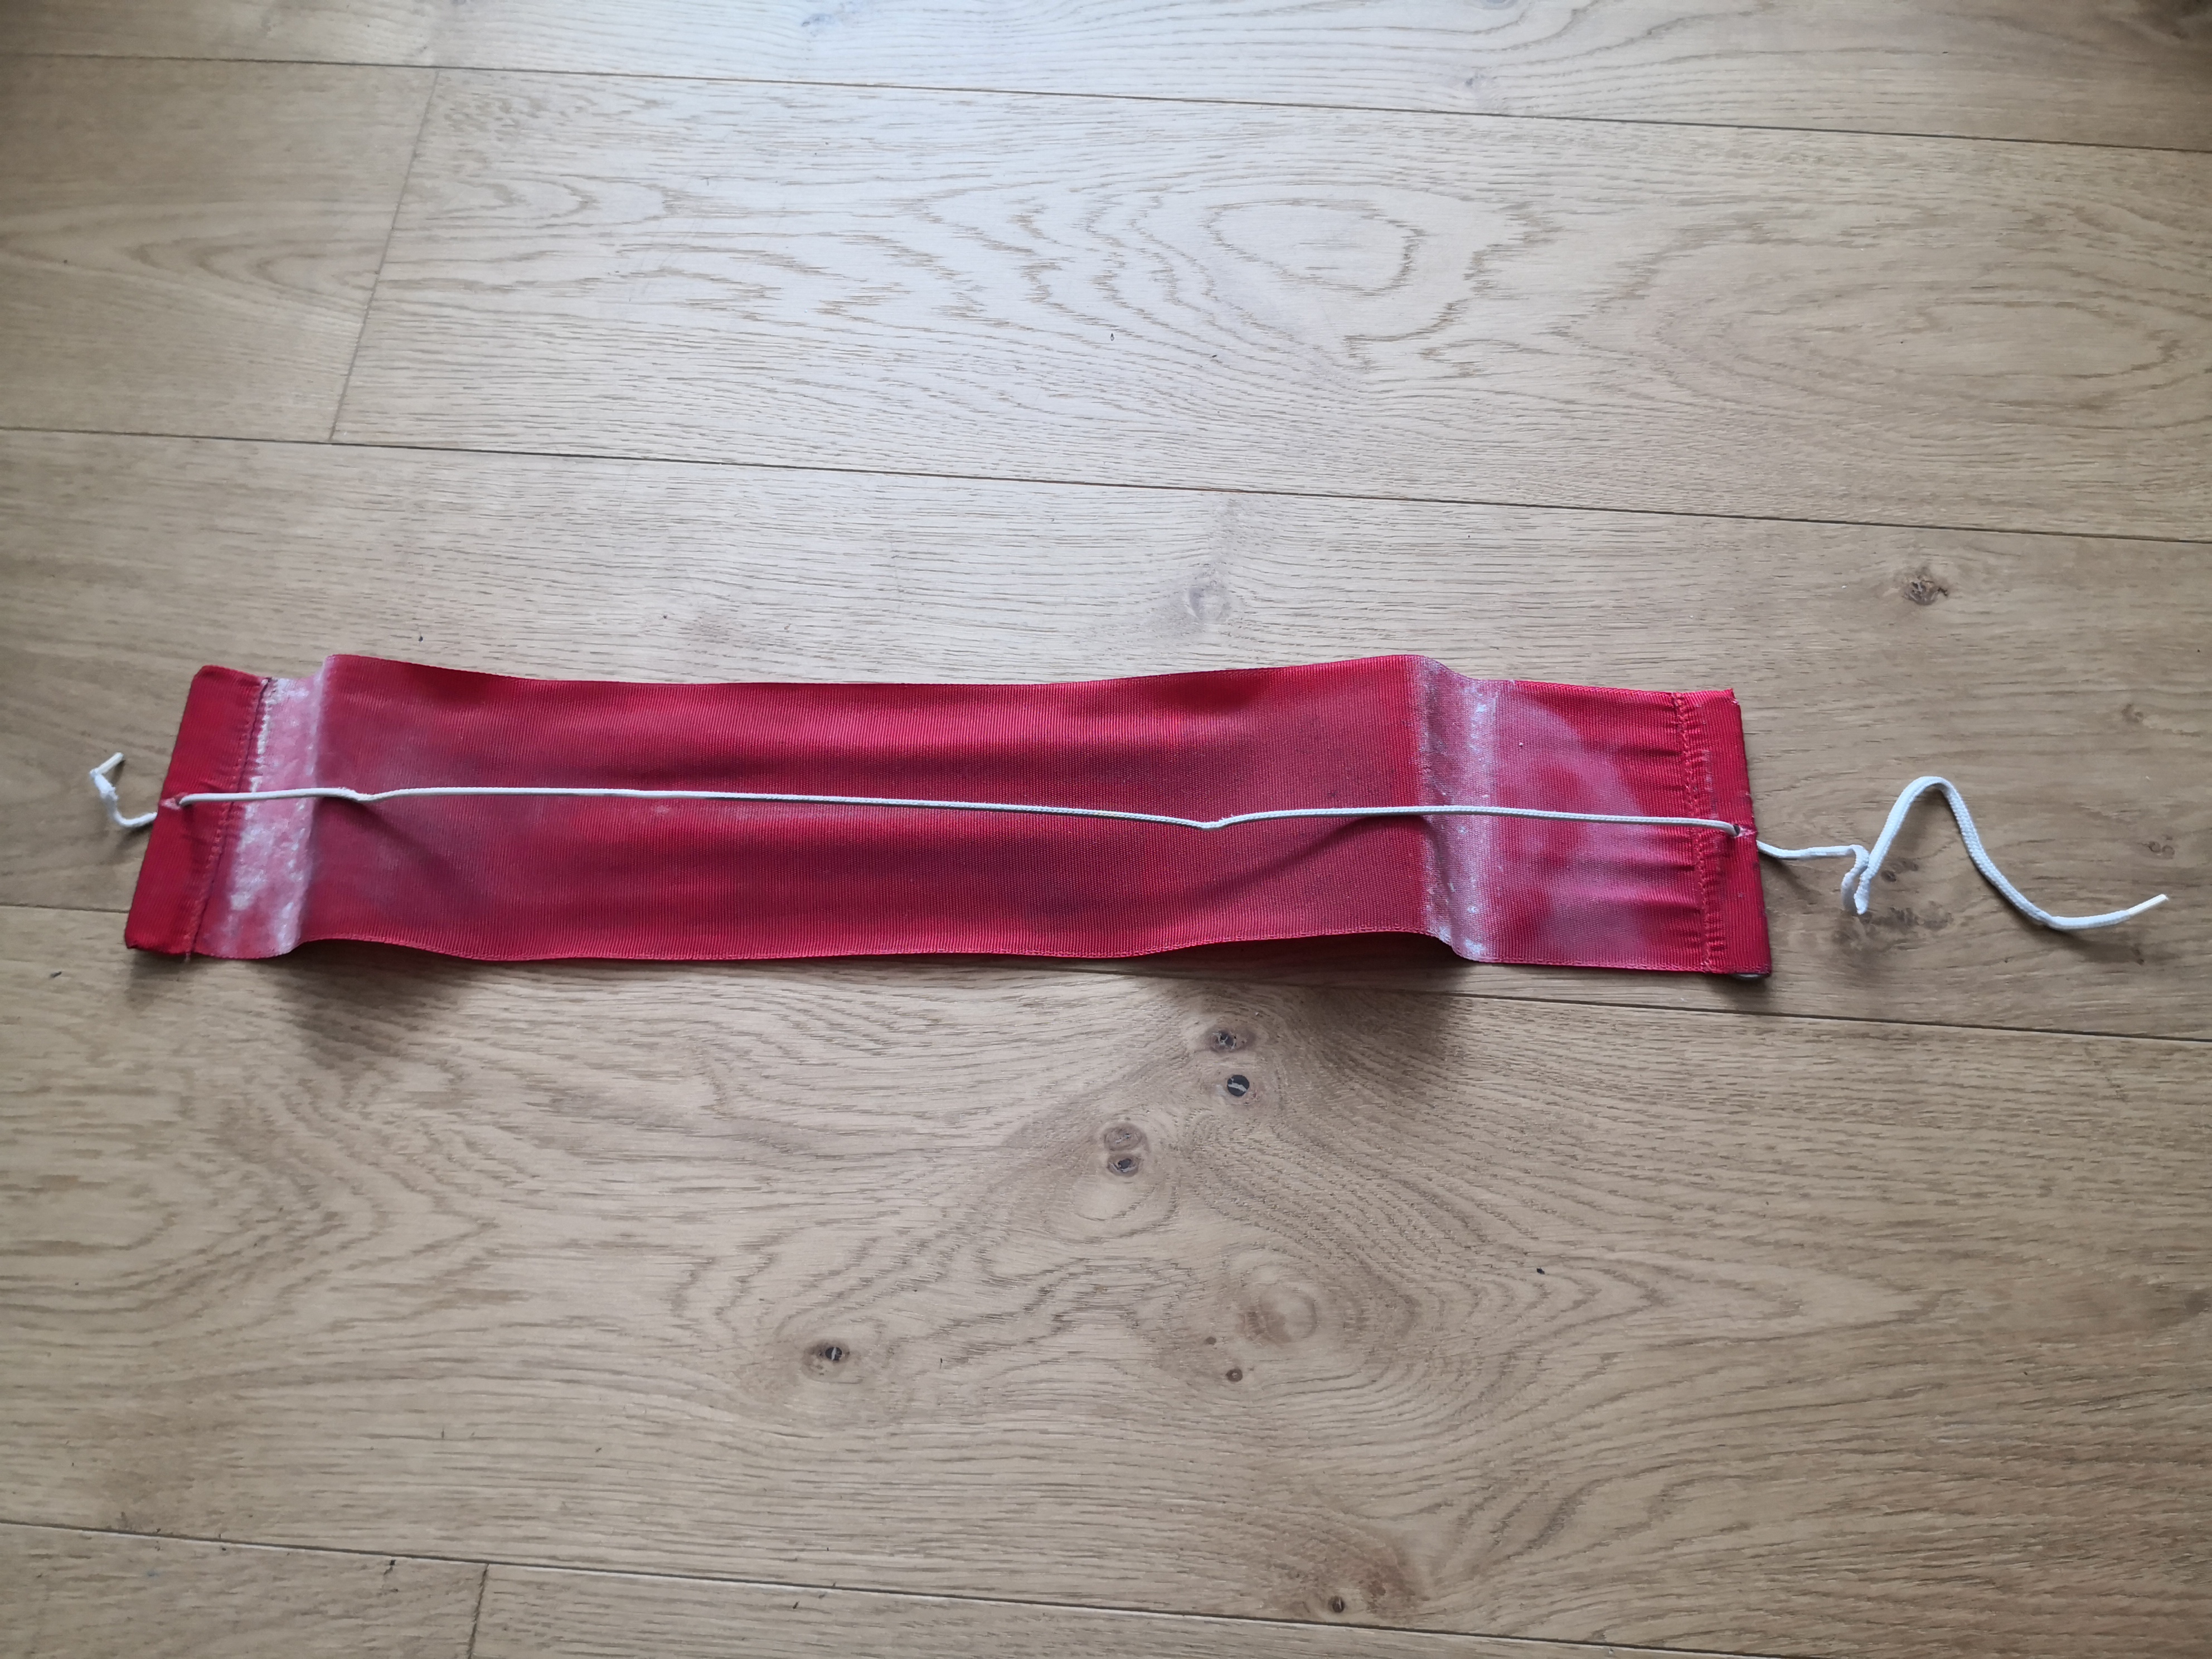
The frame was probably spraypainted satin black with these straps still on it, that´s why they also got some black paint and don´t stick out that much anymore.
-
List of components:
- "shotgunshells"/"capacitors"
- mortartube
- radardish backing plate
- radardish
- greyish-blue bottle
- toilet plunger cap
- Shires UP 90 vintage toiled syphon
- "beestinger"
- Gio´Style bottle
- Karrimor aluminium backpack frame
- Sonix Victory 75 radio
- Seedtrays
- Brexton Box
- Toilet plunger cap (same as number 6)
-
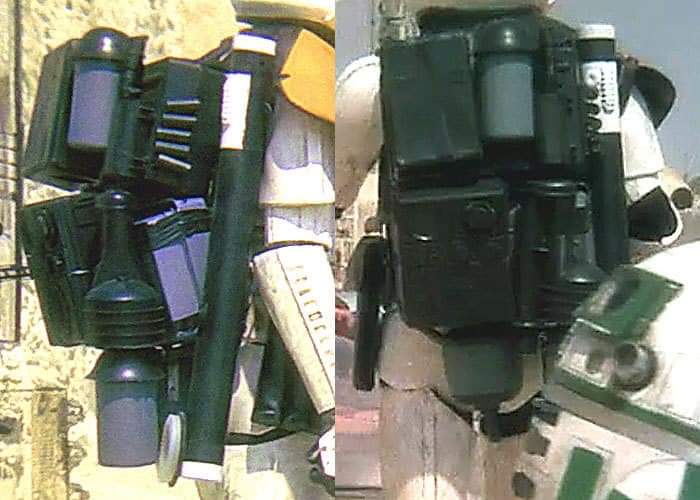
greyish-blue bottle
same colour as number 5 but at least to my eyes it seems to be slightly smaller in diameter than the lower bottle. -
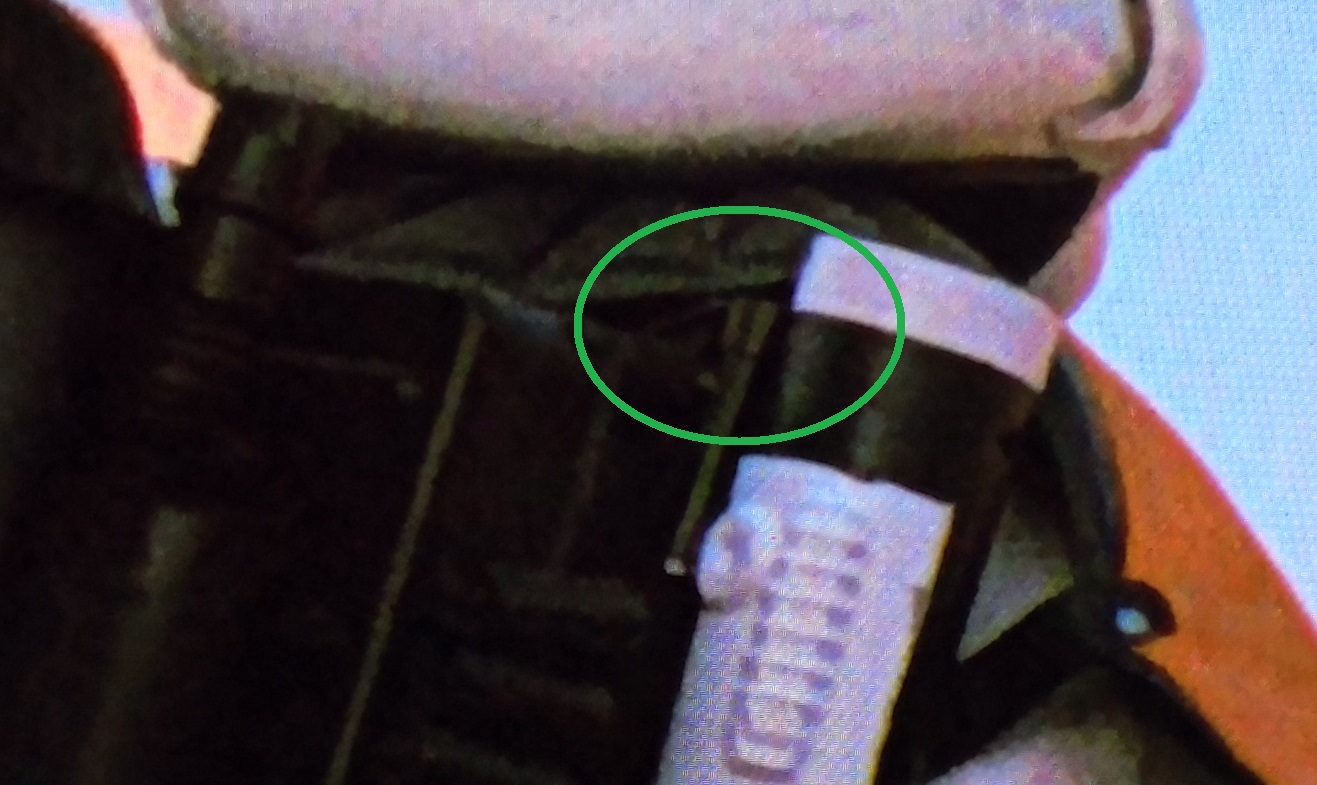
exhaust port
now I think this wasn´t any found part but just something quickly put together by the prop guys to look interesting.
Here´s the best reference pic I could find: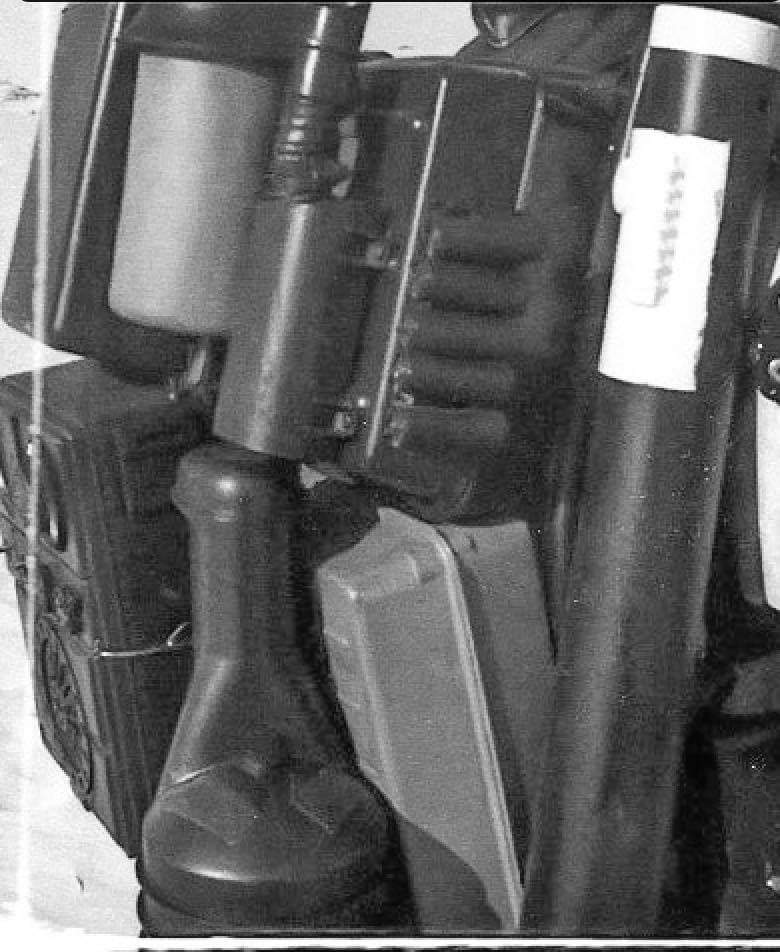
these is one detail which is relatively easy to build yourself. I have built mine from wood (main body), ABS U-shaped tube for the feet, different diameters of ABS tube (the actual end piece of the exhaust is 2,3 cm in (outer) diameter, while the smaller diameter tube is 2 cm in (outer) diameter and from what I can see,it exits the main body at an angle and then there´s a bend before the straight part with the actual exhaust begins. This is really easy to recreate with wood: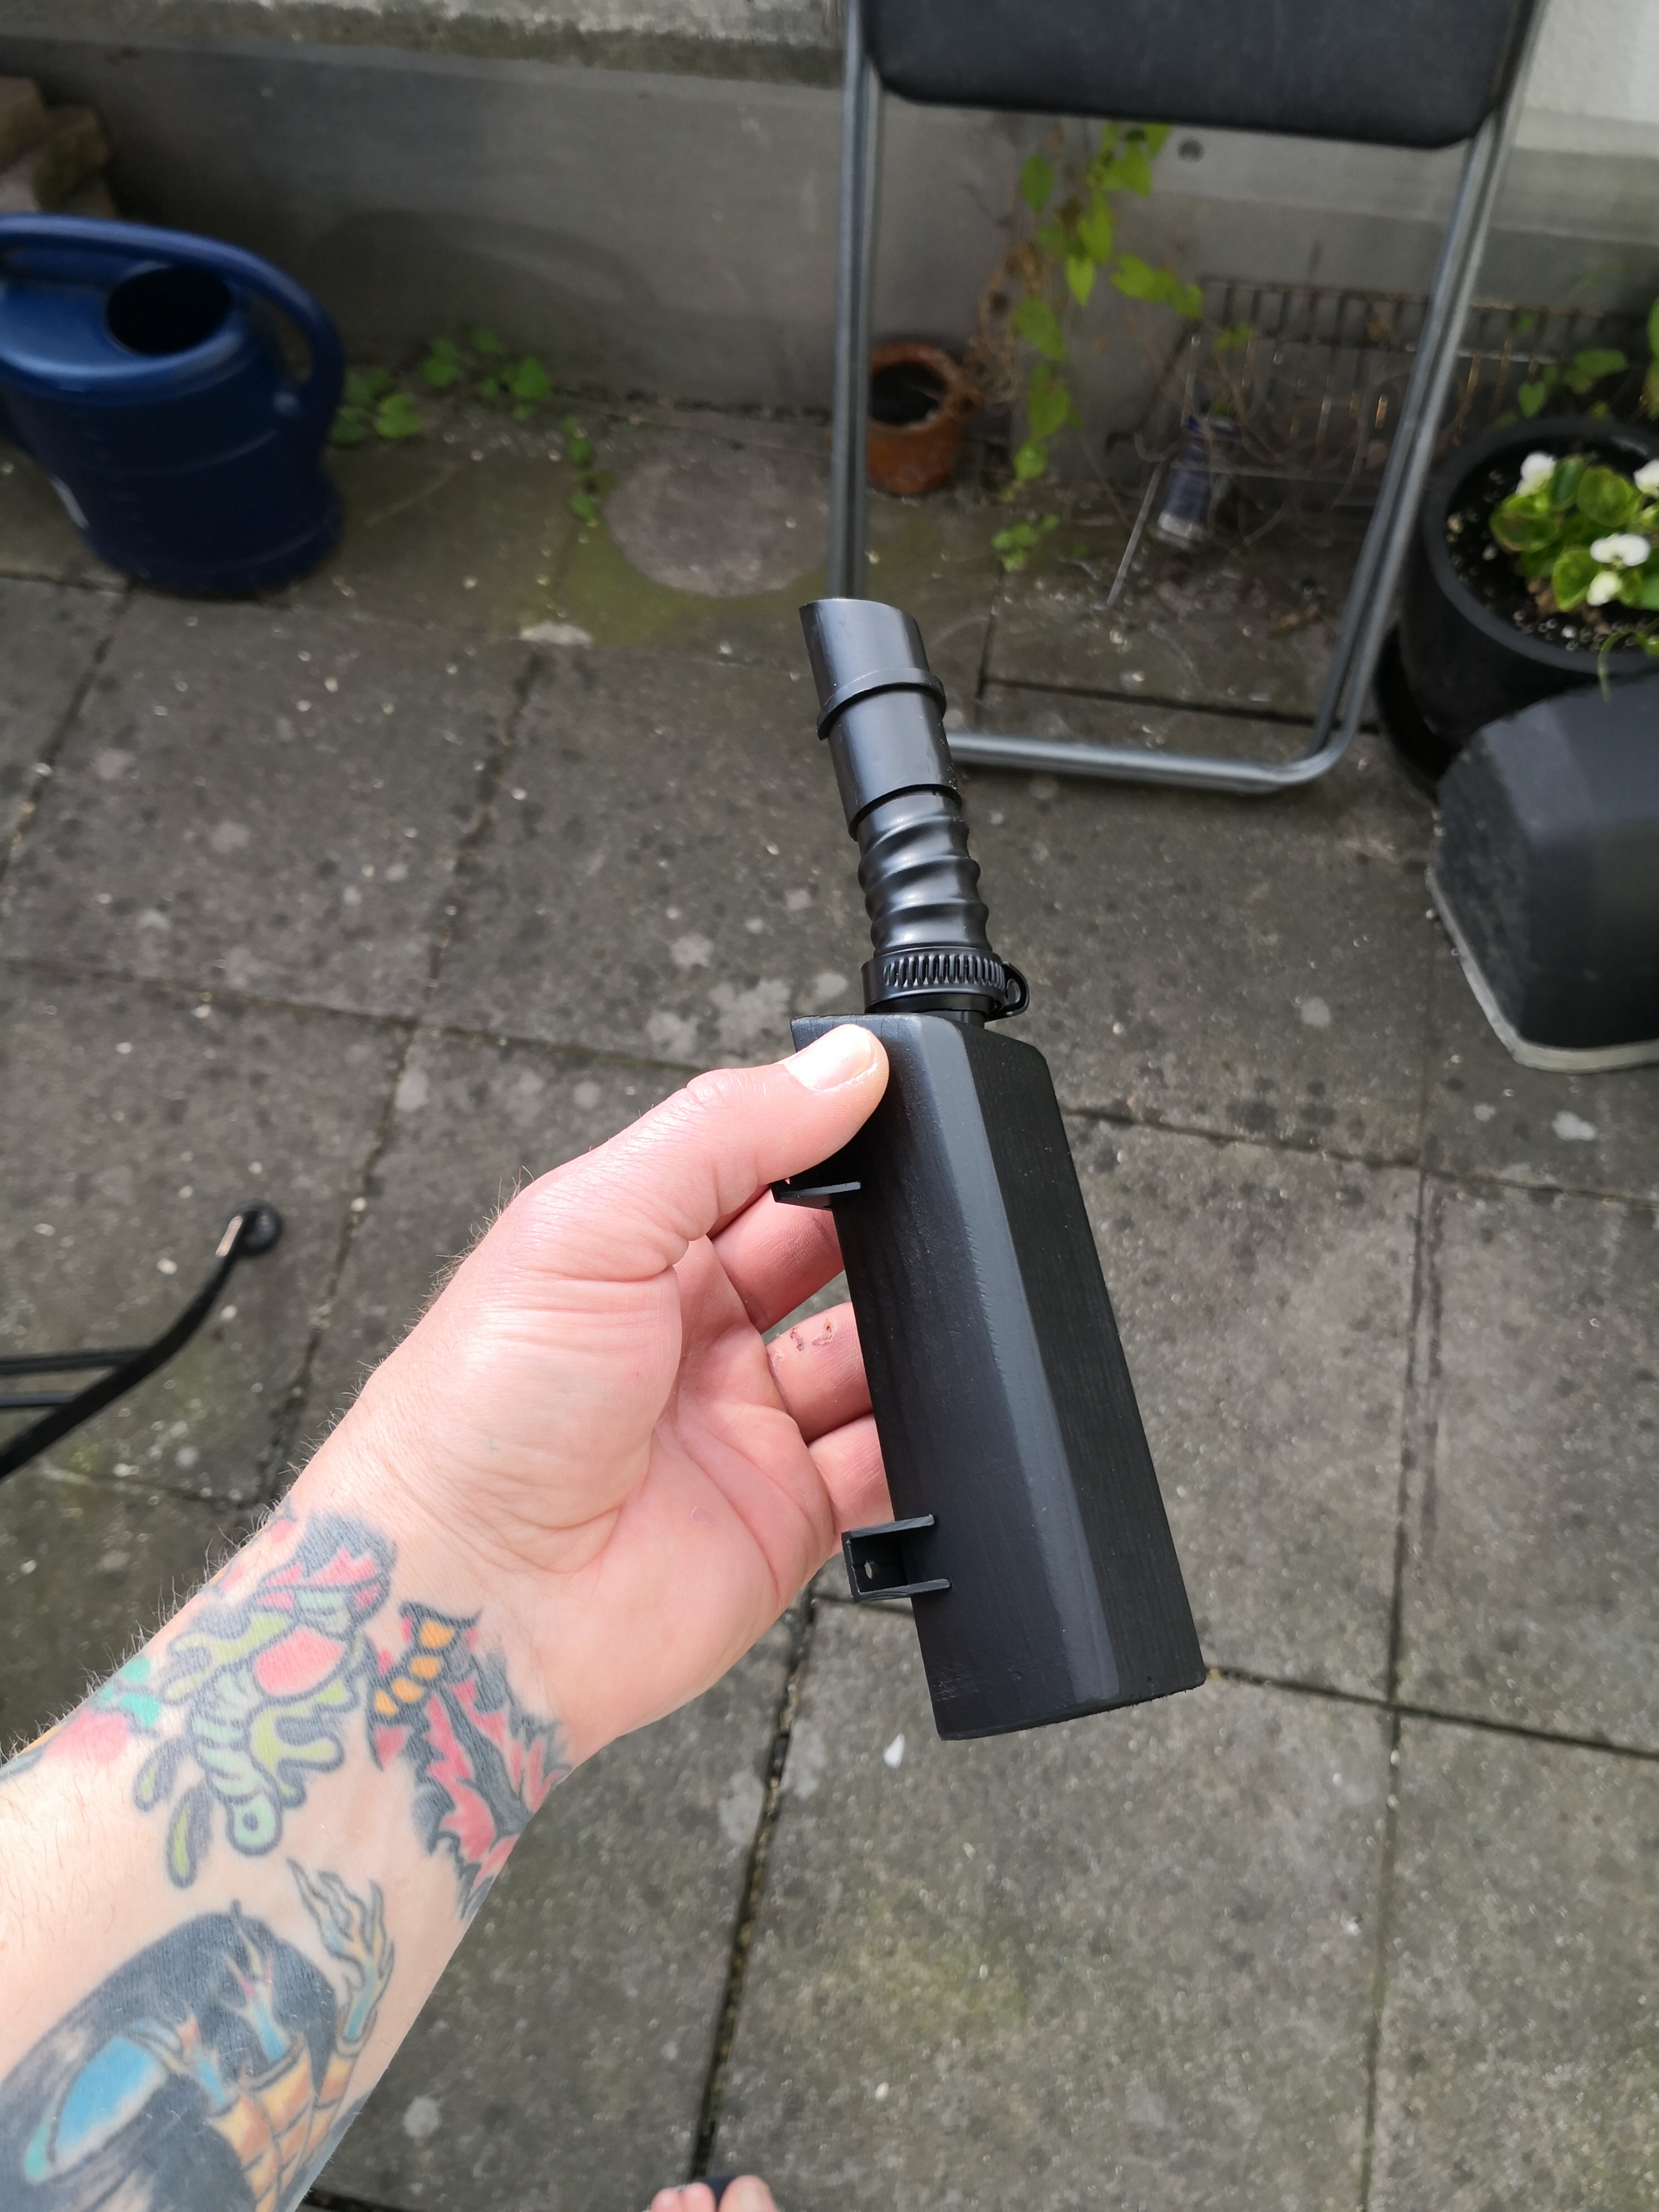
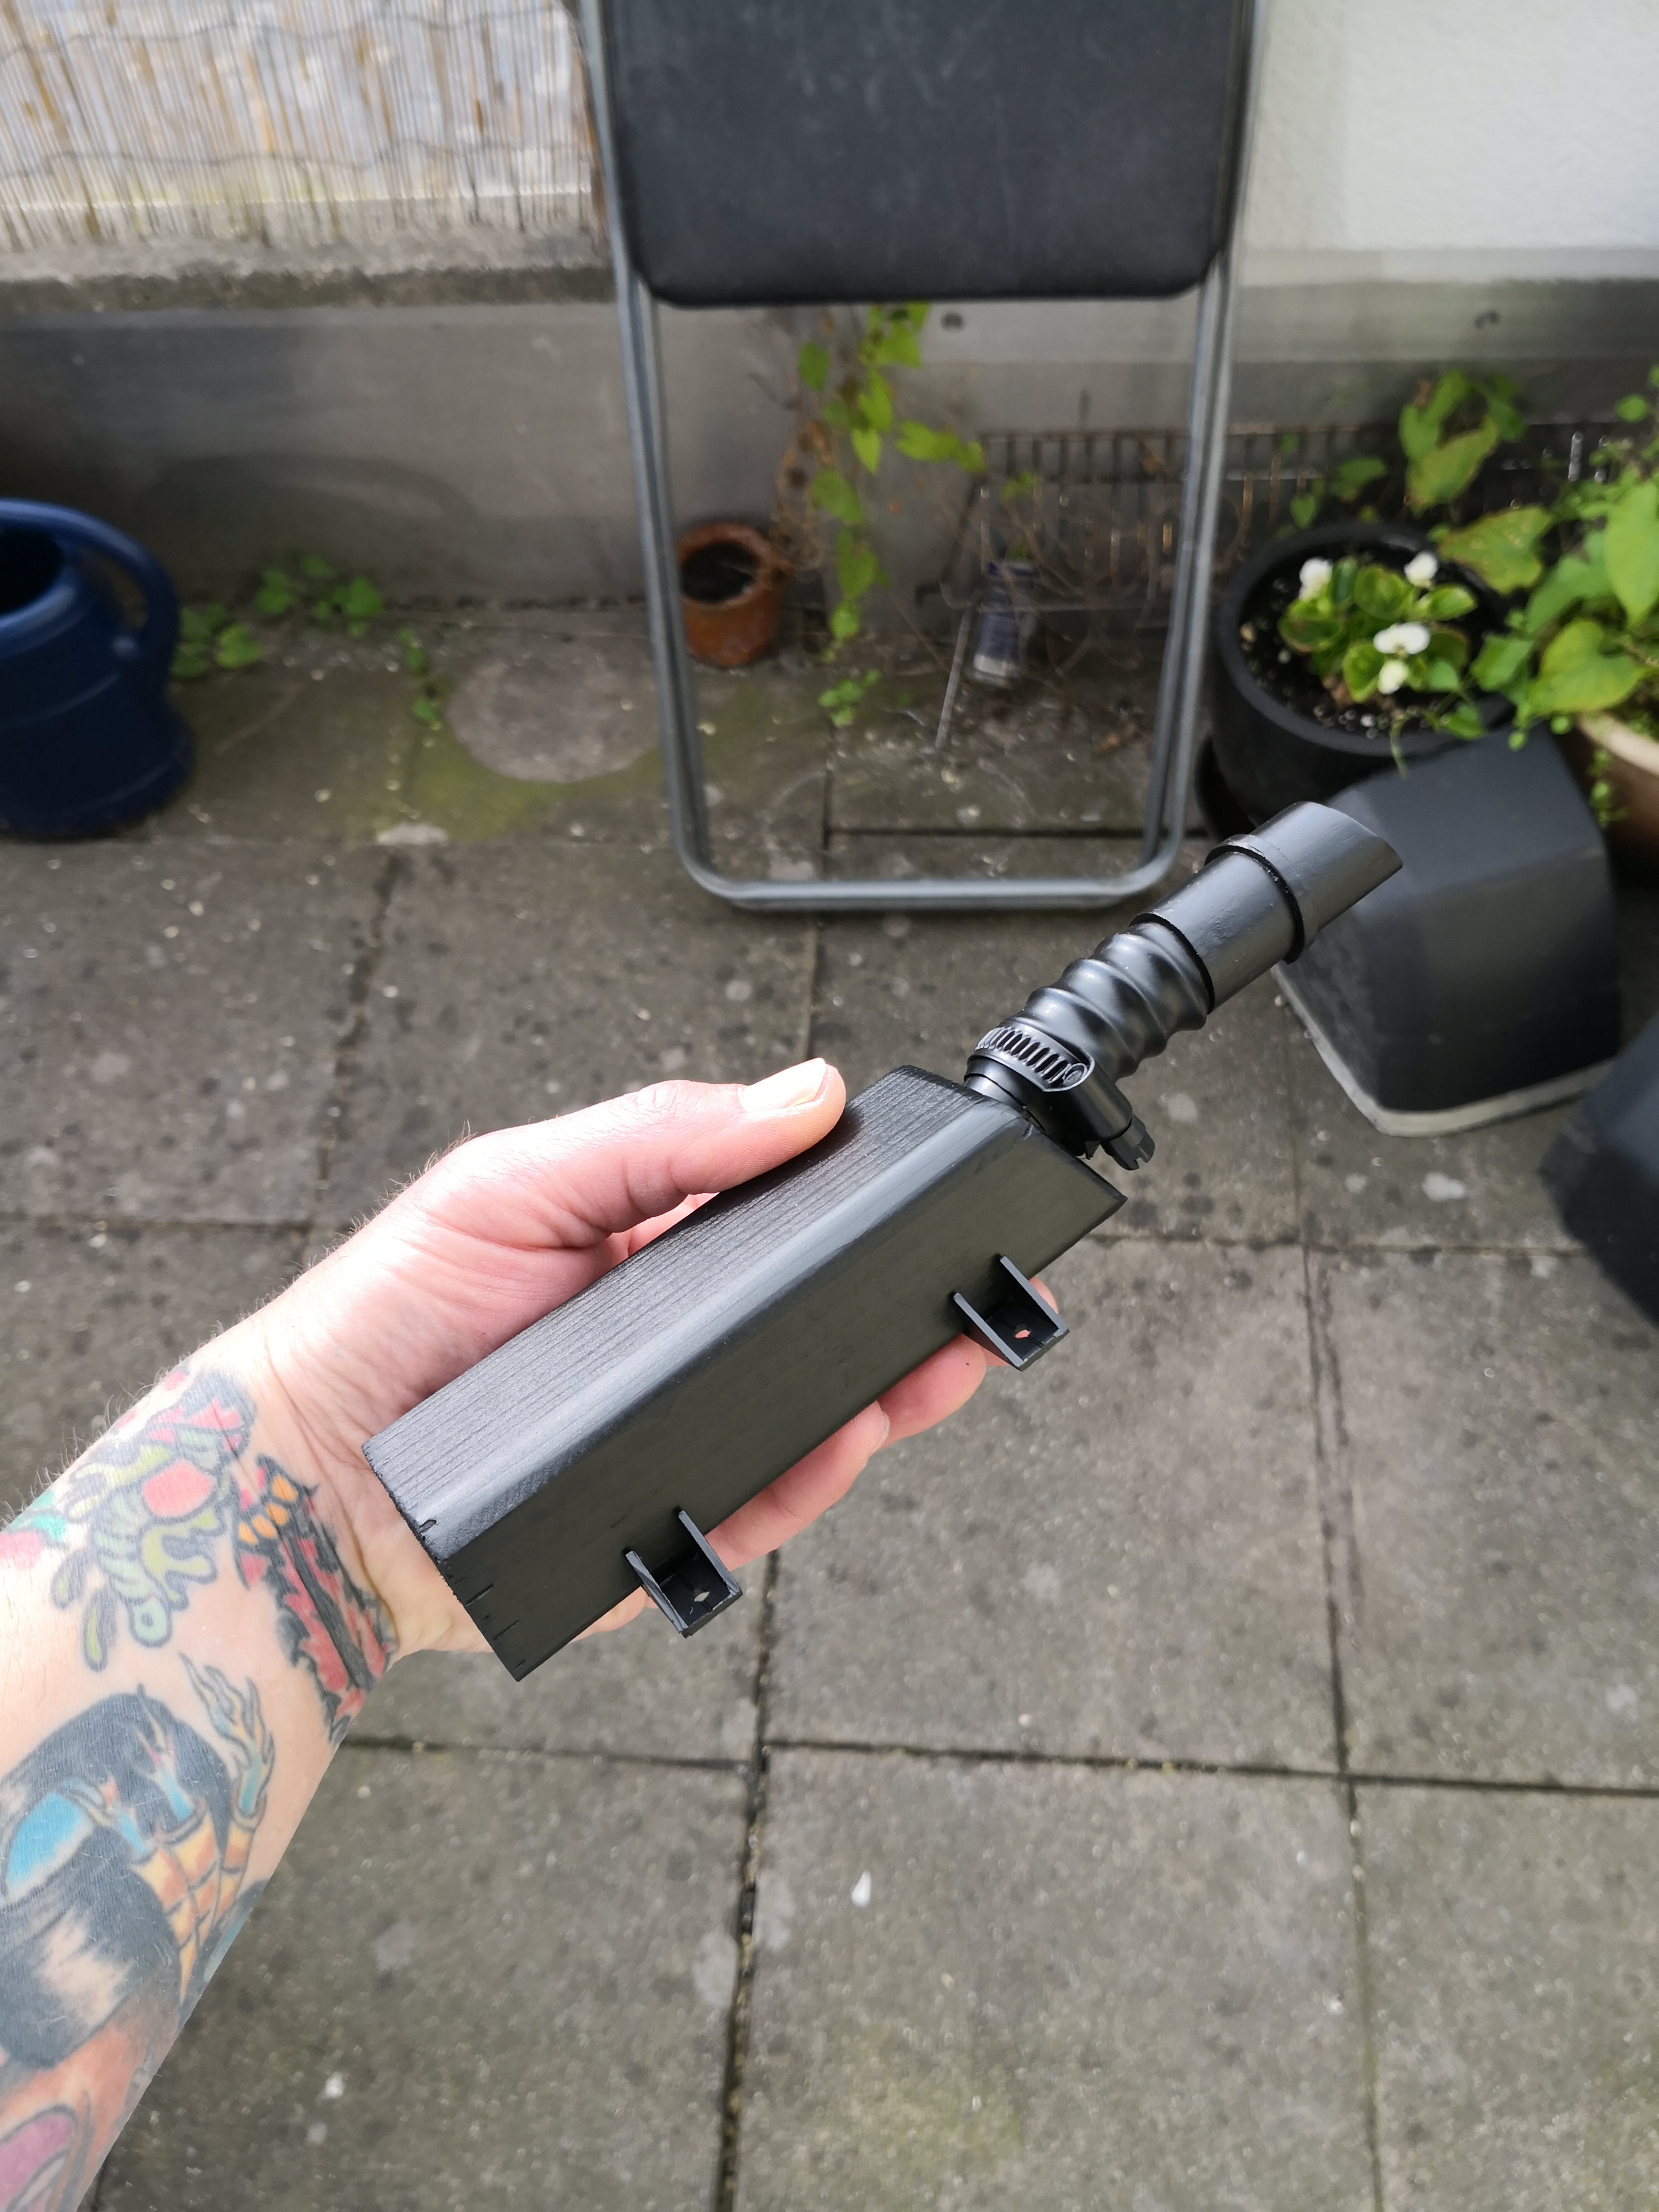
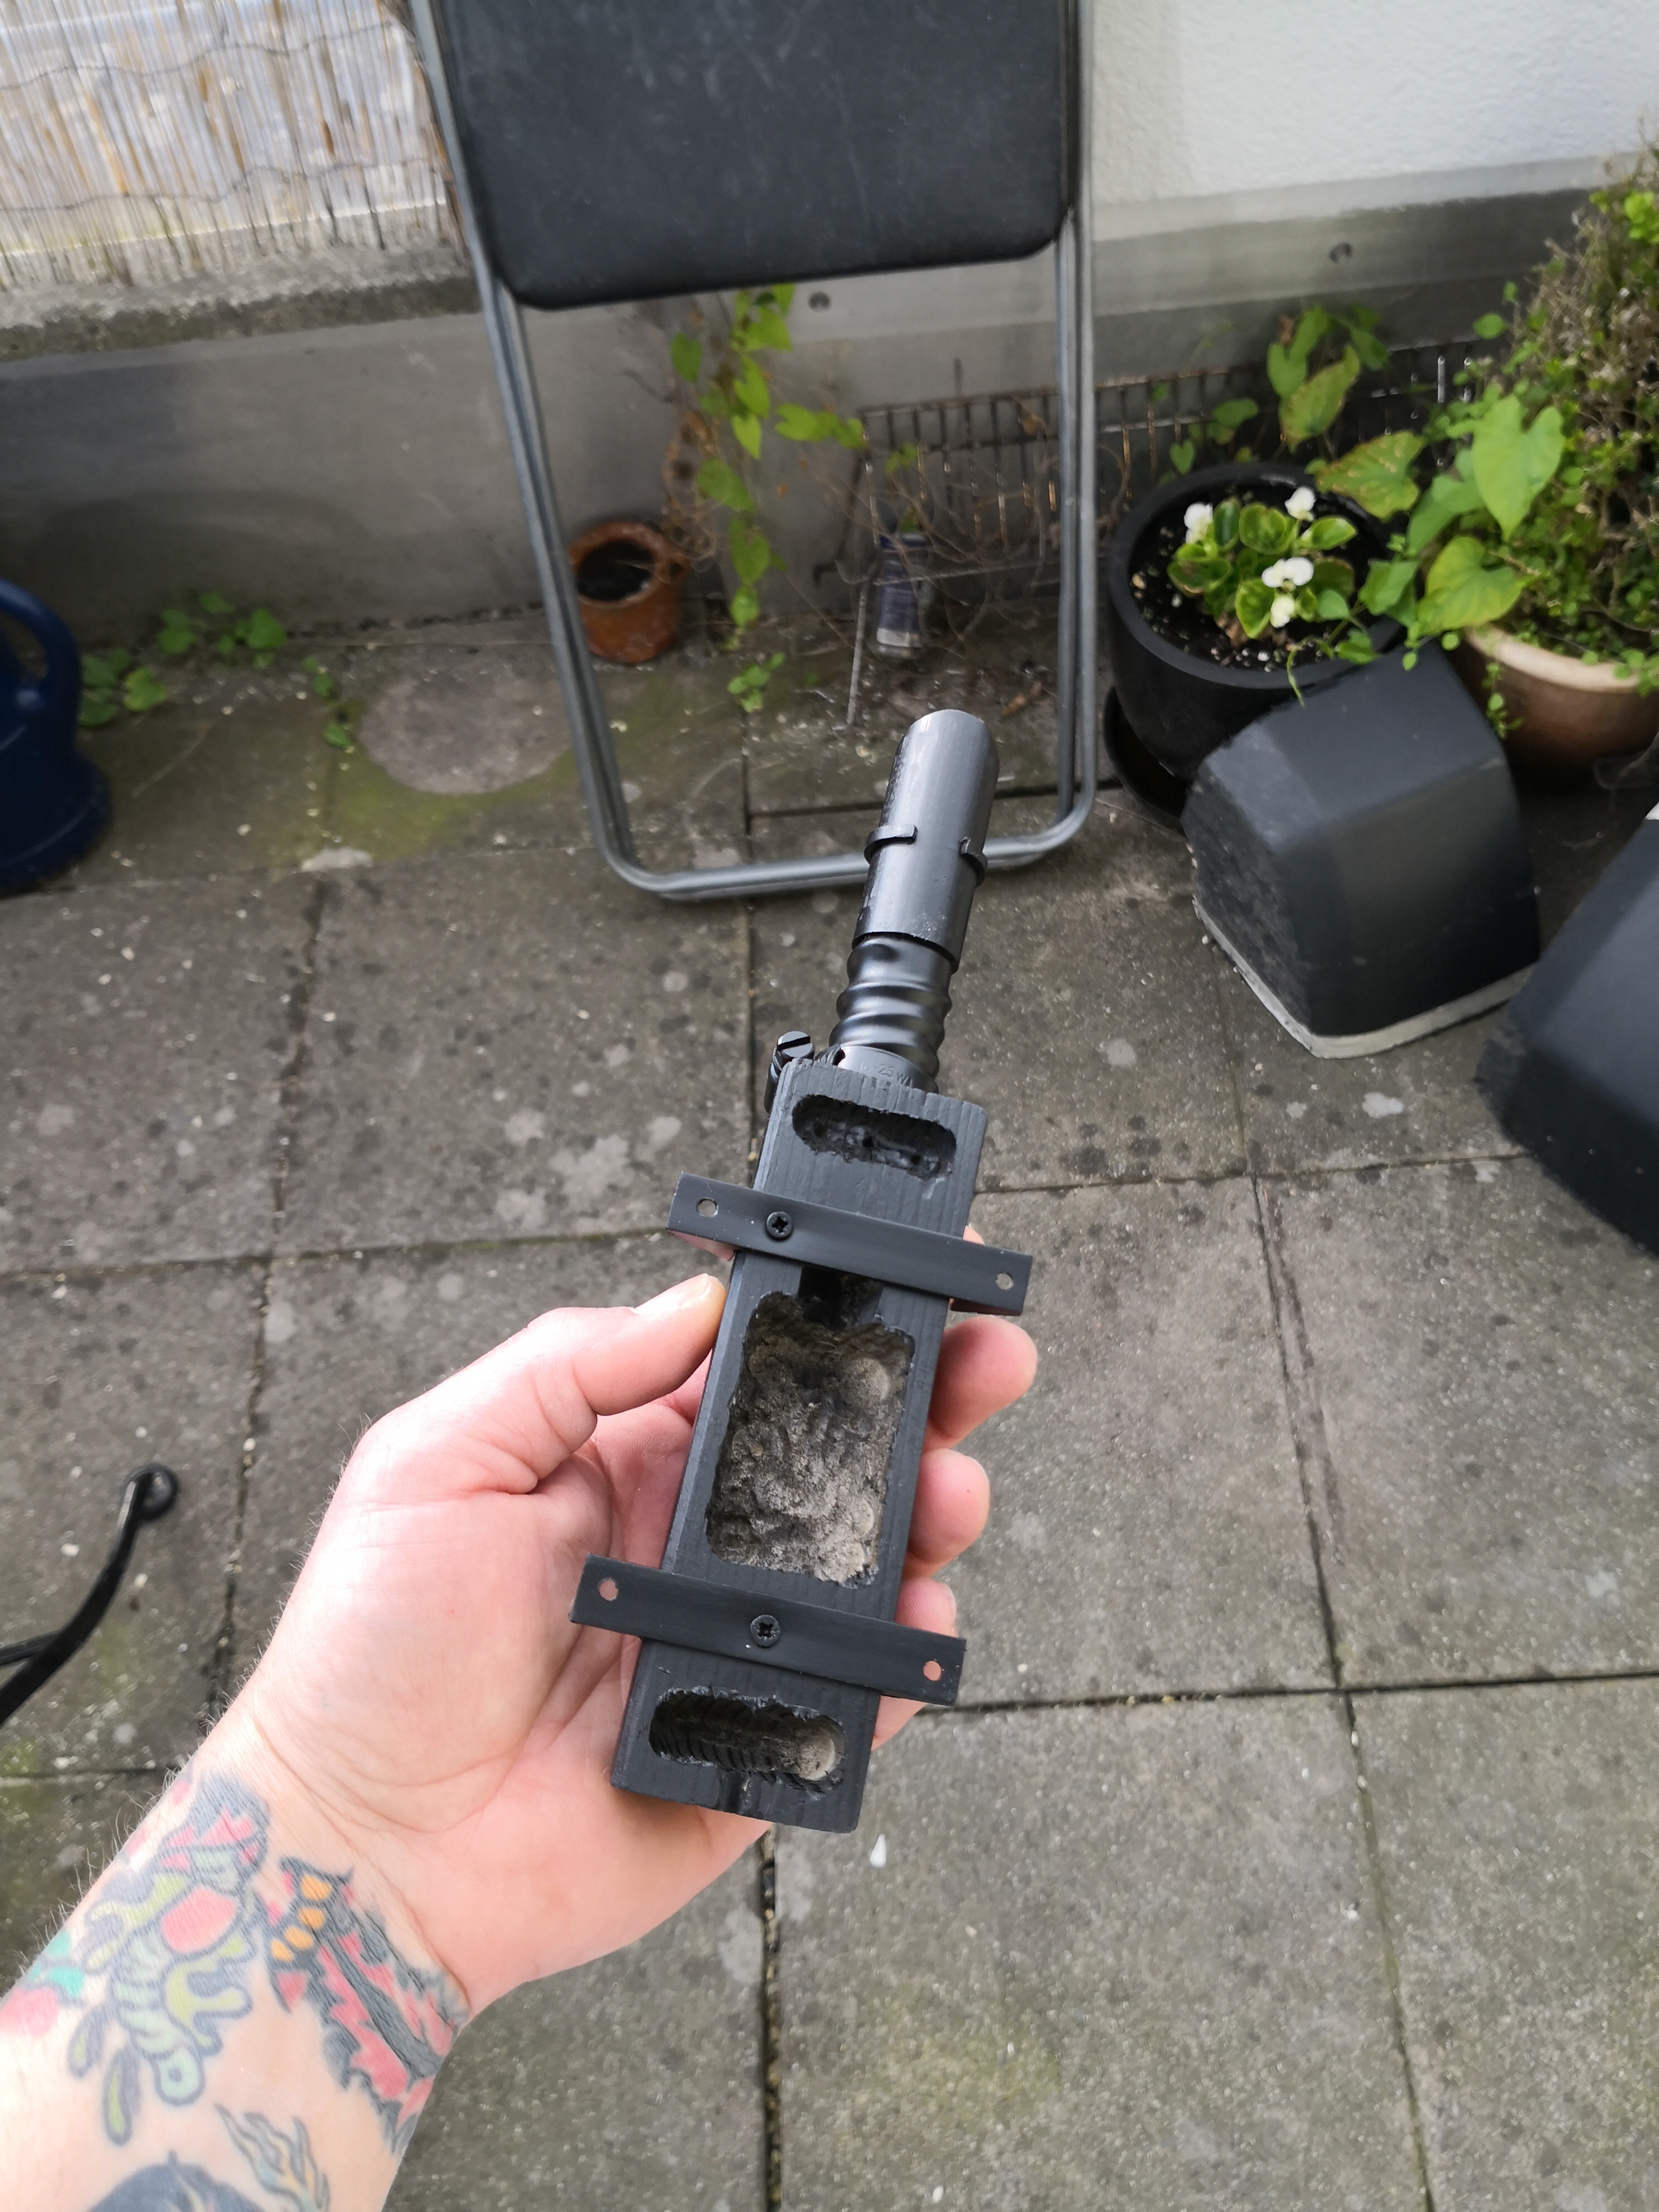
I think these pics are worth more than many words and may help you to build your own. finally I have used wire as well as some head-shrink rubber to get the look of the center section of the tube right and finally added the hose clamp, make sure that it faces in the right direction.
-
List of components:
- "shotgunshells"/"capacitors"
- mortartube
- radardish backing plate
- radardish
- greyish-blue bottle
- toilet plunger cap
- Shires UP 90 vintage toiled syphon
- "beestinger"
- Gio´Style bottle
- Karrimor aluminium backpack frame
- Sonix Victory 75 radio
- Seedtrays
-
Brexton Box
These boxes can be found in picnic baskets.
There are actually two different variants of them which vary in shape:
I for one think that they have used the version on the right but let´s also know what you think.
There is a "cross" of narrow duct tape across this box and on the visible left side there´s some weird shape which might be overspray of bluish grey or even the box´s original color, it´s very hard to tell from screen caps.
I personally think that some parts around the edges look brighter than the rest, which looks just bluish grey to me, so I tried to emulate those areas by sanding down the paint again until the bright plastic of the Brexton box showed.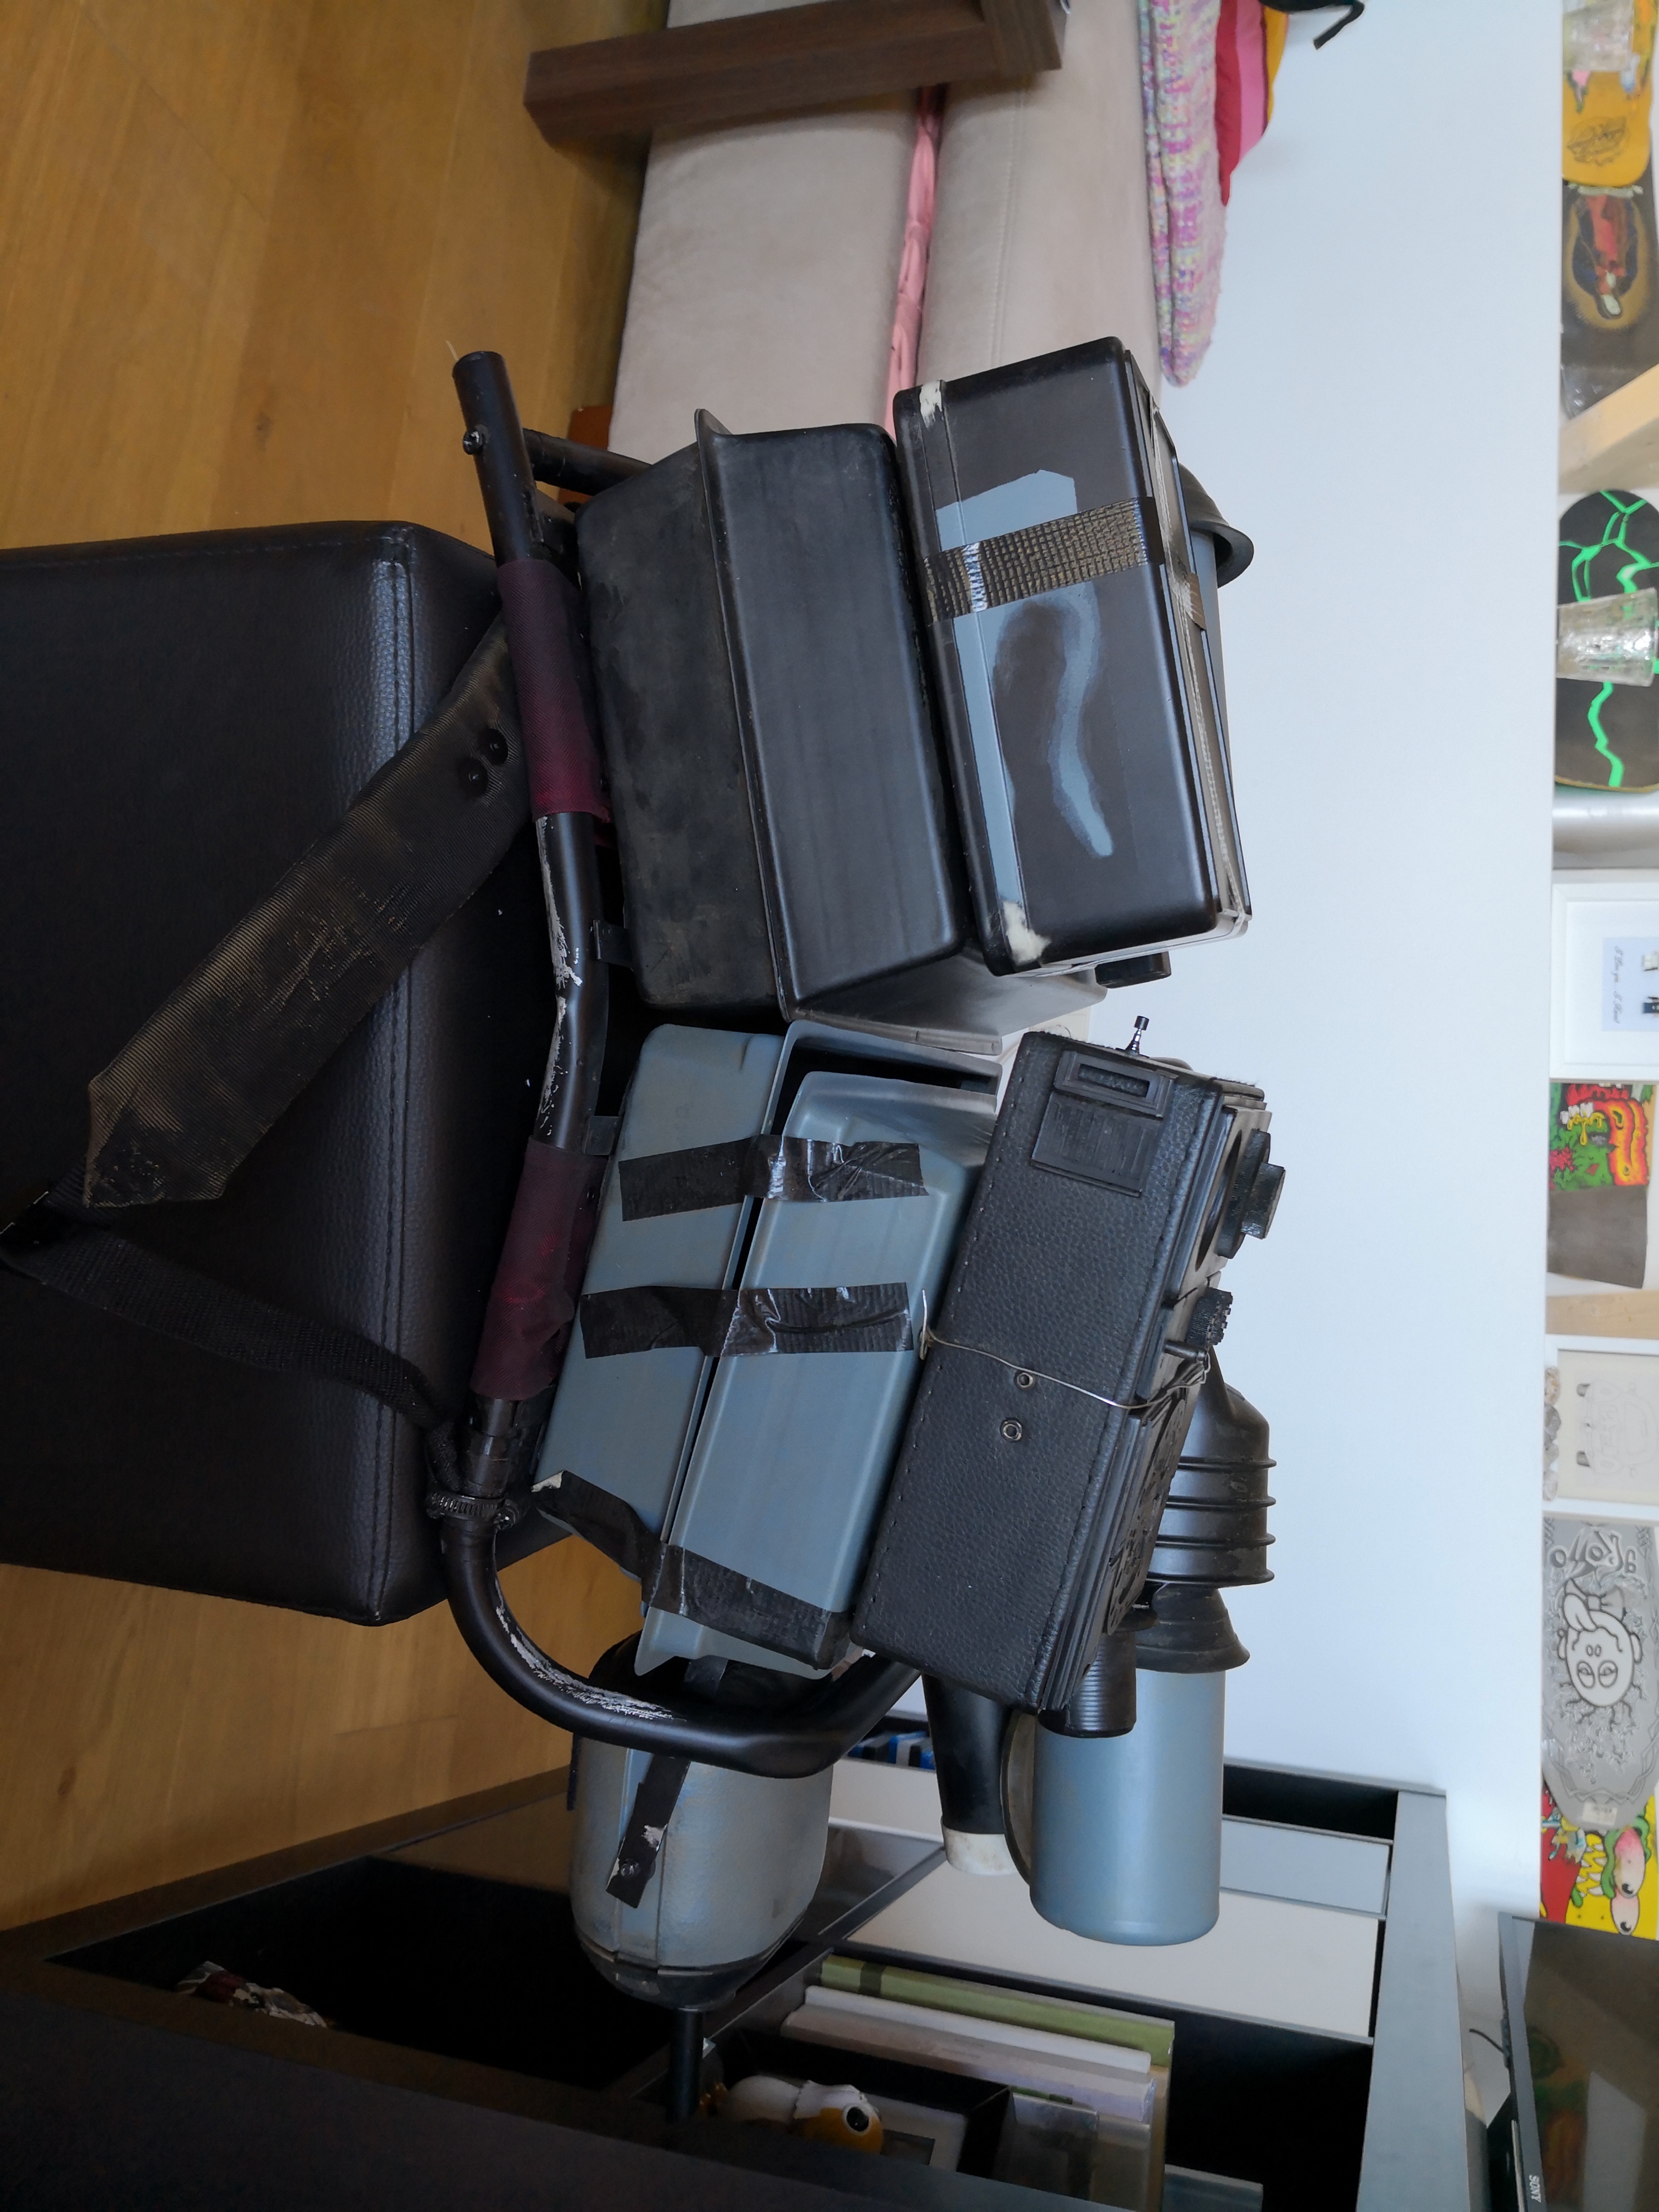
-
List of components:
- "shotgunshells"/"capacitors"
- mortartube
- radardish backing plate
- radardish
- greyish-blue bottle
- toilet plunger cap
- Shires UP 90 vintage toiled syphon
- "beestinger"
- Gio´Style bottle
- Karrimor aluminium backpack frame
- Sonix Victory 75 radio
-
Seedtrays
On pack#3 the upper seedtrays have 3 ribs while the lower trays have 5. As these were trays to plant your plants in, they might have had holes for the water to drain. I couldn´t really tell from the references so haven´t added them to mine.
New vacformed seedtrays can be bought from several makers, e.g. RWA creations.
Depending on what version of pack#3 you want to build, the seedtrays should be perfectly assembled with NO duct tape holding them together:
or the lower seedtrays almost falling apart, held together by black duct tape: on the right side at least one wide strap at the top and a narrow strap at the bottom, it´s also possible that this was also a wide strap as at the top and just looks narrow as it goes around the edge of the tray.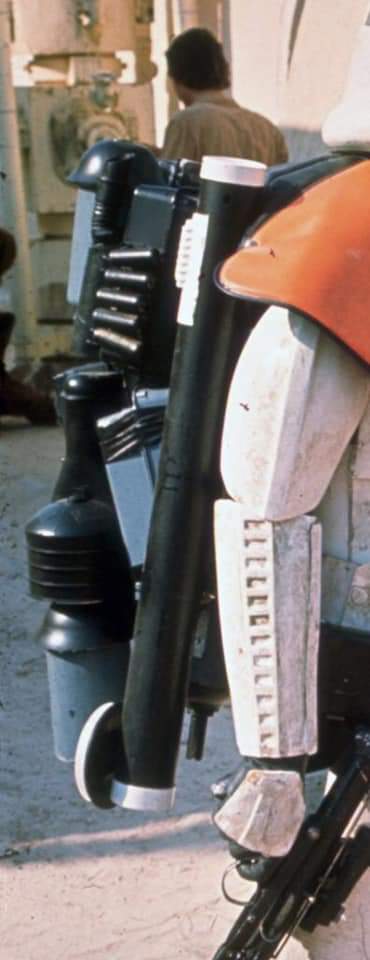
This is what it looks like on my pack: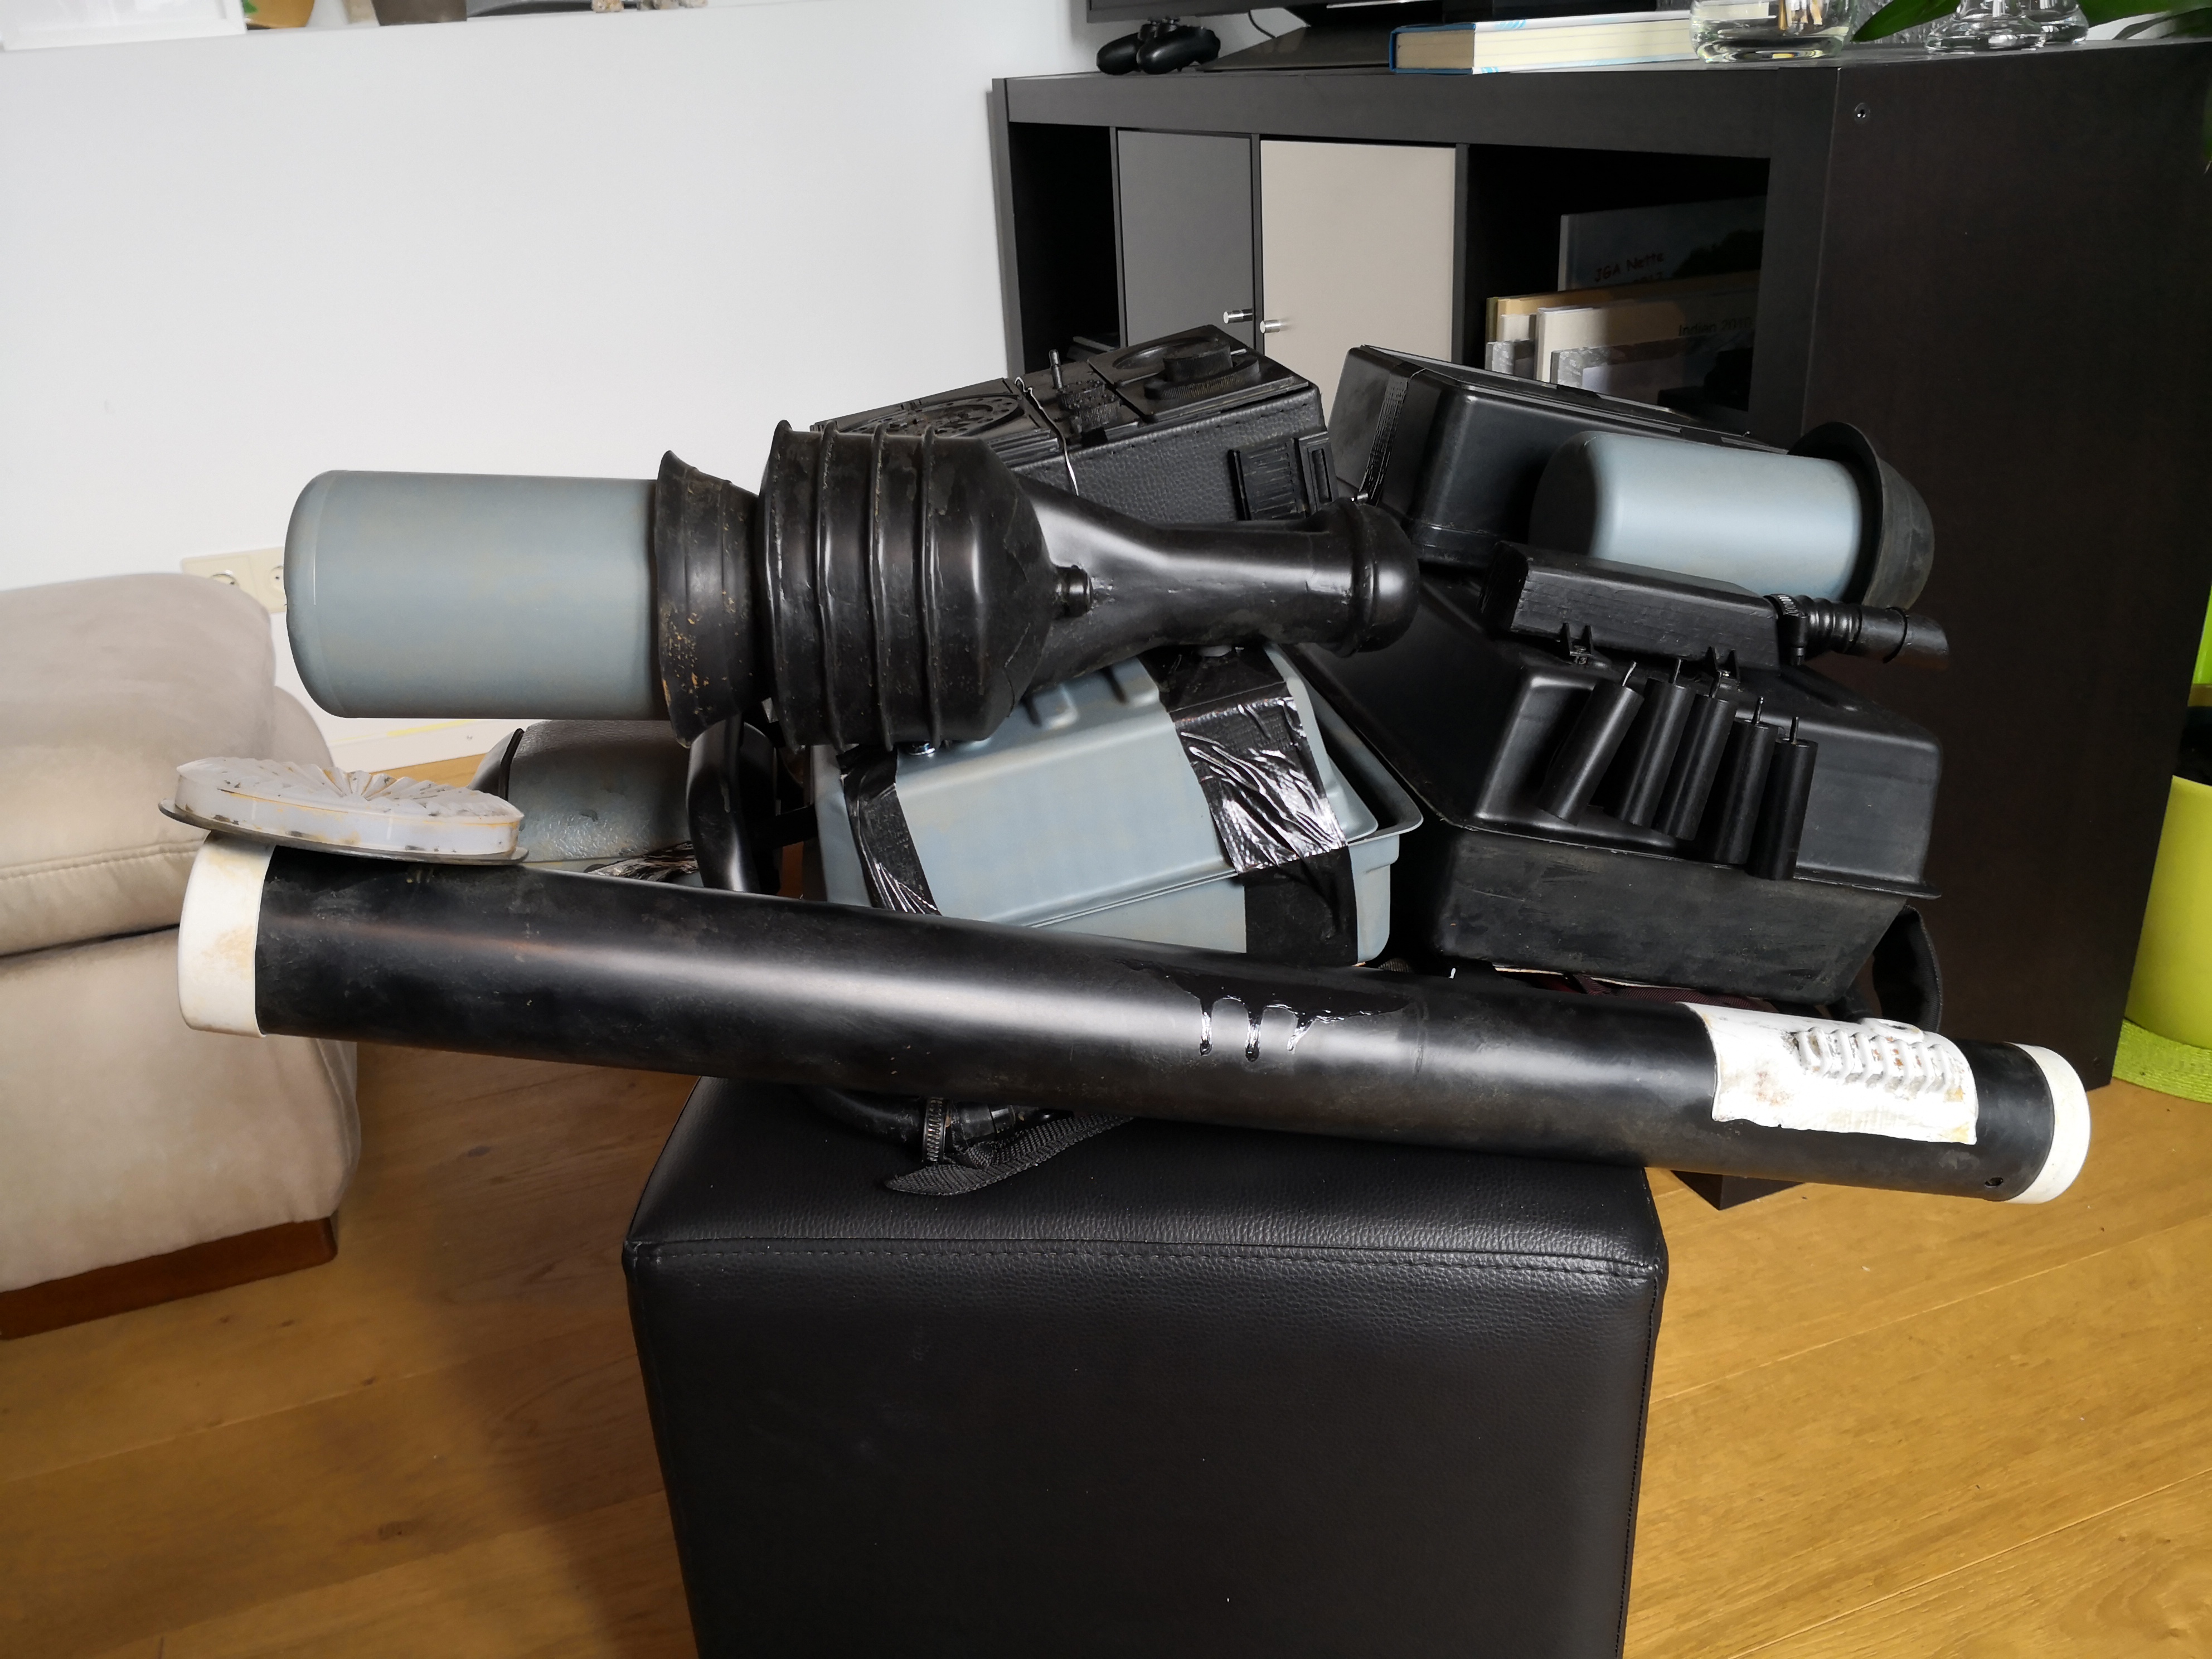
On the left side you can see three narrow straps of duct tape: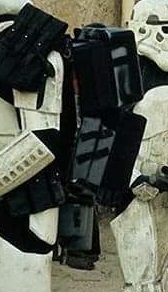
The one at the bottom has the the upper left edge crinkled, here´s my pack: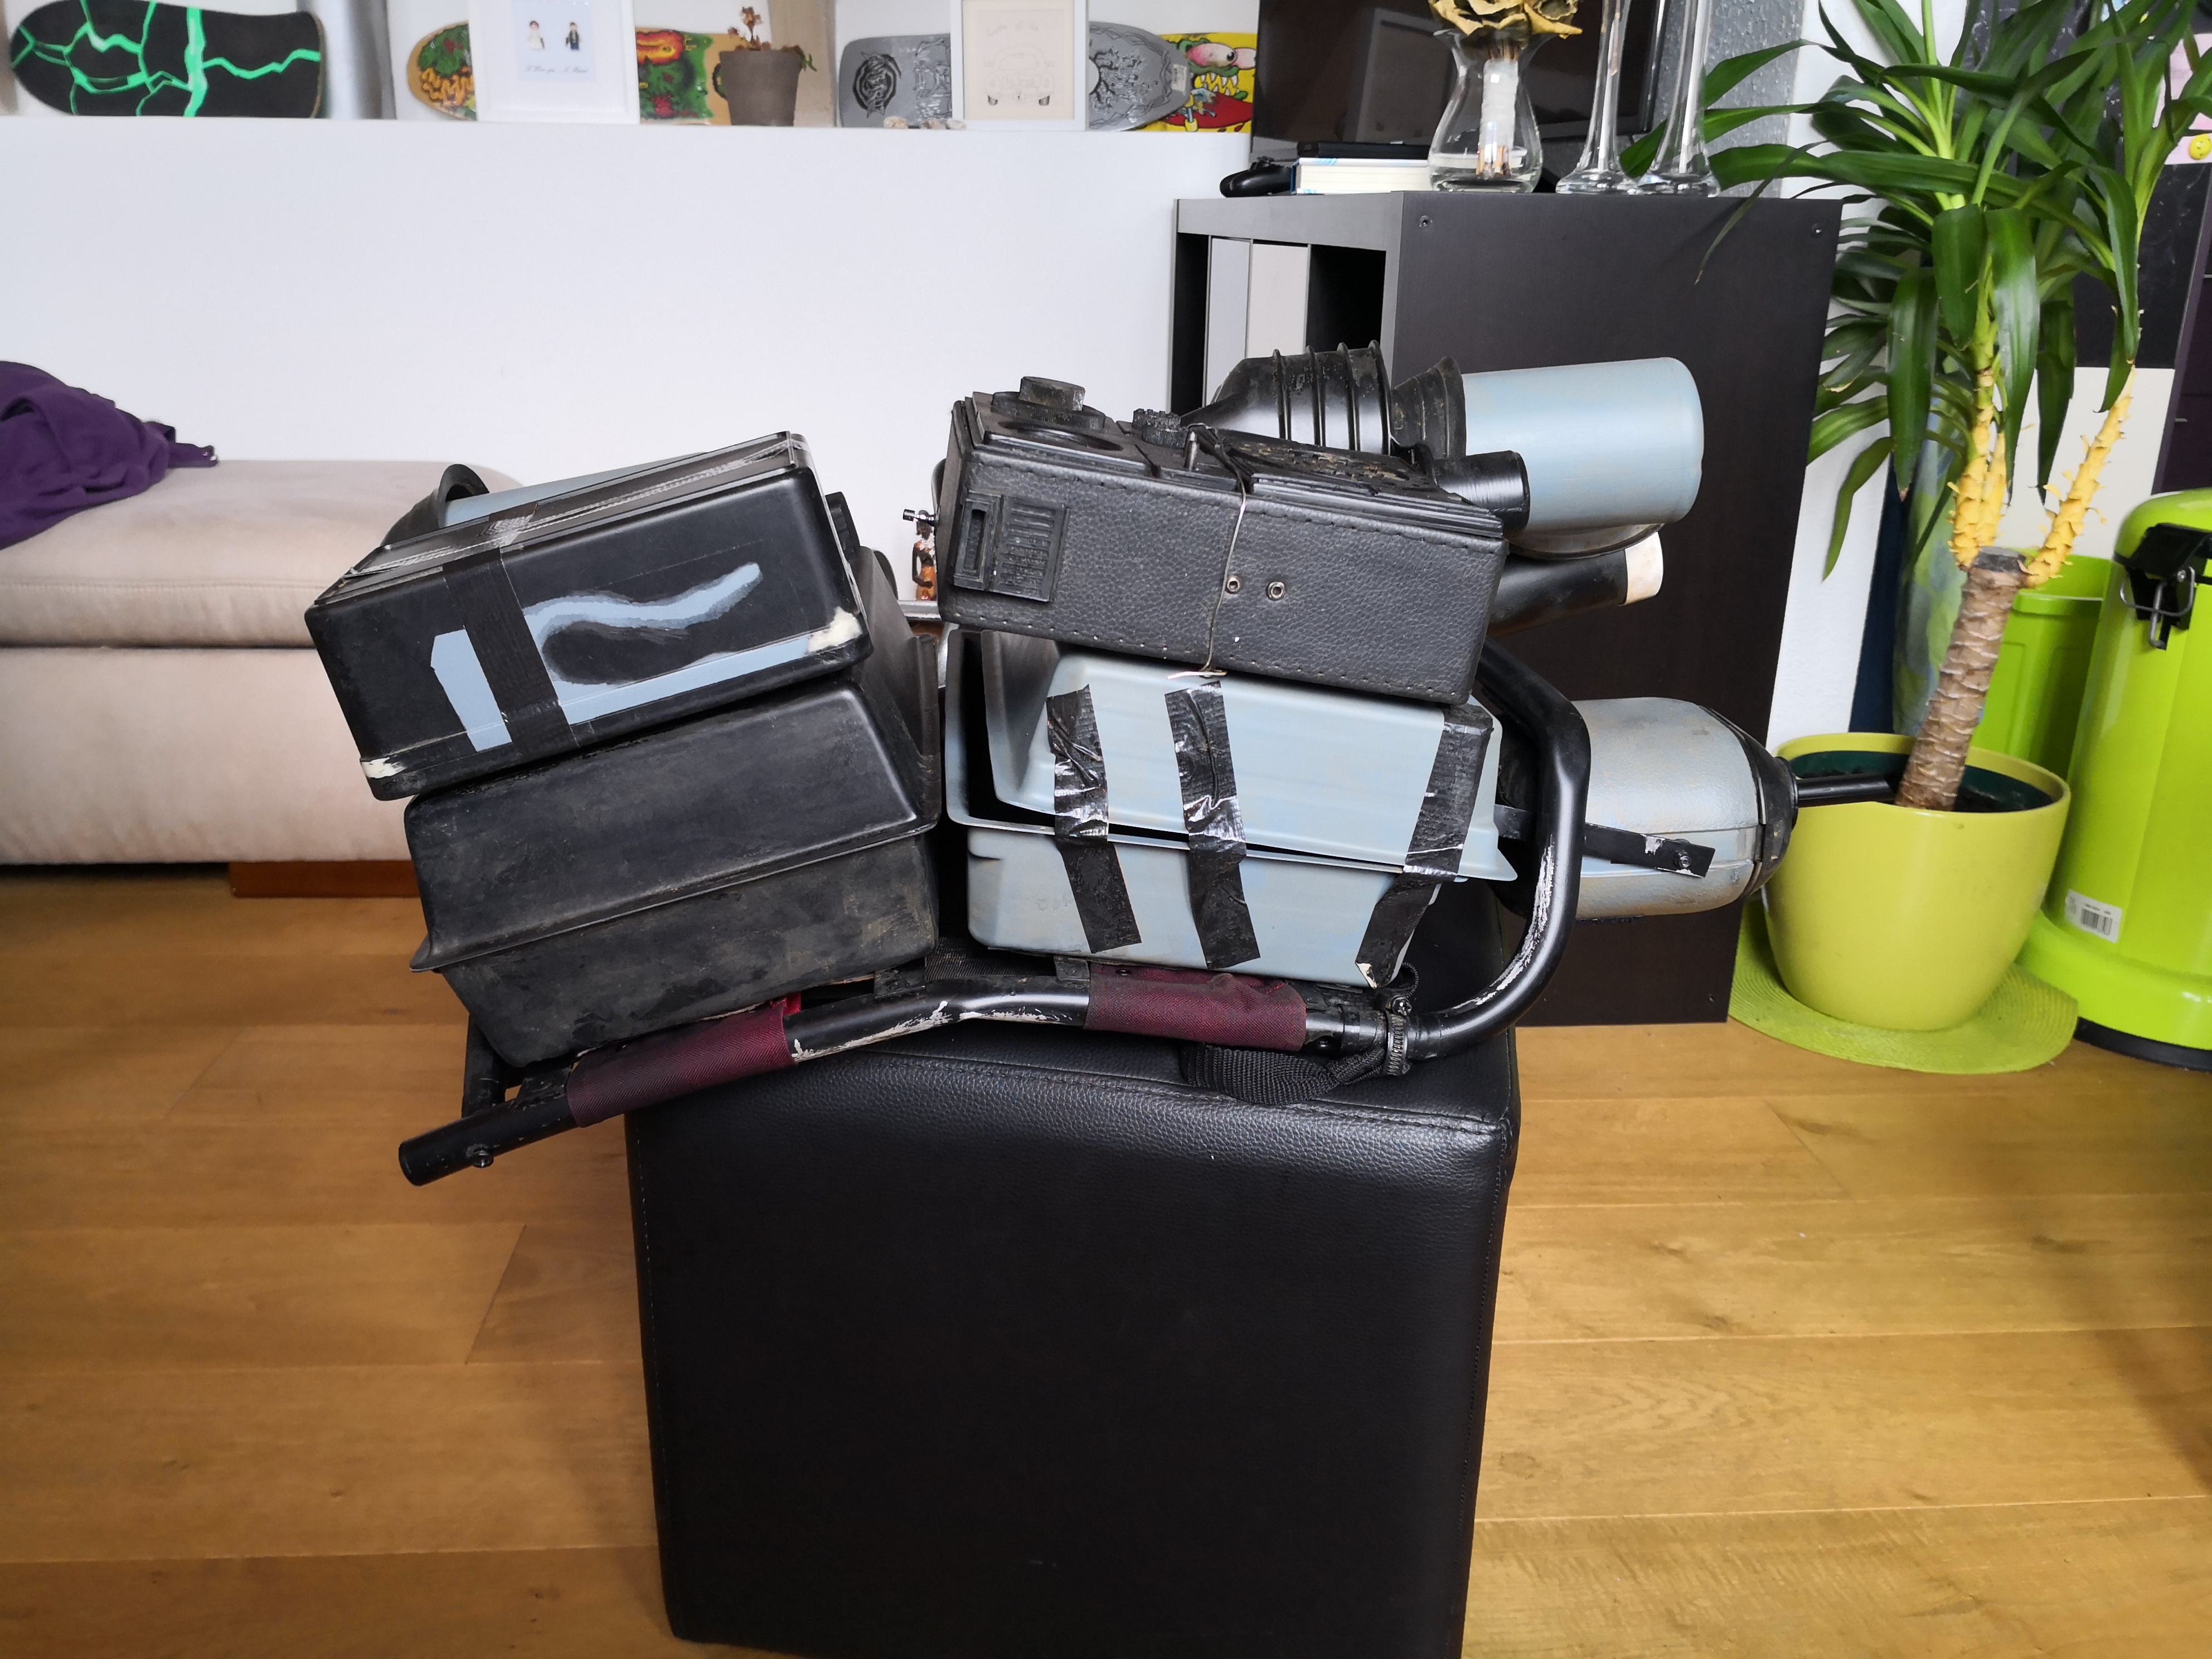
The gap between the trays on the left side is much more noticeable than on the right side, I found the easiest way to emulate this was using a self-made aluminium frame to which the seedtrays as well as the radio and syphon are attached: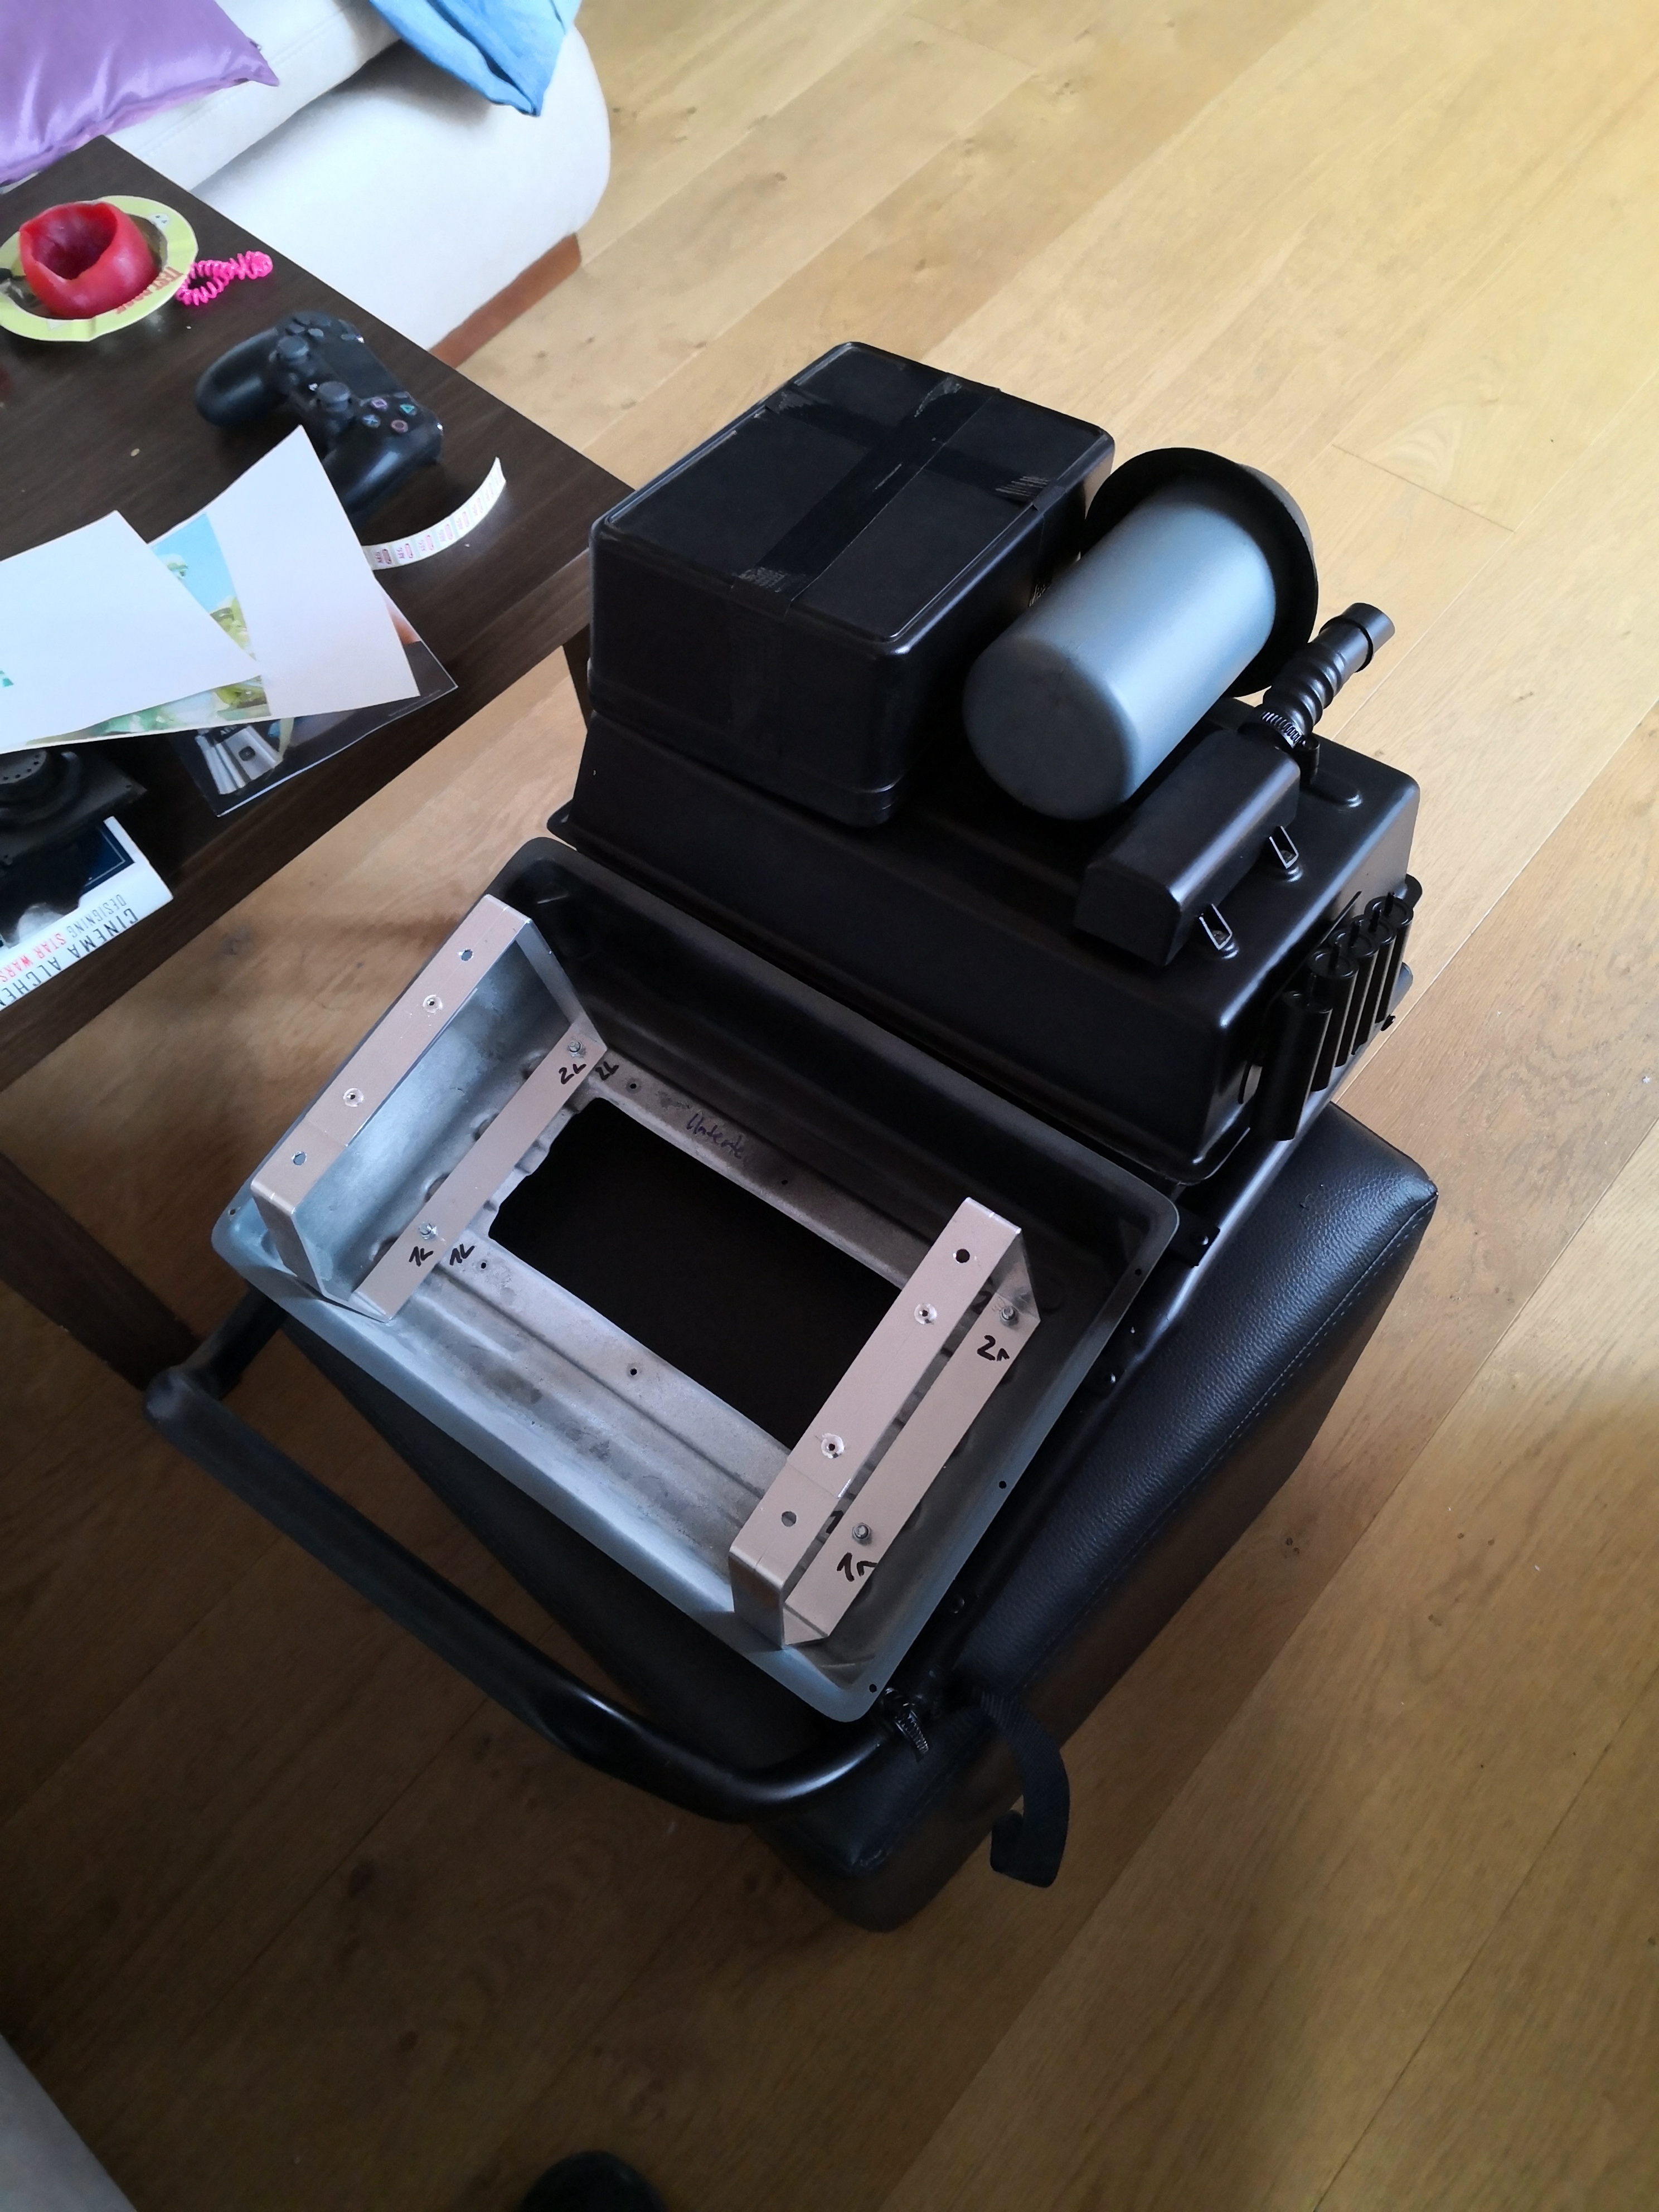
-
List of components:
- "shotgunshells"/"capacitors"
- mortartube
- radardish backing plate
- radardish
- greyish-blue bottle
- toilet plunger cap
- Shires UP 90 vintage toiled syphon
- "beestinger"
- Gio´Style bottle
- Karrimor aluminium backpack frame
-
Sonix Victory 75 radio
It´s either this or the Northstar version of this radio (same radio, just a different company). Here are some comparison shots courtesy to Bigwam and M4vrick: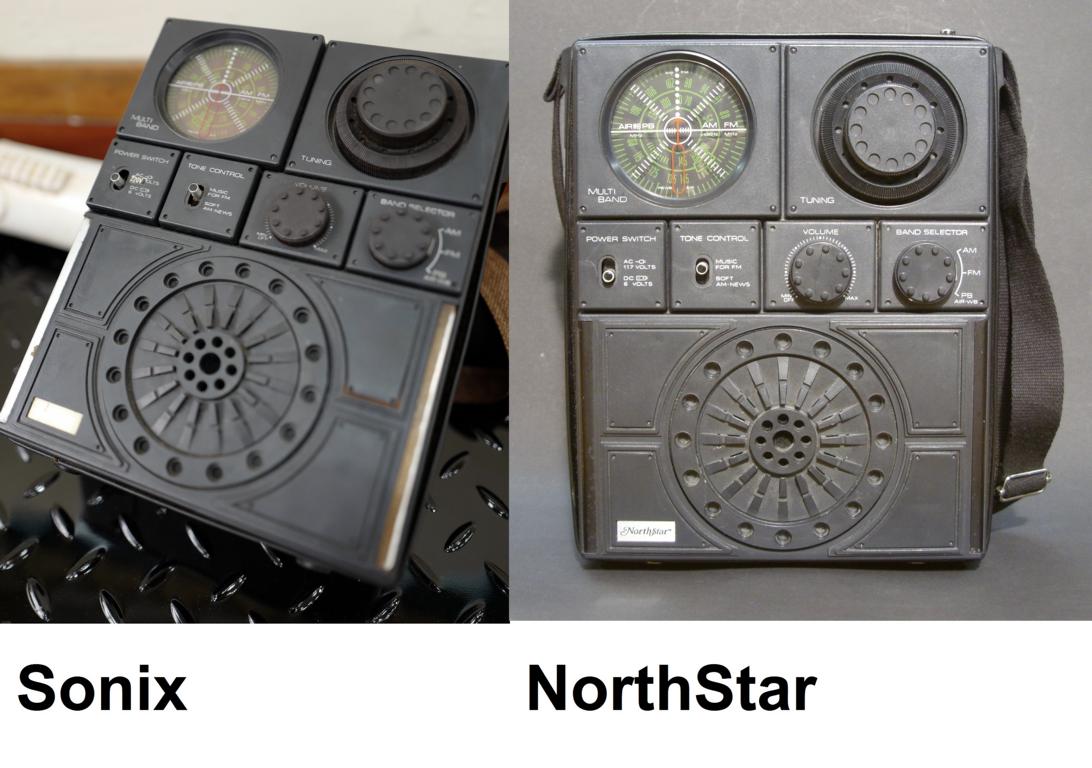
Many more pictures of the Sonix can be found in this thread:
The radio on pack#3 has been spraypainted black and is secured to the pack with wire as seen in the reference pictures.
If you don´t want to go on a treasure hunt and spend a whole lot of money on an original, Sandie Comms and Sonixworld make great and accurate kits.
-
List of components:
- "shotgunshells"/"capacitors"
- mortartube
- radardish backing plate
- radardish
- greyish-blue bottle
- toilet plunger cap
- Shires UP 90 vintage toiled syphon
- "beestinger"
- Gio´Style bottle
-
Karrimor aluminium backpack frame
The frames used on the Sandtroopers´packs (and later reused for the rebelscum soldiers on Hoth in ESB) are widely believed to be Karrimor Totem frames
However, there were other variants as well at that time which look very similar, e.g. the Karrimor Annapurna, Karibou or the K2

Compared to the Totem, these afore mentioned have larger diameter tubing. All of them are suitable for our packs but be sure to have the right shape at the bottom.
You don´t even have to find a real Karrimor frame, some people have just build their own form PVC tubing, I especially like this approach a lot and this would also work for SWAT:Some of these frames were bent to accomodate the seedtrays. This is especially noticeable on pack#3: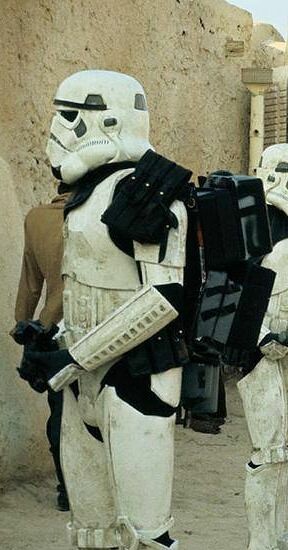
As you may noticed, it looks like those guys from the props department didn´t pay too much attention to getting a nice and tidy bend but rather seem to have used brute force. I personally have tried to recreate this look by bending the frame over a step on my balcony and I also know of other people having done the same. But be careful not to break a precious vintage frame!
This is what that bend looks like on my own pack:
Depending on what frame you can get, you will most probably have to cut it down in length. I can´t really tell you how tall it should be as this again will depend on the seedtrays you are using.
Now some frames come with these end caps (as did mine before I changed it):
But if one stuties the reference material carefully, you will notice that they should look like the white ones on this pack: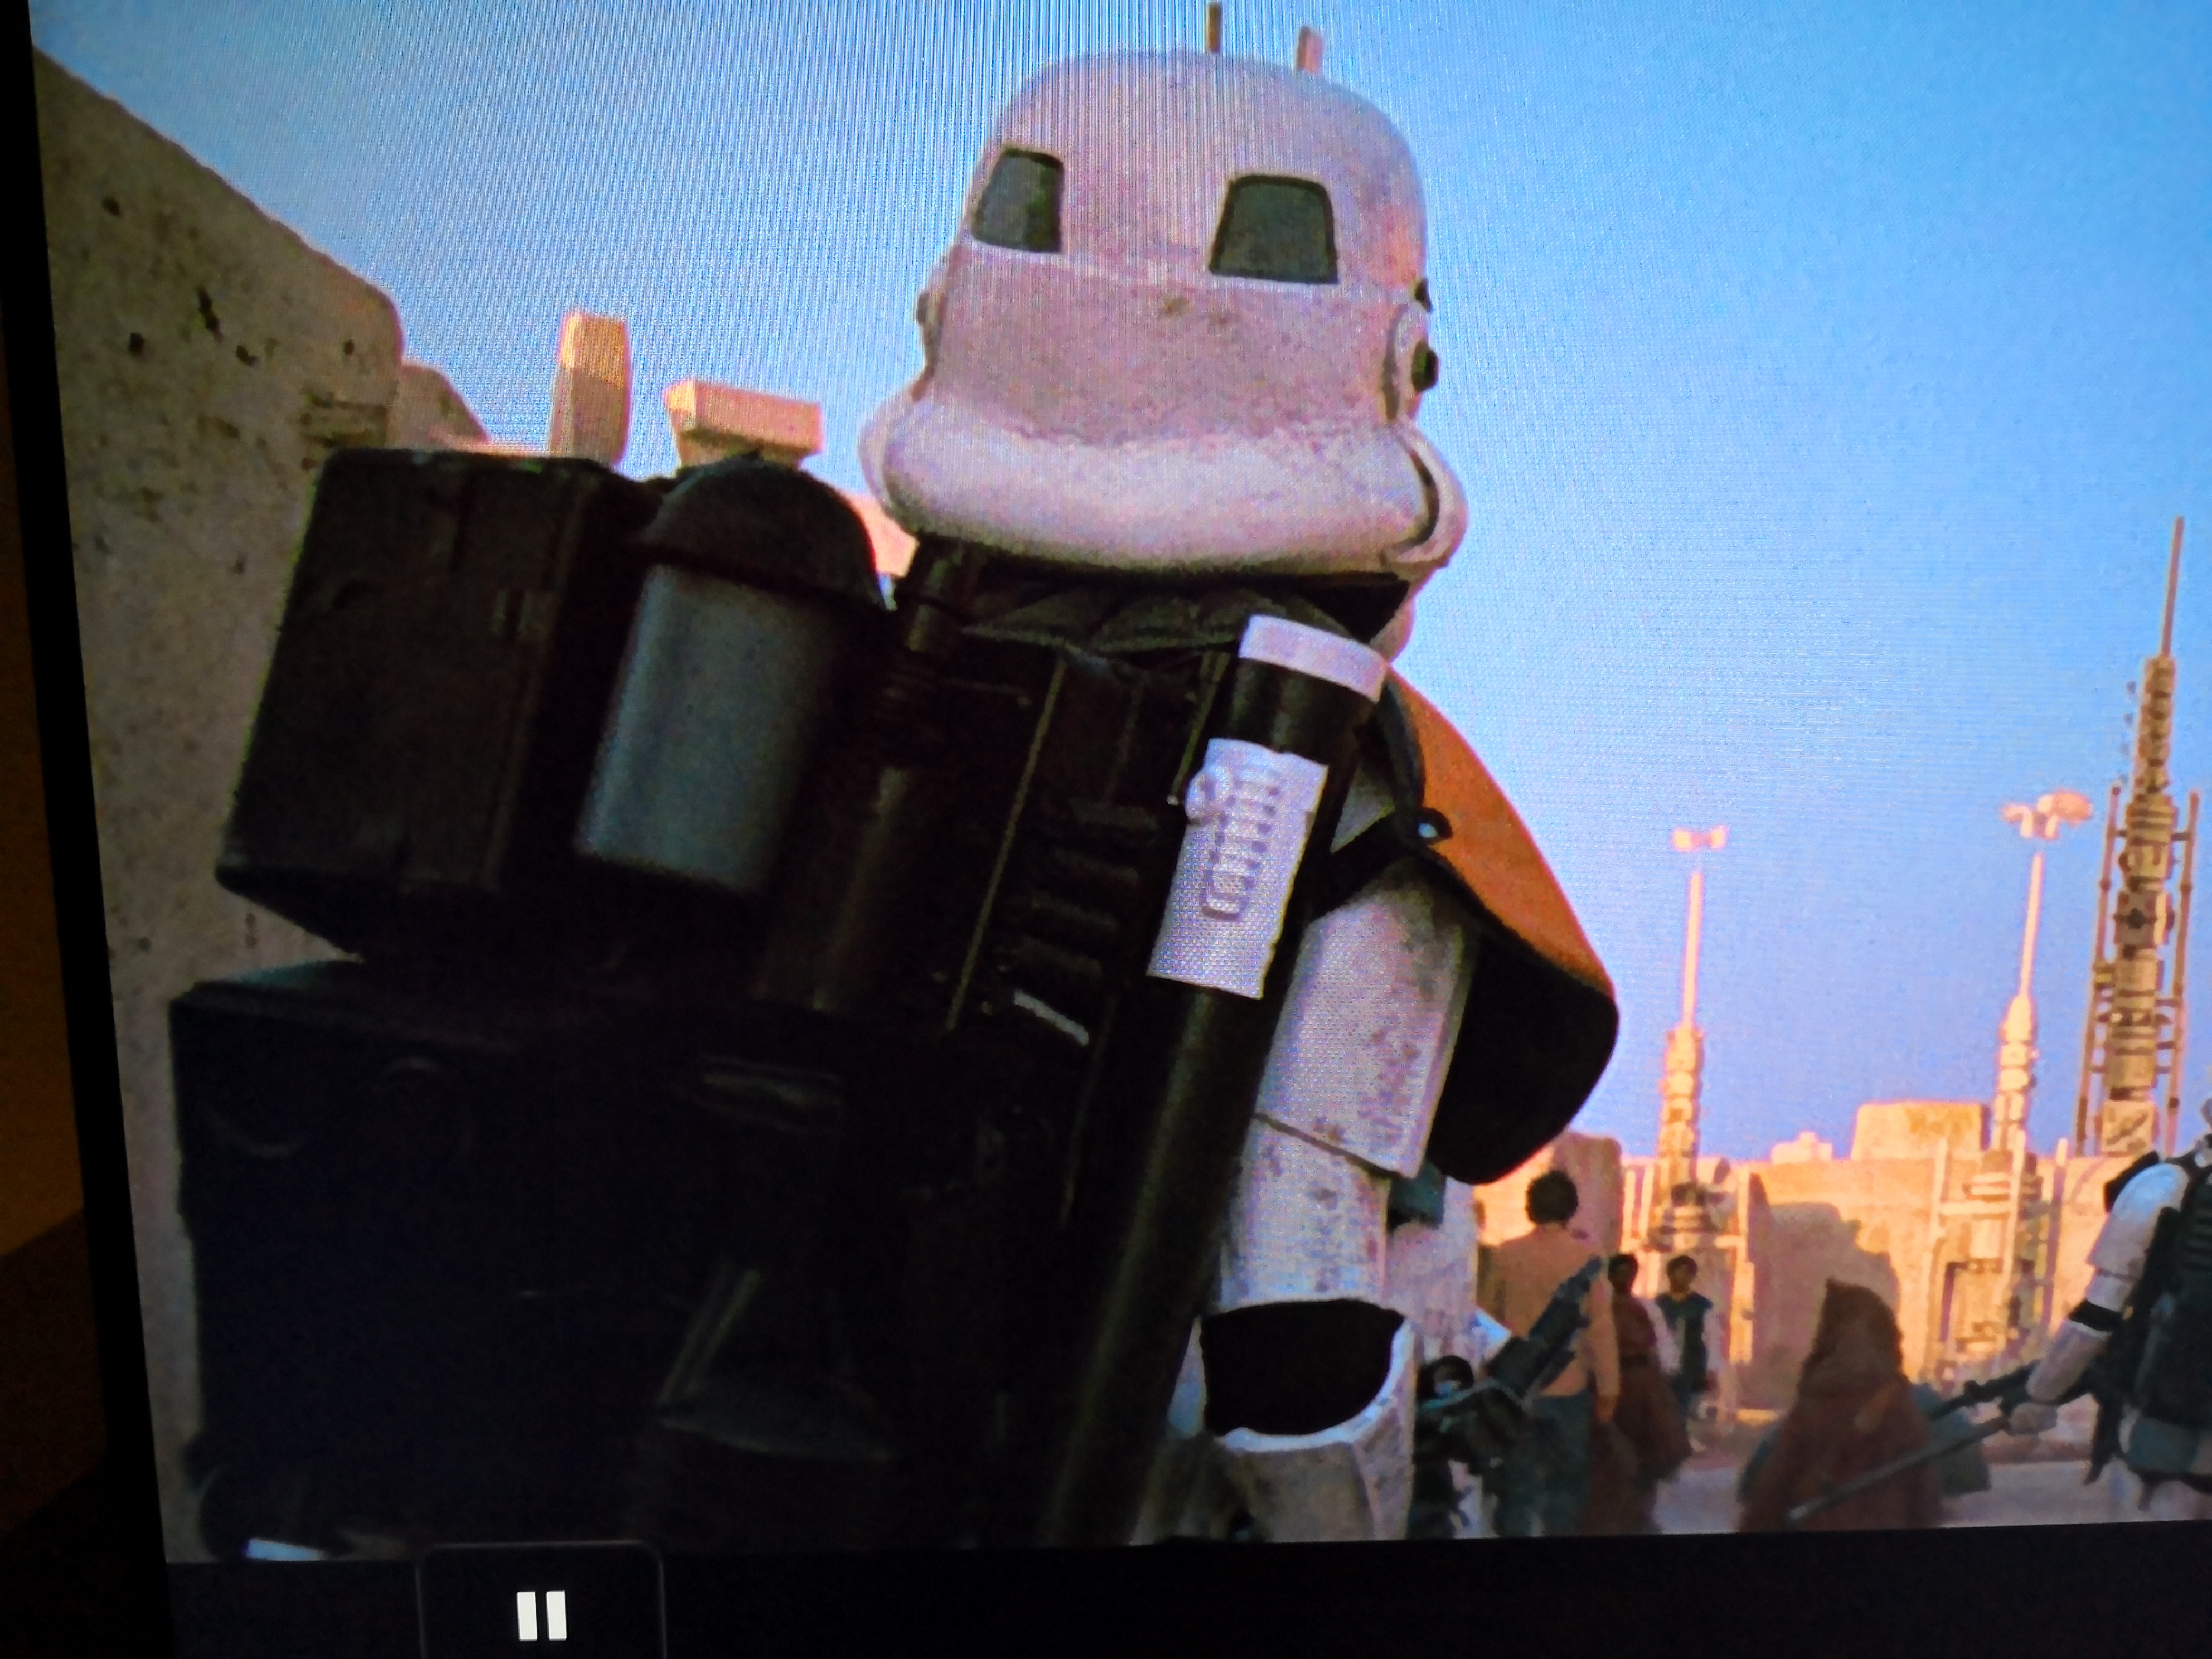
Even if your frame didn´t come with the correct version, they are easy to replace and can be found at hardware stores, just look for some end caps to protect the legs of your chairs or your floor:
If you look at those screen references closely, you can also identify some very characteristic scratches on the frame, where the black paint has come off and reveals the aluminium underneath. Of course these would have to be emulated for SWAT as well.
-
Yeah mate, as Thomas has already said, be careful not to overdo it. You don´t want to be a Mudtrooper but a Sandtrooper.
-
Insane amount of detail, that's crazy Wayne... but in a good way! I assume it will be able to shoot real bullets when you're done with it.

-
1
-
-
Amazing work Wayne, down to the tiniest little detail.

After having this one finished, you can still build the Bapty variant... would probably be a piece of cake for you compared to this.
-
1
-
-
List of components:
- "shotgunshells"/"capacitors"
- mortartube
- radardish backing plate
- radardish
- greyish-blue bottle
- toilet plunger cap
- Shires UP 90 vintage toiled syphon
- "beestinger"
-
Gio´Style bottle - I think most people believe this to be a canteen sold by the Italian company Gio´Style in the seventies, it´s called the "Safari 600" and original vintage bottles can still be found for a reasonable price on ebay. If you are too lazy too go for a treasure hunt, there´s also a modern version by a company called "Lionstar" which looks almost identical, here´s a comparison pic:
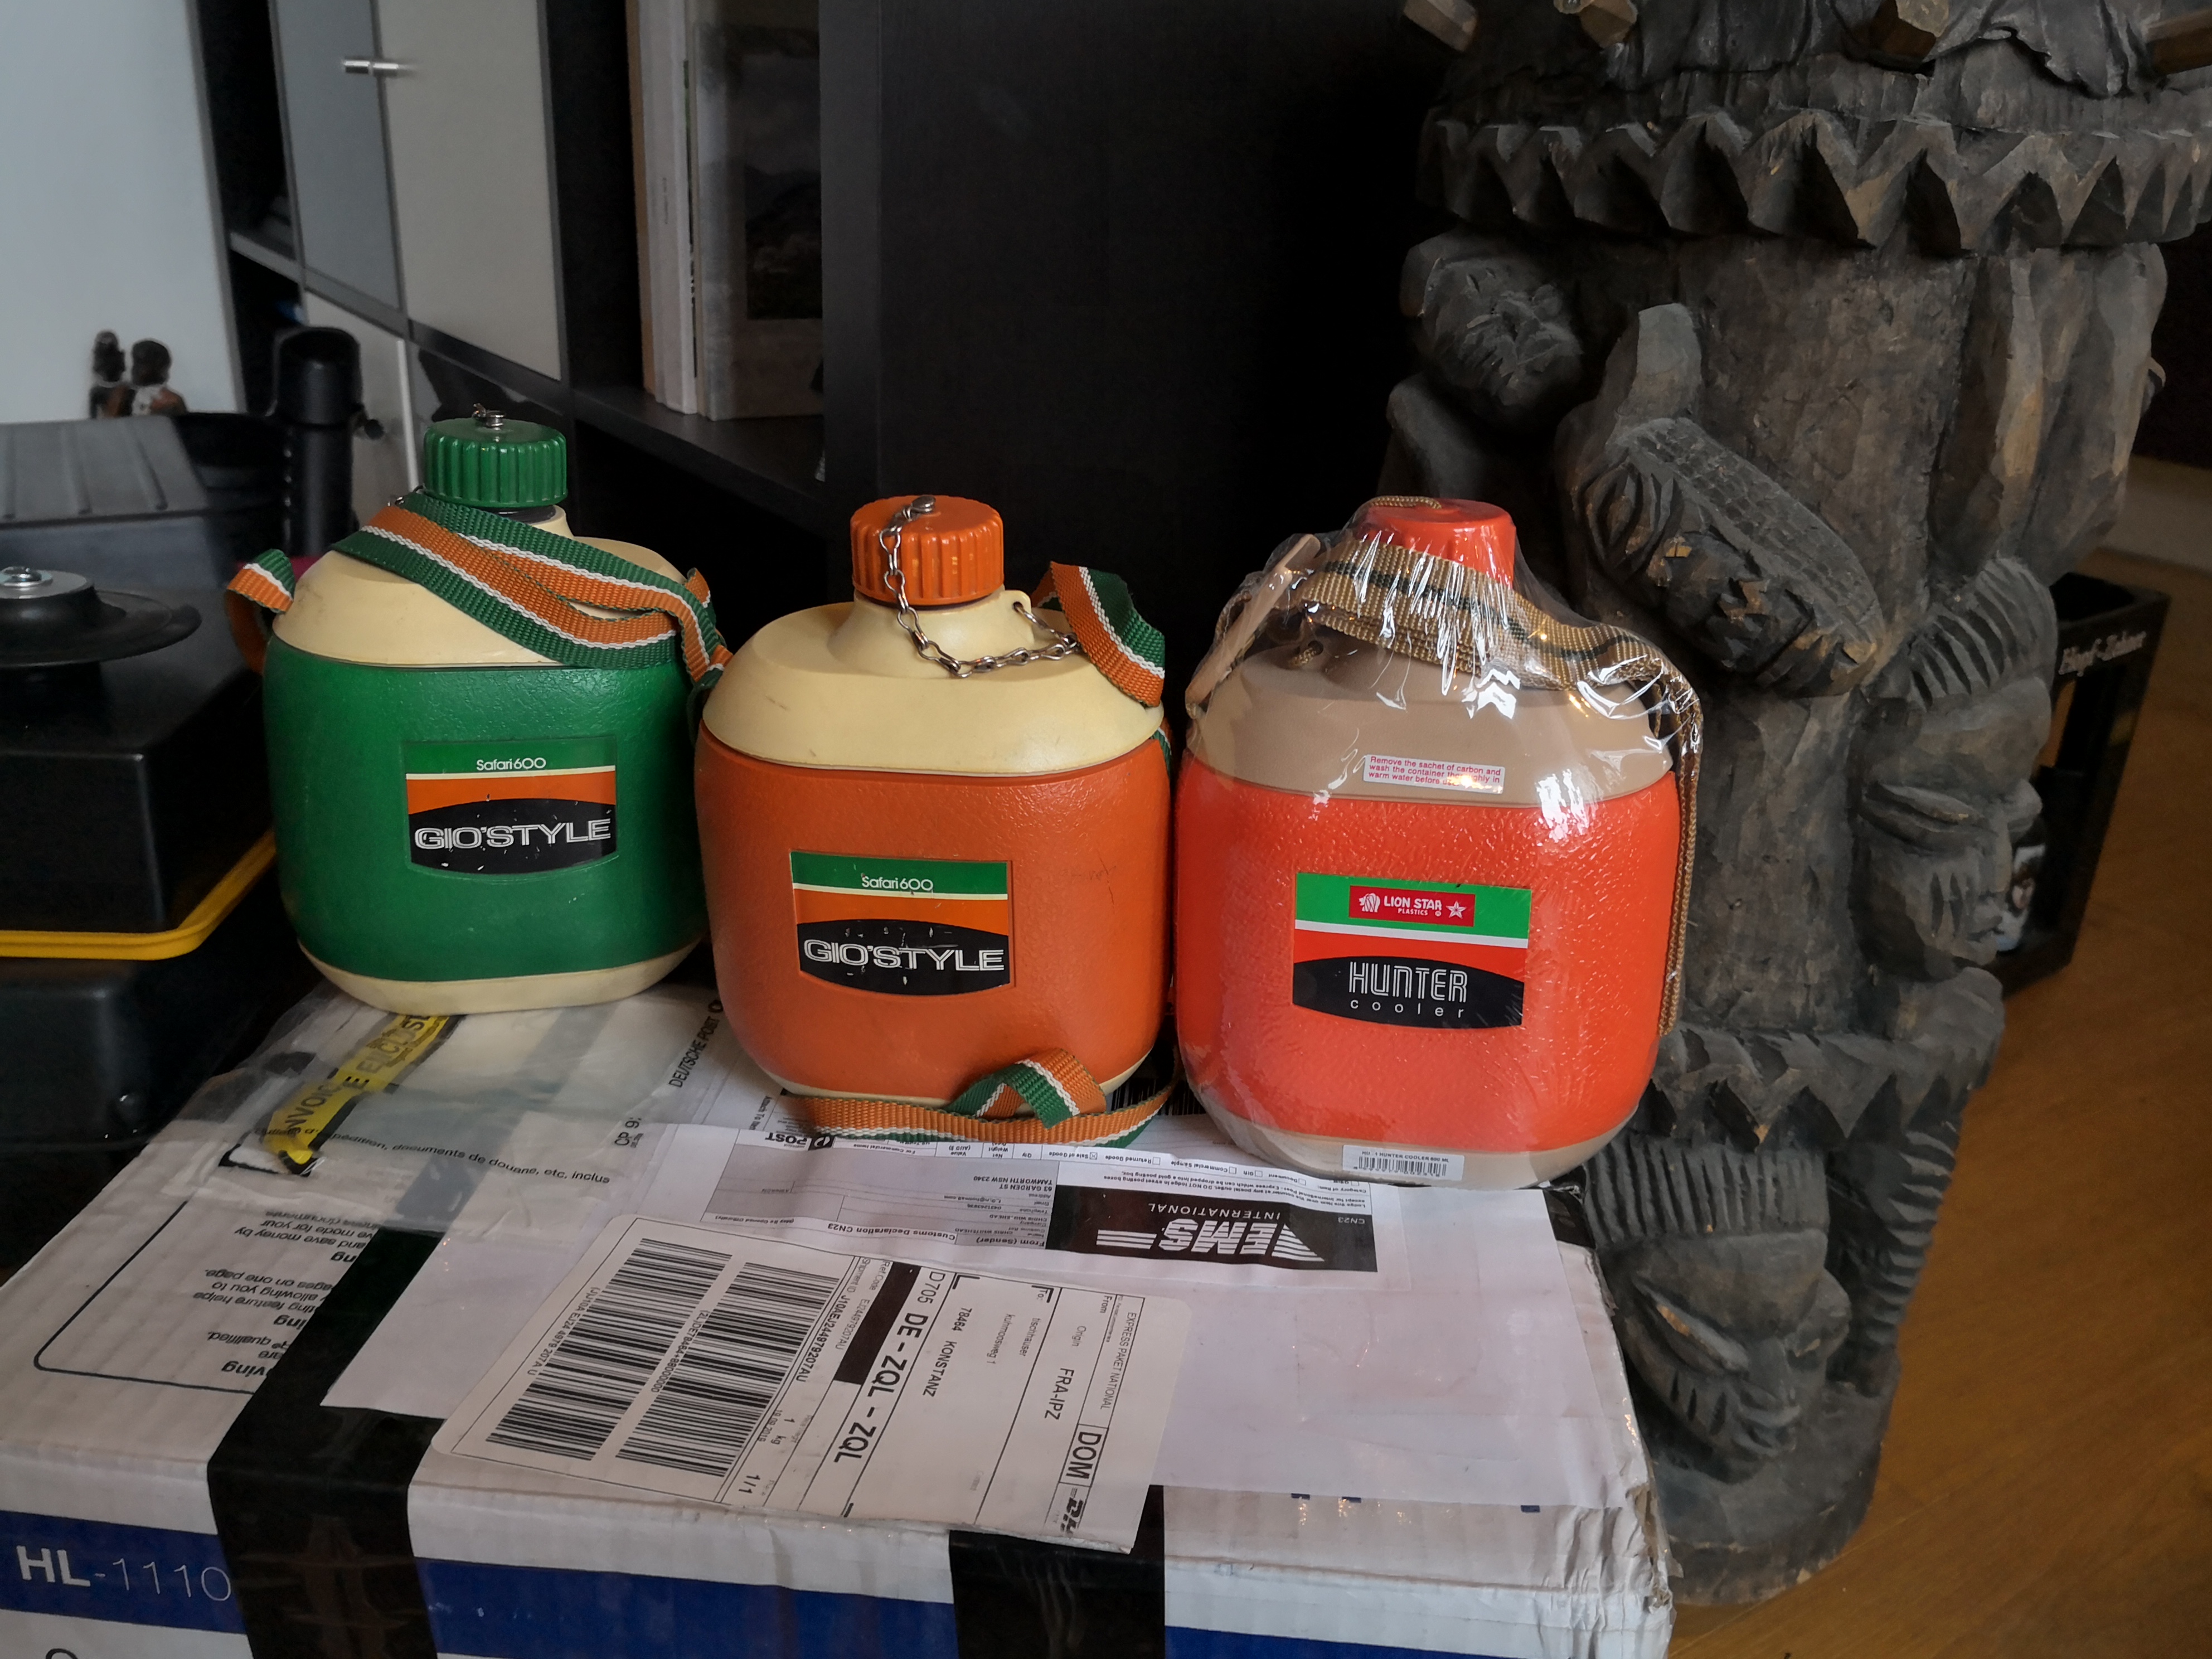
These Lionstar canteens are available through our own member of the command staff M4vrick, feel free to contact him.
The best way to attach the beestinger is to take the outer shell apart and remove the inner bottle, be aware that the styrofoam inside, which is meant to keep stuff warm and cold, will be quite messy to remove. Use a screwdriver and gentle force to take it apart, a heat gun might be useful too, to loosen the glue.
The canteen will be attached to the lower grey seedtrays via an aluminium bracket, this is easy enough to make yourself. Look at the dimensions carefully to get the adjustment right. I have used a threaded rod of the size M4, drilled holes into the bottle and attached it to the bracket using some lock nuts.
I guess the paint scheme of the bottle itself is quite clear. The bracket should be painted satin/matte black with some of the paint being scratched off. Please look at the reference pics again.
-
2
-
List of components:
- "shotgunshells"/"capacitors"
- mortartube
- radardish backing plate
- radardish
- greyish-blue bottle
- toilet plunger cap
- Shires UP 90 vintage toiled syphon
-
"beestinger" - this part hasn´t been identified yet, but feel free to use whatever you want as long as it looks right, cable or tube...
The outer diameter should be around 1,5 cm. The lower end seems to be cut at an angle as I have done with my own pack:
How you want to attach it to the Gio´Style bottle is up to you, with my second pack, I have used thick EVA foam, punched out a hole with the same diameter as the tube and glued the "beestinger" in. I then cut the remaining foam to the right size to fit into the lower part of the canteen, which I had freed of its innards previously. See more on that in the next point about the canteen.
-
1
-
Well then...
Congrats Brian!
-
1
-
-
List of components:
- "shotgunshells"/"capacitors"
- mortartube
- radardish backing plate
- radardish
- greyish-blue bottle
- toilet plunger cap
-
Shires UP 90 vintage toiled syphon
Unfortunately prices are going sky-high for these vintage toilet parts at the moment... There were two variants of these syphons used in the film, one being the UP100 and the other one which you will find on this particular pack is the UP90, which is a tad bit shorter, this is what they look like:
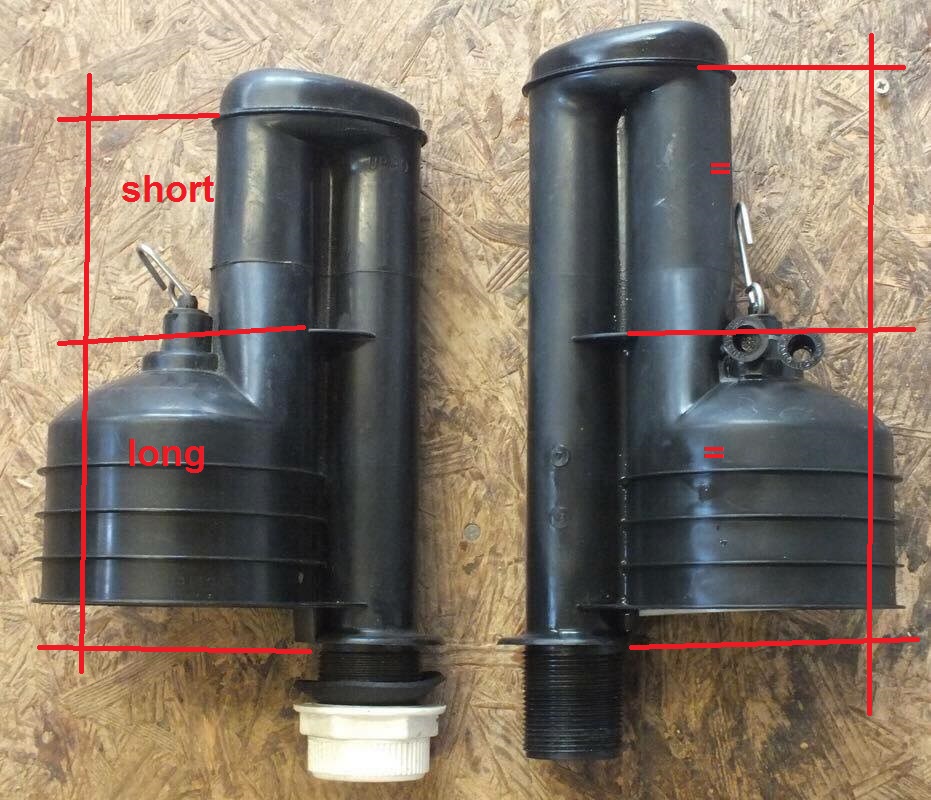
Inexpensive replicas of the UP100 can be bought from Ross Walmsley from RWA Creations, they are made of HIPS, very light and sturdy but can be a handful to assemble. They have to be cut down to match the shape of the UP90 on this particular pack. Some of the original syphons had "Made in England" written on them but the version on pack#3 doesn´t, either it was the version without the writing or they just covered said writing with some tape in order not to spoil the illusion.
Remember to get the angle right and by any means, don´t cut off the threaded section at them bottom as it is visible in the film.
-
1
-
Yeah mate, looks great and suits you well. I think I´ll be congratulating very soon.

-
1
-
-
Beautiful pack, way to go Brian, looking forward to seeing those new pics!

-
1
-


Real Sonix Victory Radio 75 Photos
in Field Backpack
Posted
You can find all these measurements on Tony's Facebook page:
https://www.facebook.com/groups/288161561700394/permalink/288163771700173/
Just scroll down a little bit and have a closer look at his post "my sonix".
Cheers mate