


Hausi
-
Posts
1,509 -
Joined
-
Last visited
-
Days Won
120
Content Type
Events
Profiles
Forums
Posts posted by Hausi
-
-
Hi Edward, in addition to what bigwam has already said about the blueish grey colour on your pack, I have something else to consider: while the chest and abdomen fit your size very well, I think you should take apart and trim down the biceps and forearms again as they look way too large.
Cheers mate, have fun building!

-
Hey mate, that's a great-looking kit and it suits you very well, good job!
-
 1
1
-
-
Congrats and welcome to the ranks of deployed troopers!
-
1
-
-
28 minutes ago, Octoarm said:
Where did you hide the pleather surround seam? Underneath one of the sets of feet?
Exactly

-
1
-
-
19 hours ago, Octoarm said:
Ok, so now I have a Shires UP90
 That was a lot of work! I guess I’m still not done with it! I’ll need to figure out the system of attaching the plumbers cup and bottle. I’ve got an order of RWA Creations seed trays and plumber cups on the way. I need to look for bottles too

Hey mate, that syphon looks immaculate, great work!
Have a look at my pack#1 build thread to see how I used a long threaded bolt to attach the bottle (don't mind that my Syphon doesn't look as nice as yours
 )
)
In my pack#3 build you can see pics of the bottle and how I have used wood and a threaded insert to attach the bottle:
Hope this helps, keep up the great work.
-
1
-
-
Hey Raymond, this is a neat and tidy application and your gear looks great and fits you very well, I am sure you will be PO in no time.
-
1
-
-
Oh dear, that's going to be some more sanding then.
Nice work mate, keep those progress pics coming.
-
1
-
-
On 5/3/2021 at 8:10 PM, Hoth Gossip said:
Hi there. Would you say that the lego helmet is 1/6 scale? I really want an accurate 1/6 helmet
It's probably a little smaller than 1/6 scale. But it's a really cool helmet. I would suggest getting a used one of these as the prizes for new ones are going up right now.
-
Karrimor for the win!

Nice find!
-
1
-
-
Hey mate, seems you have made the right choice as far as parts are concerned. That Gio'style is unique, I've never seen one like that before, really cool and you have done a great job modifying it.
Ross is such a great guy and always helpful and while the assembly of these syphons may be a little fiddly, they are light and strong and yours looks nice.
-
1
-
-
Hey Arne, very cool that you have started building a Bapty, greatest blaster of them all.
Was this printed in black PLA? If so, I would suggest filling the "heavy" print lines with black ABS Sludge (I have had good results with this approach) and then use black automotive spray putty, that way it will just be uniformly black and even if you bump into something and the paint chips off, it will not be as noticeable.
Way to go mate!
-
1
-
-
Holy shit, those details... and I like it a lot that you have chosen to include aluminium parts, they look sharp and just add that "real-metal-touch". The 3D-printed parts look great too and the weathering is spot on,well done.
As a side note: you know that the RT-97c seen in the movie has no inner barrel?
")
-
2
-
-
Hey Wayne, that's another gorgeous big blaster, well done!
Do you mind sharing some images of your work in progress? You don't have to write a complete WIP, I am just really interested in seeing the parts as they looked before you started working your magic on them.
-
Hi Willi, good to hear that you are joining the dirty side, welcome to the sand pit!
Your weathering looks already very promising, just a piece of advice: the white parts in between the patches of dirt still look way too white and shiny so I would suggest giving it a wash with some watered-down Vallejo game color earth:
Use a brush to apply it and almost immediately dab it off again using some paper towels (Küchenrolle
).
Then let it dry and repeat until you are happy with it.
I've used this technique for all my kits and helmets.
Have fun weathering!
Cheers mate
-
1
-
-
This is really cool and much easier and much more convenient than reading through all of the pack#3 thread.

Great work and thanks for doing this.
-
** APPROVED 21/03/2021 **
Thomas, I am very happy to officially activate you as the second SWAT Officer of 2021 and the second one who has ever had this torture done to him twice in a lifetime. And I feel really honored that I was the one to do your review.
Your hard work and your attention to detail on your build has been carefully evaluated and inspected. You have met all the requirements to place you among the MEPD's Finest.
Thank you for your patience throughout this process, I know that it was probably nerve-wrecking for you but it was definitely worth it and you have set a new benchmark for this particular trooper and SWAT in general.You can now take your place amongst the SWAT Troopers for the second time! Well done bro!
Please submit a picture that you would like to use for your SWAT Profile to Luis (TD-5044 / "SANDMAN TIGUI") to help get you properly processed onto the SPECIAL WEAPONS and TACTICS Unit Members Page.
Congratulations on successfully taking the next step as a proud member of the SANDTROOPER ELITE.
Welcome aboard, SWAT OFFICER # 57
-
Hey Thomas
I wonder how you get these changes done so quickly…you seem to be extremely keen on becoming the next double SWAT officer.
Okay, then let´s do this.
MEPD SWAT OFFICER: application review part 3
Name: Thomas Herodek
Legion ID#0: TD-30571
Forum Name: bigwam
Garrison: German Garrison
ANH Sandtrooper selected: Roadblock Private with RT-97c (cheesegrater handguards version)
Helmet:
Green lenses: check
Paint color on traps / tears: check
Paint color and number of teeth: check
Mic Tips: check
Vocoder color: check
Rank bar: check
Brow: check
Side Screws (ears): check
Weathering: check
**Additional Comments**
**Result on Helmet**
CHECKED & CLEARED
Armor / Suit Details:
Canvas straps shoulder: check
Neck Seal: check
Black Undersuit: check
Shoulder Bells: check
Biceps: check
Forearms: check
Pauldron: check
Chest / Back Plate: check
Kidney / Butt plate: check
Ab plate / Side Rivets / Cod: check
Strapping: check
Tighs: check
Shins / Calves: check
Sniper Plate: check
Boots: check
Gloves: check
Hand plates / Guards: check
Ammo Belt (waist) w/ correct angled edge: check
Ammo Belt (right knee): check
Canvas Belt: check
Pouches: check
Weathering: check
**Additional Comments**
Good to hear that you agree and I think it looks fabulous now and matches the screen references perfectly. Well done!
**Result on Armor**
CHECKED & CLEARED
BACKPACK
Pack#1Details: check
Weathering: check
**Additional Comments**
**Result on Backpack**
CHECKED & CLEARED
WEAPON: RT-97c
Details: check
Weathering: check
**Additional Comments**
**Result on Weapon**
CHECKED & CLEARED
So this was your third and probably final review Thomas,
I am absolutely happy with your work and I think your new trooper is another piece of art.
Thank you for making my job so easy mate.
I will now ask my fellow CS officers if they see anything I might have missed and I hope to get back to you very soon, so stay tuned.Hausi – MEPD Deployment officer
-
Hi Thomas
Thank you for making the requested adjustments so quickly and providing new pics and thank you as well for being so patient.
I think your wife has done an amazing job in helping you to get the same poses as seen on screen but I know what you are talking about, my wife always gives me “the look” when I tell her that I will be dressing up as a plastic spaceman again and asking her to take some pics.
Then let´s get started with the second round of reviewing…
MEPD SWAT OFFICER: application review part 2
Name: Thomas Herodek
Legion ID#0: TD-30571
Forum Name: bigwam
Garrison: German Garrison
ANH Sandtrooper selected: Roadblock Private with RT-97c (cheesegrater handguards version)
Helmet:
Green lenses: check
Paint color on traps / tears: check
Paint color and number of teeth: check
Mic Tips: check
Vocoder color: check
Rank bar: check
Brow: check
Side Screws (ears): check
Weathering: check
**Additional Comments**
**Result on Helmet**
CHECKED & CLEARED
Armor / Suit Details:
Canvas straps shoulder: check
Neck Seal: check
Black Undersuit: check
Shoulder Bells: check
Biceps: check
Forearms: check
Pauldron: check
Chest / Back Plate: check
Kidney / Butt plate: check
Ab plate / Side Rivets / Cod: check
Strapping: check
Tighs: check
Shins / Calves: check
Sniper Plate: check
Boots: check
Gloves: check
Hand plates / Guards: check
Ammo Belt (waist) w/ correct angled edge: check
Ammo Belt (right knee): check
Canvas Belt: check
Pouches: check
Weathering: see comments
**Additional Comments**
I was quite certain that you have included that specific shape on the upper returnedge at the back of your right thigh but I had to see it nevertheless. Great job mate, wouldn´t have expected anything less from you.
Weathering:
Inside of the left thigh:
Well done, now it looks right.
Backside of the right shoulder bell:
You really matched the pattern seen on screen very well, spot on perfect.Backside of left shoulder bell
I agree with you on that spot probably just being a reflection caused by the light.Chest
You have done a terrific job in recreating that pattern on the chest. The only thing that I am thinking about is whether you should add another wash of earth to this specific spot, let me show you what I am talking about: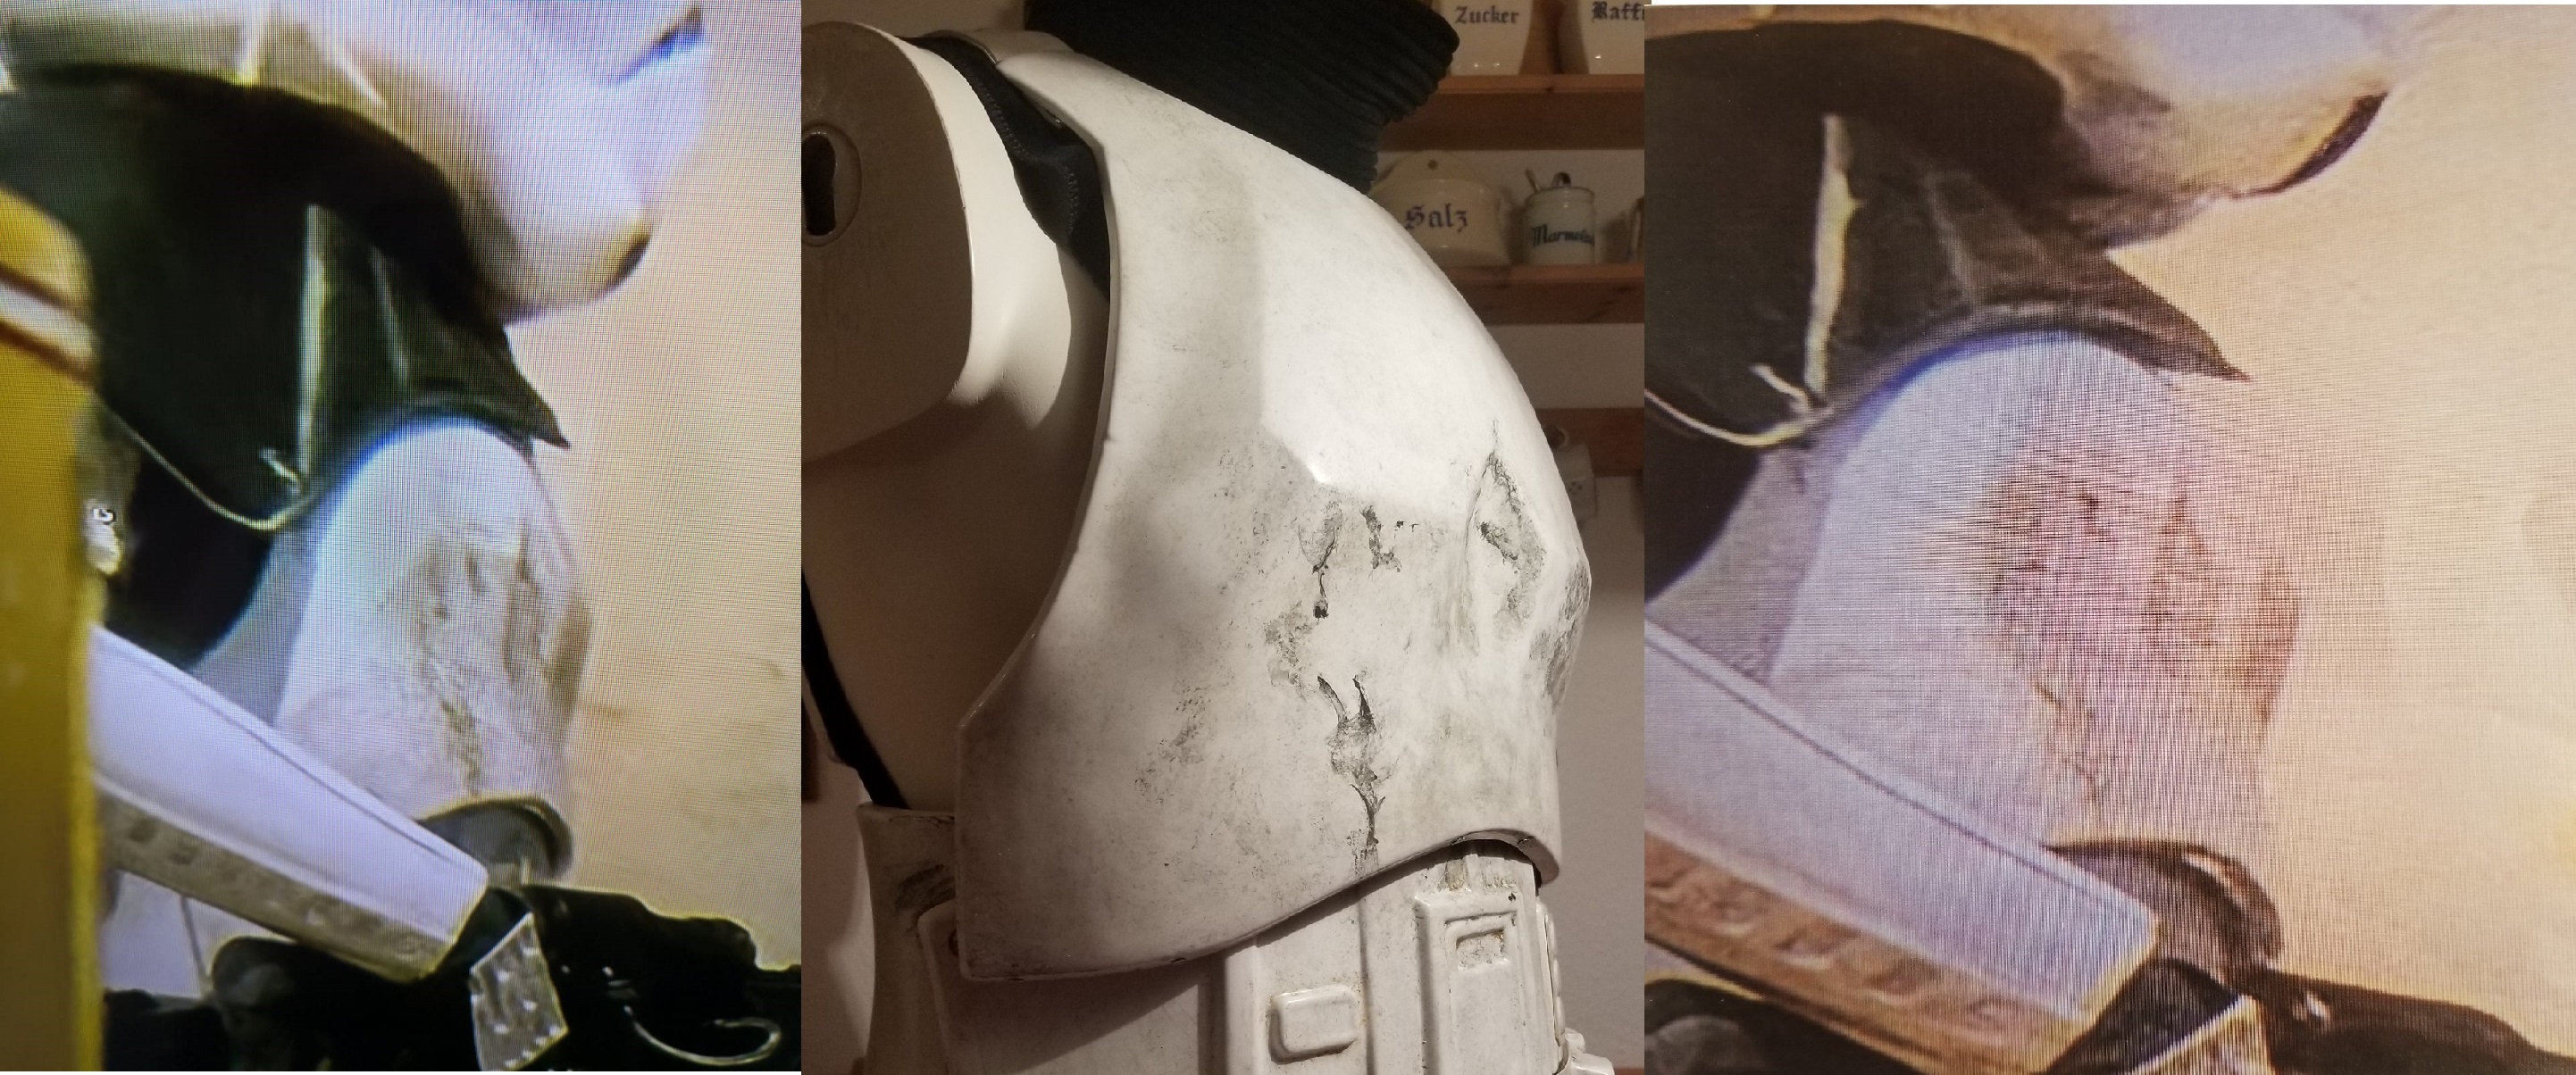

What do you think, Thomas?
**Result on Armor**
PENDING
BACKPACK
Pack#1Details: check
Weathering: check
**Additional Comments**
**Result on Backpack**
CHECKED & CLEARED
WEAPON: RT-97c
Details: check
Weathering: check
**Additional Comments**
Man…I really envy you for that Hyperfirm gun.
**Result on Weapon**
CHECKED & CLEARED
So this was your second second
 review Thomas, there are still some -not a lot though - things to address and think about and I am looking forward to hearing your input.
Hausi – MEPD Deployment officer
-
I've already seen this on facebook. Great work guys and I am truly jealous.
Looks like you've had a fun time, thanks for sharing! -
Hi Jamie and welcome to the dirty side!
Your TK looks great and suits you really well, good to have you join us here at the MEPD.
Don't worry too much about the yellowed parts, I think the weathering is more or less going to even out the differences in colour.
Looking forward to seeing your progress, have fun building!
-
You are making great progress Mikel, nice to see a new pack come together.
It looks really good and I like your approach on building the shells.
Are you planning to use this pack to be approved as a police officer? I am asking as the radio faceplate is vacformed and although you have done a terrific job in building it, it's still not approvable for PO.
-
Welcome to the MEPD Thomas... oh wait... you have been here longer than I have
Thank you for your interest in joining the elite for a second time and submitting your request for SWAT OFFICER activation#2.
It really looks like you have put an extreme amount of time and effort into getting your chosen trooper as screenaccurate as possible and I really like your attention to detail.
Your gear is on spot and your emulated trooper is immediately recognizable. But each new or returning SWAT candidate gets looked at even more so from the previous trooper and the bar gets raised even higher.
You are definitely on the right track.
Still we always emphasize patience during this process as we pay more and more attention to fine tuning with each new SWAT applicant.
I will give your armor a full inspection and review.
Some details may definitely be missed and re-checked, but I will try to catch them on every pass given until you are cleared and ready to join the Special Weapons & Tactics Team for the second time my friend!
I´ve been very busy lately but I have started the review process, so hang in there!
Then let´s get this started…
MEPD SWAT OFFICER: application review part 1
Name: Thomas Herodek
Legion ID#0: TD-30571
Forum Name: bigwam
Garrison: German Garrison
ANH Sandtrooper selected: Roadblock Private with RT-97c (cheesegrater handguards version)
Now as you can see, I have added the specific version you are going for in brackets.
There are two version of this Private standing next to the move along Captain, one wearing the cheesegrater handguards and the leather shoulder pouch sitting quite high on his shoulder. This version is actually only seen from the side, one never gets a clear view of the front.
In another shot in this very scene, there is the regular handguard version of this trooper, who is wearing a regular left handguard on his right hand, has the Davin Felth helmet (although with less weathering), the leather shoulder pouch is sitting much lower on his shoulder and he definitely also has another chest as the weathering is quite different but we will get to that later on in the review.Helmet:
Green lenses: check
Paint color on traps / tears: check
Paint color and number of teeth: check
Mic Tips: check
Vocoder color: check
Rank bar: check
Brow: check
Side Screws (ears): check
Weathering: check
**Additional Comments**
Thomas, you have done an amazing job emulating this iconic and beautiful helmet.
As a side note: adding all these details might not even have been necessary as the helmet of this version of the trooper is only seen from the side on screen and to be honest, it could even be possible that it´s not the same helmet, who knows. However, I would have done the same and I strongly believe that it should be this helmet.
**Result on Helmet**
CHECKED & CLEARED
Armor / Suit Details:
Canvas straps shoulder: check
Neck Seal: check
Black Undersuit: check
Shoulder Bells: check
Biceps: check
Forearms: check
Pauldron: check
Chest / Back Plate: check
Kidney / Butt plate: check
Ab plate / Side Rivets / Cod: check
Strapping: check
Tighs: see comments
Shins / Calves: check
Sniper Plate: check
Boots: check
Gloves: check
Hand plates / Guards: check
Ammo Belt (waist) w/ correct angled edge: check
Ammo Belt (right knee): check
Canvas Belt: check
Pouches: check
Weathering: see comments
**Additional Comments**
You have done an excellent job in building your armor and fitting it to your size. I fits like a glove and suits you very well!
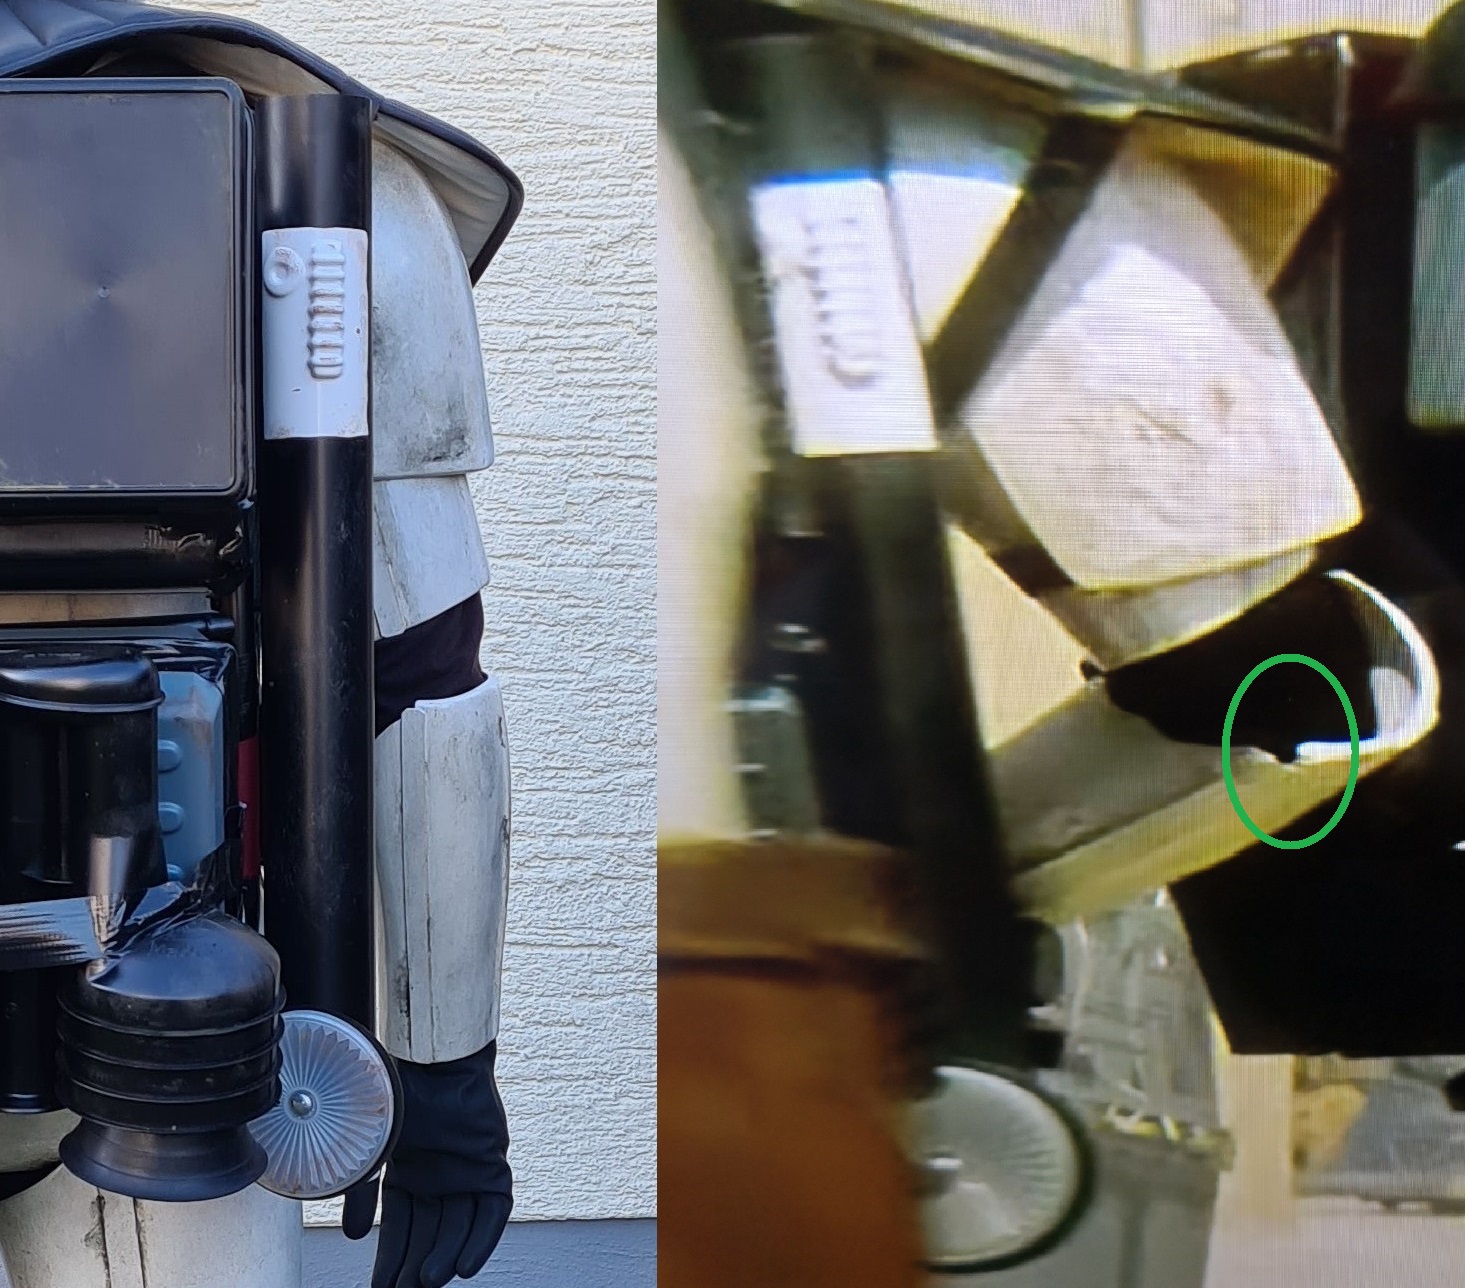
1. Thighs: please show me a picture of the back of your right thigh. I am especially interested in the upper returnedge which is quite specific with this trooper as you see in this picture.
When speaking about returnedges, there´s another one I would like to point your attention to: the upper returnedge on the right forearm. As you can see in the same picture, the returnedge is quite wide which you have included in your build but I think I can even see a little crack there. This isn´t anything I would force you to add… but you might think about it…
2. Weathering:Inside of left thigh:
If you look at my comparison pic closely, you will see that there is quite a lot of dirt on this trooper´s left thigh´s inside. Maybe it is there on yours as well but as I can´t really see it, please add another detail pic of this particular part.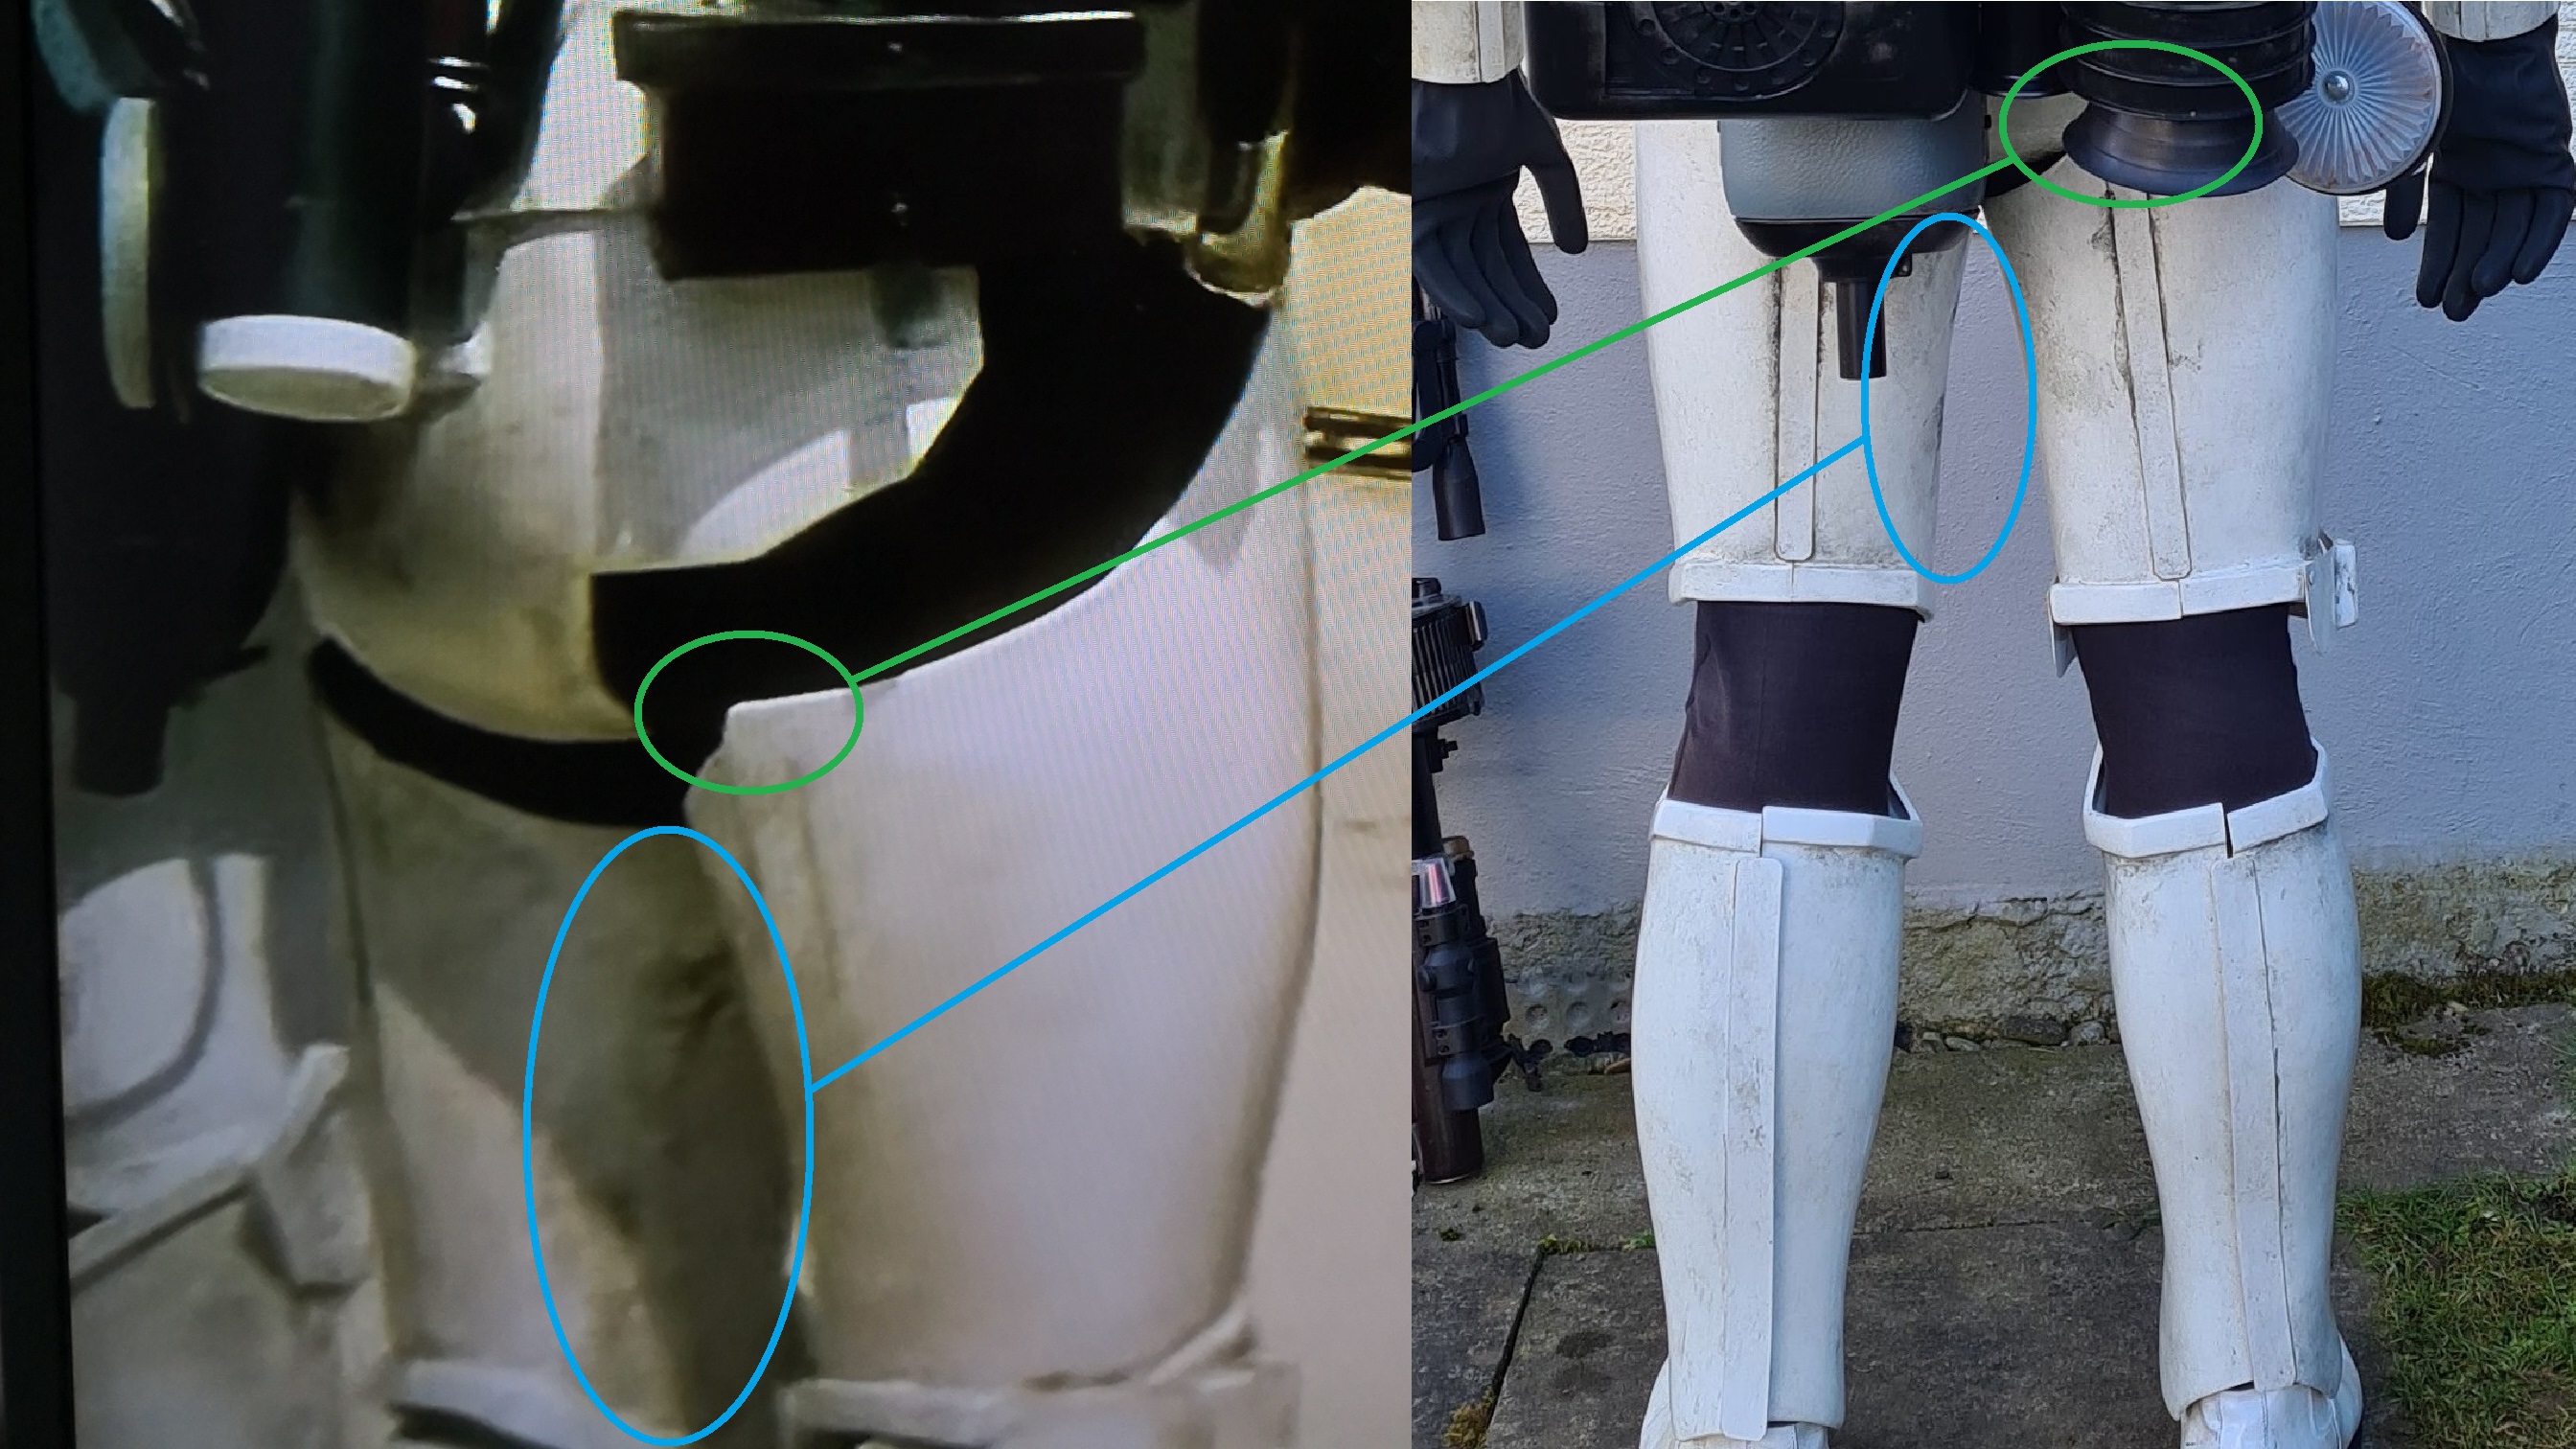
Backside of right shoulder bell
While you really matched the pattern on the front very well, I see a different pattern on the back which looks quite characteristic, so please adjust your weathering here to match the given screen reference.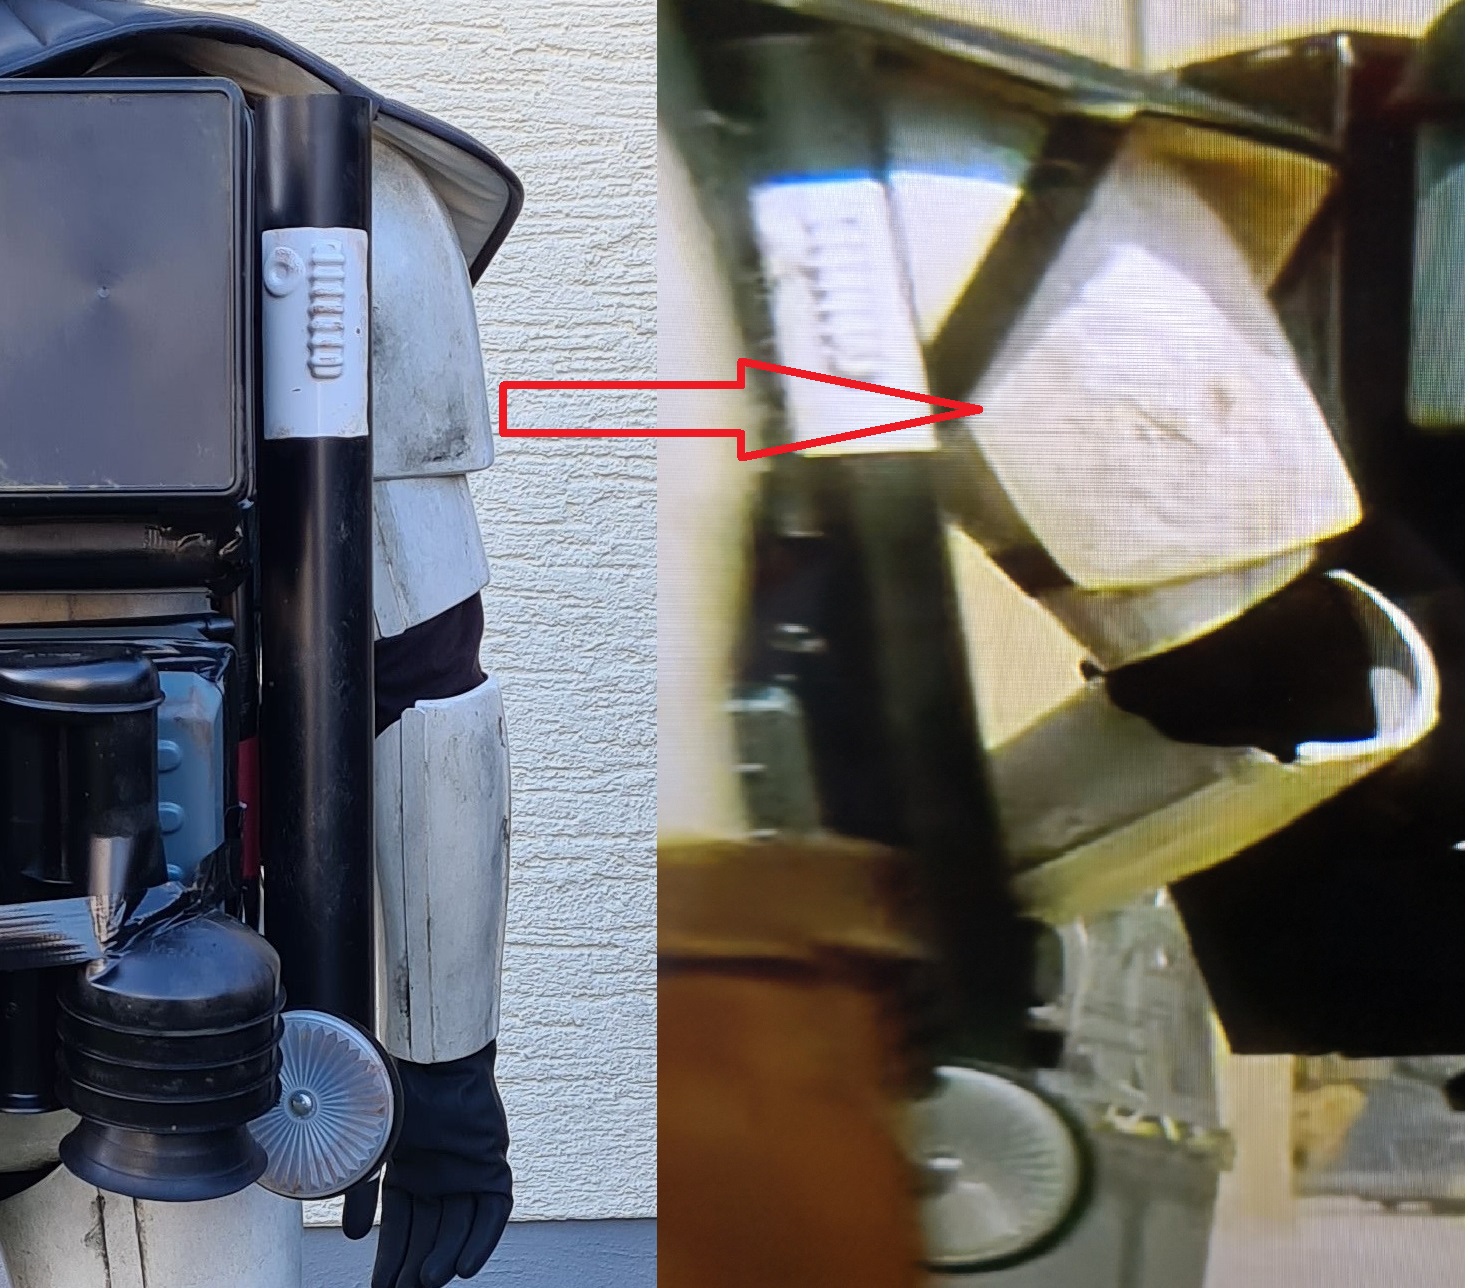
Backside of left shoulder bell
I see a difference here in the pattern too. In the screengrab, it looks to me as if it was quite dirty and them someone just wiped off the dirt in the middle and left the rest untouched. Please have a look at this comparison and try to recreate the look of it as seen on screen.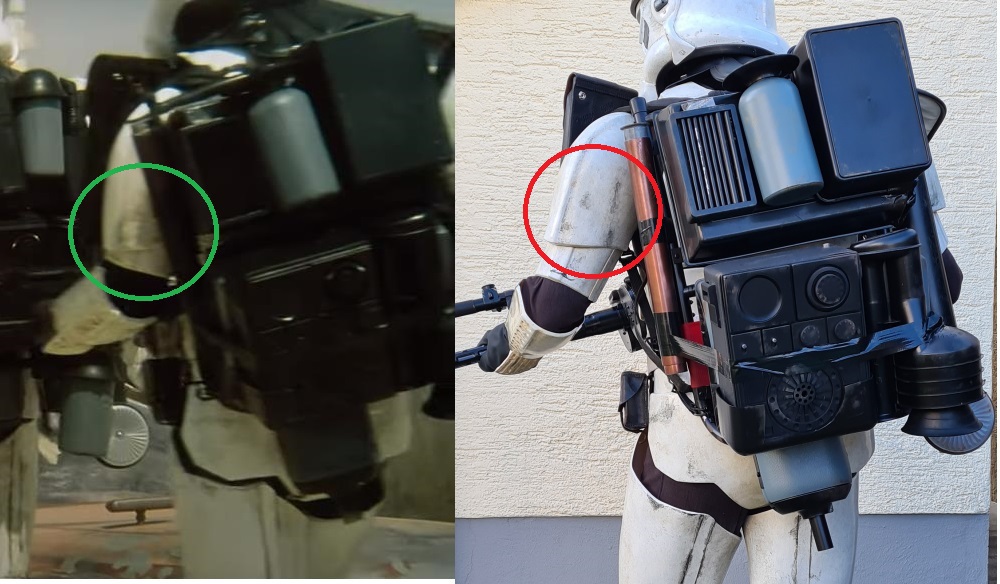
Chest
I have to admit that it really makes me sad to point this out but you have picked the chest weathering pattern of the wrong version of this trooper, moreover am I sorry as you have done an excellent job with it.
But if you study this scene very carefully, you can see that the weathering on the chest of the trooper wearing the cheesgrater handguards is different.
So please redo your chest weathering to match that of this version of the trooper.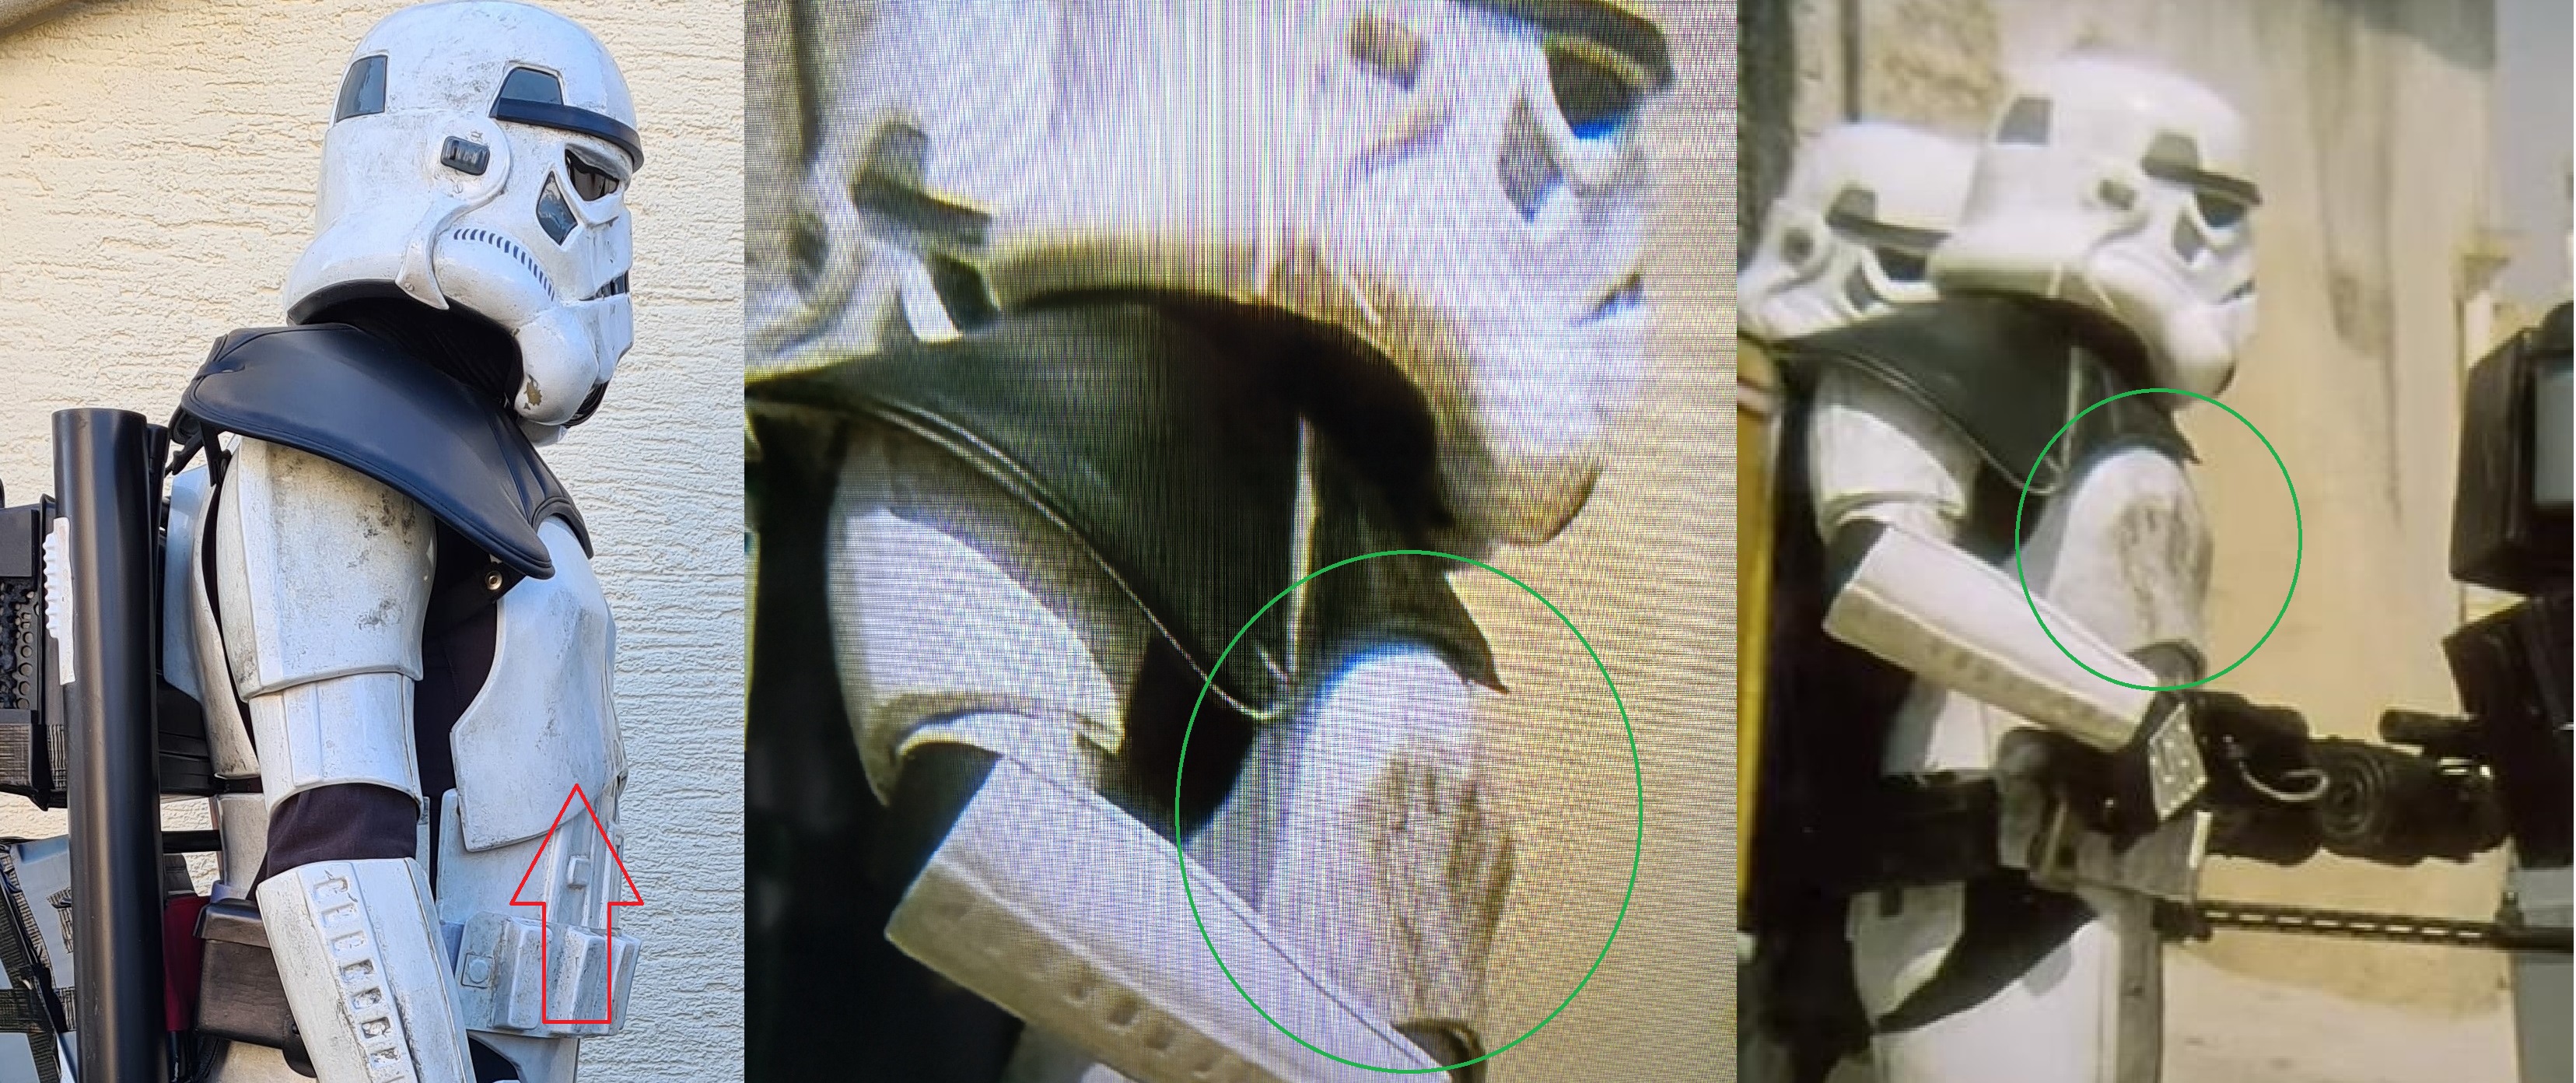
Here´s another image taken from Project 4K77 scene:

**Result on Armor**
PENDING
BACKPACK
Pack#1Details: check
Weathering: check
**Additional Comments**
Personally I think Pack#1 is one of the nicest packs out there and you recreated it in style
") , nice work my friend. Now please show me if you have added the feet to the radio too (even if they aren´t visible). Just kidding.
, nice work my friend. Now please show me if you have added the feet to the radio too (even if they aren´t visible). Just kidding.
**Result on Backpack**
CHECKED & CLEARED
WEAPON: RT-97c
Details: check
Weathering: check
**Additional Comments**
If I wanted to be really picky …and mean, I would have to point out that a rubber Hyperfirm blaster doesn´t work as it has a solid barrel:

...but that would be really unfair and you have done such great work on that paintjob which even tries to recreate that hollow look so all is good.
**Result on Weapon**
CHECKED & CLEARED
So this was your second first review Thomas, there are quite some changes as SWAT is a challenging but finally rewarding process as you already know and I am absolutely certain that you will successfully overcome these challenges. Some of these changes … well actually most, will be just peanuts to you. As I know you, you will have done these changes in no time to become the second double SWAT-officer in the MEPD.
Man, I can´t understand how people can be this crazy to have this torture done to them twice in a lifetime.
Hausi – MEPD Deployment officer
-
1
-
-
Well congrats!
-
As Bigwam says.
-
1
-


Dengar´s Bapty DLT
in T-21, DLT-19, RT-97c Heavy Blasters
Posted
I am simply going to continue this thread. I have actually almost completed my Dengar costume, the only thing missing is the backpack (here´s a pic of me in it )
)
and since I have sold my old Sandtrooper Tunisian Bapty DLT, it was time to build a new one. This one will remain missing the T-tracks until I have completed the backpack, then I am going to add the tracks and convert it to Sandy-style again.")
I have started my build making the wooden buttstock (I was actually building several of them at the time as I was also making one for a mate and another one for a later project), I just like working with wood, even if it´s a hell of a mess every time.
I got a kit for the front MG 34 parts from a friend in the German Garrison, Lars Boller. It consists of aluminium tubes and some resin parts, I wanted to have black resin and Lars was so kind to make that happen.
I then cut some material off of this part to get the same shape as seen on the original MG 34:
and added a notch for it to sit in when attached to the wooden buttstock: