

MonCal
-
Posts
21 -
Joined
-
Last visited
Content Type
Events
Profiles
Forums
Everything posted by MonCal
-
Re-creating the "roadblock" scene and designing TD backpacks
MonCal replied to MonCal's topic in Field Backpack
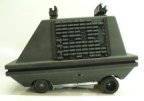
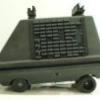
Here are some more pics. To get ready to mount the cistern, we drilled holes in the seed tray and the cistern so the cistern can just be screwed on with drywall screws (drill a smaller hole in the cistern for the threads to bite). You can see the holes in the cistern in this photo: Since we went with the larger tubing for the mortar tube, the detonator part is a little "springy" but not too bad. It was still easy to glue on with goop glue. We used some velcro cable ties to hold it while it cured: Two of the packs have this "filter" piece. I made this from our Dengar backpack filter part by cutting one down, re-building, making a new mold and casting up this smaller "filter" box: We drilled some holes in the seed tray and the back of the filter box. Then we attached it with drywall screws: Next we attached the bottle and used the same process as the filter and the cistern by drilling a hole in the seed tray that allows the drywall screw to pass through and a smaller hole in the bottle so the screw bites. Voila: Next we worked on the "bee stinger". First we bent some aluminum brackets: On most packs the brackets appear to be painted black. I believe pack #3 has unpainted aluminum brackets. Here we are making pack #2. We were able to pop rivet it to the seed tray as shown here. Notice we decided to flip the brackets around so they are hidden: Since we are making pack #2 at this time, we are making the box that the hose attaches to. Notice the hose on top of the pack here: The beginnings of that little box: We drilled a hole in the "front" of the box for the hose (here we are using our tie pilot hose): we drilled some 1/8" holes in the back of the box and in the seed tray so we could pop rivet it to the seed tray: See the pop rivets: Next we drilled a hole in the top of the seed tray for the other end of the hose: Voila: I had to make custom caps for the mortar tube since our normal detonator caps are too small. We toyed with ideas on how to attach the caps so that we could still get to the attachment bolts inside the tube. This was our first idea for a solution: Chicago screws (aka: binding screws, binding posts, sex bolts) Bungee cord: Voila: This method works nicely. Another method that works is by putting small round adhesive velcro tabs on the end (side) of the tube and inside the cap. This holds well too. Next we attached our "tool box" by pop riveting it to the seed tray: Shazam... pack #2 ... sans weathering: The pack weighs 9 lbs. I don't think it is possible to make it lighter and this durable at the same time. It's not too bad at all actually! We did add some leather pads on the shoulder straps that go under the shoulder armor so it doesn't dig into the shoulders. Next we started on pack #3 (the "move along pack") Ignore the temporary / what I call the "fake" radio from pack #2 that's sitting on it: In starting on the next pack we needed to work out how to attach the tupperware stow n' go box: We gooped in these pvc standoffs: That held the backer plate in the right spot. Next we zip tied the backer plate to the stow n go by drilling into the storage divider walls inside the box and then bolted it to the seed tray. I need to take a picture of that.. as I cannot find one We are still waiting on our 3d printer guy to finish up with the radio face and then we will be able to finish up all the packs. ... until next time ... -
Re-creating the "roadblock" scene and designing TD backpacks
MonCal replied to MonCal's topic in Field Backpack
Thanks again everyone! Ruggero, I will definitely keep that in mind. Thanks for the heads up Oh my...it's been a while since I updated this project It's a big one, so it's gonna take a while. Anyway, here are some old pics from a few months back. Gluing the lab pipe "kit" together: Putting the rivet nuts in the tops of the mushroom caps: Preparing our "exhaust port kit" (or whatever it's called for pack #3 ); I mentioned this earlier but in my research and scaling, I don't believe the typical 2 1/4" pipe that most troopers use for the mortar tube is the correct size. We are going with this slightly larger, lightweight aluminum tubing. Putting primer on all the parts: More paint: For the "filter" on pack #5 we went with a piece of pvc tubing for the core and glued a chunk of exercise mat to it. Then we squished it to make it more egg shaped instead of being round. For the "bee-stingers" we made some shims with wood blocks: This made gluing on the vac-formed bottoms much easier. For the "tool boxes" we made vacuum forming bucks to make the boxes and I had these square picture frame pieces cut for the kit: Masking so we can paint the "stinger" portion: Getting the bottles and "shotgun shells" ready: Lab pipe, strapping, and mortar tube attached to the frame: Radar dish attached to the mortar tube: To put the two halves of the seed trays together, we came up with this method. We glued in some alignment tabs and drill holes in the back seed tray (against the frame) for zip ties to go through: For the outer half of the tray we glued in these brackets for the zip ties to loop around: It's tough to see but here you can see, when looking at the back of the pack (against your body), the zip ties are pulled through. This way we can clip them if we need to take the pack apart: I have a bunch more photos to add. I will have to get to those later ...until the next post ... -
Re-creating the "roadblock" scene and designing TD backpacks
MonCal replied to MonCal's topic in Field Backpack
Thank you all for the kudos. I really do enjoy these forums. I swear I can feel a tiny bit of the excitement I used to feel when I started in this hobby ... oh... 14 years ago or so, on these forums. It's a lot of fun. Unfortunately I don't have very much time... but... My buddy / helper Andrew is working on these packs again (starting yesterday). Not only is he making new progress, I have some progress photos from late March that I still need to edit and upload. Maybe later next week I'll be able to post some more info and progress. Take care all Oh.. I think I've discovered an actual part used on the "move along pack"...but I need to confirm first and it might take some time before I can get the part...but it's exciting nonetheless. -
Re-creating the "roadblock" scene and designing TD backpacks
MonCal posted a topic in Field Backpack
To go along with the landspeeder project we have been doing a lot of research on the sandtroopers in the famous "roadblock" scene in Mos Eisley from ANH. I have slowly done research on the backpacks here and there over the years but I had no idea how much research was needed. These silly props / costume pieces are kind of intense. They are not all the same, of course. Each trooper is slightly changed for each scene in the movie to make it seem like there are more than 7 sandtroopers (total) with 5 backpacks (total). Lucas (presumably) had pauldrons flipped over, pouch arrangement, and blasters changed per each scene. Well, I'm focusing on the roadblock scene. Going off of the awesome reference and research that has already been done here on the MEPD I have delved a little further in designing this scene. The 501st folks here have already given the packs a number, for reference so I will continue to follow suit. Here is the arrangement of the packs in this scene: I will borrow the awesome reference / research that has already been done here on the MEPD and add a few more notes of interest, for this particular scene: Pack #1: Pack #2: Pack #3: Pack #4: Pack #5: Now, here are just a few reference shots for each of those packs: Pack #1: Pack #2: Pack #3: Pack #4: To show the MG34 (based on this particular photo): Pack #5: For each of the sandtroopers in the "roadblock scene", this is each of their pack, pauldron, pouch, and weapon configurations, using the backpack number for reference: Pack #1: * Black pauldron (white underneath) * "roadblock" pouch * Smooth MP40 pouch on left shoulder * MG-15 * Cheese grater hand plate (the one with the bumps) Pack #2: * White pauldron * no pouches on the hips * MP40 pouch (with the tool pouch) on left shoulder * MG15 Pack #3 (Move along trooper): * Orange pauldron * Leather MP40 pouch on right hip * Leather MP40 pouch on left hip * MP40 pouch (with the tool pouch) on left shoulder * E-11 blaster Pack #4: * Black pauldron (not sure what color underneath) * Leather MP40 pouch on left shoulder * Possibly MP40 pouches on both hips, depending on the reference shot * MG34 (based on one reference shot) Pack #5: * White pauldron * Small spanish pouch on left hip * Leather MP40 pouch on left shoulder * E-11 blaster Guy with no pack (standing behind speeder on right side, as you're looking at the scene) * Orange pauldron * Large spanish pouch on left hip * no sniper knee * white ears (don't paint them gray) * MG-34 Now, on to our progress pics All 5 kits organized and ready for attention: Soaking the faucet covers in water so the labels will come off easier: 5 aluminum pack frames built and ready for paint: I've been making the "seed trays" for years but with recent events I decided to revisit the design and make our vacuum forming tools more accurate: Pulled in .090 virgin grade black ABS plastic so durability is not a question: The "bee stinger" / faucet cover needed a cap / cover to be more accurate than just using the faucet cover off the shelf so I sculpted a cap for it: The "bee stinger" kit with the vacuum formed cap: Our "lab pipe" kit: The "radar dish" kit: Now, 2" PVC isn't the "correct" size but I've bolted it to a piece, just to show the profile shot: And a reference shot: I designed a kit for the cistern: A few shots from the tutorial for the cistern kit: Pack #1 in the roadblock scene has the threads cut off of the cistern so ... cutting that puppy off with the bandsaw : With a coat of primer: On to the most difficult part of the kit... the radio. Aaron (garbz) found a model of the radio that has some parts that are "almost" correct so he purchased a radio and is helping us reference and design the radio for the TD pack. Thanks Aaron! This is the faceplate and main dial: The main dial isn't 100% correct on this model of radio but it's a good reference piece to work from. A few of our reference shots and design notes: We are getting the faceplate and knobs 3d printed, using the state of the art technology (SLA) so the parts come out perfect, with no cleanup, ready to be molded: I currently don't have my costs worked out for all the individual "kit" pieces yet but eventually we will so just keep an eye out. We are also crazy busy so I don't know how soon we'll get these all finished up. I just wanted to share what we have so far.... actually there is more... I just need to edit a bunch of photos Enjoy! Who remembers this from Saturday morning cartoons? ..."After these messages..... we'll be riighht back!" -
That is a good, hi-res screencap. That's what I was looking for... and thanks for the info. Very helpful indeed! The "have you seen sandtroopers" comment isn't necessarily helpful to the general membership. I say this nicely of course .. just a friendly observation. Part of posting this question is for the members, not just my own skepticism and since this thread seems to be created as a "sticky" topic to help the new members find the answers I thought this would be a good place for the information to stay stuck. I could respond by saying "have you seen the picture I posted above?" I still think it looks like leather. The back piece which comes up and over the top, forming the flaps, really looks like leather. It's thick, rigid, and nothing like the flaps in the pics of the canvas pouches. Now, the "tool pouch" looks pretty soft. Could they have used a leather 3 pocket pouch and added a canvas tool pouch? Just a thought. I also read somewhere on here where a WWII collector mentioned that the other leather pouches (different discussion as you mentioned) may not have been created by the art department and may have actually been manufactured that way either at the end of the war or post war, with the rivets on the back, but the topic died after that comment (if memory serves). It just seems like a lot of speculation.... kind of reminds me of the days when lightsabers "had" VW wiper blades on them instead of the t-track which was later proven. It's easy to create a theory the fans will solidify as fact. Sorry.. not to get so far off topic. I'm just curious is all. Photo evidence is very helpful and is a valuable documenting tool for members to reference. I see this thread helping a lot!
-
Awesome! I love the theories guys. Way to let your twelve year old self (with grown-up knowledge) delve into the Star Wars universe and create some retroactive continuity. Who knows? Maybe the prop guys did actually do some of this when designing them. I have at least two helpers who do this when we're designing props. They can't just "slap" stuff together. It has to have a story behind it.
-
5 New Pouch Styles What Do You Think
MonCal replied to Blaster 8266's topic in Pouches, Pauldrons, and other Accessories
Excellent work Anthony! I may be in contact -
What Happened To Your Pouch?
MonCal replied to SAND DEVIL's topic in Pouches, Pauldrons, and other Accessories
Nice work! That should work out great. I too, as well as several guys in my garrison, have put the aker amp in our chest plate, facing out. They seem to work great in that location but I like your idea as well! -
I still need to dig a little deeper in these forums, I know ...but so far I haven't found the answer. .. o.k.... is everyone ready? I'm going to ask a total "newb" question here... Is there some evidence that can be shared in this thread which shows the shoulder pouch is supposed to be canvas? So far in looking at all the screen captures etc. it looks like leather to me. It appears to be very rigid and not "floppy" like canvas. This looks like it might be the right one to me: O.k... I'm ready for the spitballs to start flying .
-
Thanks guys! I am actually very excited to get "dirty" I've wanted to pursue Sandtrooper stuff for many years but I'm always so danged busy. It took taking on a huge project (the landspeeder) to finally push me into doing this. Hi Brad, Yeah that's me Although I can't take all the credit. My wife Kathy is a huge help and is often the person people talk to when they email or pm us ... so for me to be actively posting and conversing is quite rare. I am typically running the biz, in the workshop, etc. while she takes care of the correspondence. We also have a couple good friends who help us. One of which will be starting a progress thread here soon, as soon as he makes some more progress on his TD kit. I'm in the same boat. I want to make a little more progress before starting a thread Thanks again! Cal P.S.. here is some "eye candy" of the landspeeder project. On the 501st forums: http://www.501st.com...3482&highlight= On the RPF if you're not a member of the 501st yet: http://www.therpf.co...r-build-167303/ I don't want to derail this thread so I'll save the rest for up and coming thread posts.
-
Cool I should have searched for a thread... and I'm sure this sort of thing has been discussed many times. I just meant the topic to be fun. ... that's all. We often get so involved with these things and these projects, and while it IS fun, it also is very serious ... so have fun with the idea. Come up with some "Star Wars universe" explanations for the pack components Let the 12 year old in you come out and play ... that's the person who got you into all of this, most likely
-
Need help identifying this pouch!
MonCal replied to T-BONE's topic in Pouches, Pauldrons, and other Accessories
Cool... a thread on this I was getting ready to start a new thread. I didn't see this configuration in the awesome example pics in the CRL here: http://www.mepd.net/crl/private/ Can we add this configuration with pack #2, the black pauldron, and the small Spanish pouch on the right hip? Or do we need to figure out the pouch first? I don't know if these pics are any better: -
Awesome! I'll try to keep an eye out for it now too. thanks
-
This is backpack related so maybe ... it's not off topic?? So, has there ever been any "ret-con" (retroactive continuity) applied to backpacks? The expanded universe has been living off of this loophole in the original movies. Just curious as this can be a fun topic. I kinda hate looking at these packs with a "real world" sort of mentality thinking oh that's a tupperware container and that's out of a toilet. I think it would be fun to play with possible theory, if the prop builders had such a thing in mind. So, wouldn't a soldier get a backpack full of the typical issued gear (such as a radio and water purification device) but also have the option of throwing on a few varying items that would differ from pack to pack? So, perhaps the cystern is a dry climate water collector / purifier? Maybe the tupperware "stow-n-go" container is atually a lunchbox? Maybe the seed trays have soaps, a bed roll, etc. inside them. Is the "mortar tube" actually a "mortar tube"? What is the pitcher lid for then?
-
There is still a lip but it's trimmed down. You can see the "shells" sit on the back half of the top set of trays: Also, thanks to Art's eagle eye the "shells" should be sitting on top of little "stand-offs": The tubes seem to have "mushroomed" ends sort of like a ceramic resistor The resistor idea is just an example but if you look you can see shadow lines and light glare before the line, at the ends which imply a "bulbed" or "mushroomed" end. I haven't noticed where you can see light through them. Can you share a picture? .
-
I agree with putting extra shims on the back to keep the lines on the front "correct" I also agree, not to use a heat gun. Unless you have had a lot of practice it can be very dangerous (to the armor). I don't know what kind of plastic that kit is made from but with the ABS that I work with I am very confident in its durability so in cases like this I literally roll the plastic up like a newspaper with my bare hands to give it a curve (if it needs it) FX armor is definitely strong enough to handle this sort of thing unless perhaps it's getting old. Now... DON'T DO THIS before testing or finding out for sure what kind of plastic you have or learning what its limitations are. If you can't go that route I'm not entirely sure what to recommend. Perhaps Marcus' idea of a hair dryer might work. If you have to use a heat gun be very careful and make sure to heat as slowly and as evenly as you can, constantly moving the heat gun. I have been able to do this before when designing helmets and things but man it is risky. Here is a picture from my tutorial as even my stuff has this issue sometimes. The plastic has a little bit of a memory when formed so it can "spring" back a bit pulling it from its intended oval shape. I use .090 virgin grade ABS which is extremely durable. If you have something similar you should be able to manipulate it by hand. Just be careful. I'm not actually bending it that far in this pic. I could literally bend it another 1 1/2" down or maybe 2" without any issues other than maybe a little "pucker / kink" on the return edge which you can straighten out later by pressing the armor against the edge of a table at the location of the "pucker" Hopefully this helps.
-
I have been recommending a snap - strapping system with our kits (T/MC) for many years. Here are some pics from our tutorial I Hope this helps you in the decision making process. It's good to research, ask questions, and get opinions from several different sources who used different techniques. Keep in mind this is from a Stormtrooper tutorial, not a Sandtrooper so a few things will be slightly different but at least, hopefully it will give you some new ideas Tray actually came up with this idea of using the phillips screwdriver back in the day when he was in our garrison I strongly recommend it!! Now, if you are buying snaps, you need to make sure you get a good brand. I don't know where you are but if you are in the US. do not buy snaps from Wal-mart, Jo-Anns fabric, Hobby Lobby, Ace Hardware etc. their snaps are really expensive and poor quality at the same time. I have been building kits for many years and I have only had a couple of snaps pull through the webbing in that time. I've never had one fail. The key is to buy good snaps though! My TK armor has been through the Rose Parade, in the movie "Paul".. both of which were very rigorous events and I never had any problems. My wife and friends in the Mountain Garrison who have used my system haven't had problems either. Now I take that back. If you are (how to say this nicely) a more bulky body type there is a chance of having troubles but that can happen with velcro as well. Body type always influences these things unfortunately. If you can get to a Tandy leather or order from them online they have good quality snaps. Also Rochfordsupply.com has great quality snaps! I get them in bulk from those folks. Again, this is just my method so it's not a "do it this way or else" sort of thing Also, these pics are for a Stormtrooper tutorial so a few things are a little different from the assembly for a sandtrooper. Hopefully I will be updating a sandtrooper tutorial in the coming weeks. I hope it helps. Best of luck! Cal
-
Wow... I definitely haven't been here in a long time. These breakdowns are awesome! Good work. I borrowed them and created a thread on our garrison forums for our local troopers to reference as well. I also re-arranged them according to backpack as well, incase someone chose a particular pack configuration to go off of. It would be yet a ton more work but it would be cool to have screen caps to go along with the breakdown. That's the 12 year old in me saying "y'know what would be cool??" I'm definitely not implying someone should delve into that much eye-crossing insanity... I have trademarked that sort of insane, anal behavior and I had better not catch anyone else doing it hehe.. I kid.
-
Well.. I'm not technically a new user here but it has been many years since my activity on these forums and my information must have been lost or jumbled at some point so I had to create a new account... with that... what the heck?. ... I may as well post something My name is Cal Pierce. I am almost 40 years old.... ack.. that's wierd to type that. I have been a active member of the Mountain Garrison of the 501st since 2003 so this is my 10th year now. I actually started "trooping" 2 years before that because I "thought" I lived too far away from the active members of the Mountain Garrison so I didn't officially join until I gave up my musical career pursuits, came home from the road, and my wife and I moved closer to Denver. I got the prop and costume building bug in 1999 after going to Star Wars Celebration 1 in Denver. Yeah it rained... yeah it was muddy ... yeah it wasn't organized that well... but man did I have a blast at that convention!! I immediately started building jawas and jawa blasters which I suppose kicked things off for me. The jawa blaster was a lot of fun and I made quite a few of them for folks in the hobby. By 2002 I got going full boar. I actually got sucked in (like many) and bought a FX armor it .. but I loved that kit. I got to be included with the 501st in going to Spike TV's first VGA awards show and also got to do a lot of other amazing events. By 2004 I wanted many costumes .. of which I could not find a good available representation of so I dove in and started making them myself. And here we are today. I am still going strong, building Star Wars props and costumes like crazy. Over the past few years I've been building giant pieces like the Hoth "wampa door" set which we hauled to the Albuquerque comic expo and Star Wars Celebration V in 2010. Last year we built the Han in Carbonite alcove from Jabba's Palace. We hauled that to the Albuquerque Comic Expo and all the way to Florida for Star Wars Celebration VI for the 501st bash and then we moved it to the 501st experience room. Now I'm building a full scale landspeeder, which brings me here I now want to (finally) finish and upgrade my designs for our sandtrooper kits and eventually create a nice "roadblock" scene to go with the landspeeder. Some of you may be familiar with parts I've been making including seed trays and mushroom caps. An associate who used to work with me offered those parts here for me. Right now we are trying to get the speeder and sandtroopers "parade ready" for St. Patrick's day parade here locally next month. Boy have I got my work cut out for me??!! The speeder and the sandtroopers won't be completely finished and accurate but should be o.k. for a parade. I won't stop there though I'll continue to upgrade everything and get it as close as possible. I have been lurking here for a little while, re-aclimating myself but I will be getting a little more active, posting, and start a progress thread (or 2) for eye candy Perhaps my good friend and shop monkey will start one too since he's actually building a sandtrooper first, before me Thanks for reading. Sincerely, Cal
-
This is what I was thinking of doing. I have this system on my jango pack and it's nice (underneath the jumpsuit). I used regular nylon straps for my boba costume and those things dig in like crazy. My max is about 5 hours in that costume