

Purplehaze
-
Posts
202 -
Joined
-
Last visited
Content Type
Events
Profiles
Forums
Posts posted by Purplehaze
-
-
Great site Nick. Love the cover photo.
-
Excellent work Simon,
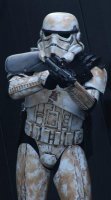
Now all i need is for someone to let me know if the Ally Check & Cantina Sargents are related. if so i will be able to use the full length shots for weathering refrences aswell. one difference I notice is the Cantina Sargent has a cleaner Pauldron, where as the Ally Check seems to have the matching marks to the Dewback Sargent. Does it ever end!!!!!!!!!
Andrew.
-
Hi Simon,
Great looking armor, the only thing I spotted is that the ear on this troopers right side appears to be all white as per the Cantina Sargent. As I am going to be doing the Cantina Sargent for my application, you may have just found me a full lenght shot off his armour.
Cheers
Andrew.
-
Hi Everyone,
Just thought I would let you know that my armor arrived safley in Australia from America on Tuesday. And i must admit it was a huge relief after reading this 2 weeks ago.
Andrew.
-
Hello again Jason,
I am also going to do the same for the Cantina Sargent. I plan on building & weathering the armor to that particular trooper plus adding all that is required for 501st approval. I will then add/remove what is required for SWAT. As far as the teeth go, I read on here somewhere about using pieces of t shirt & melting ABS & acetone together to fill the 4th tooth back in. I think it may have been Brian (Bigdane) or one of the German Garrison boys who wrote about it. Also you could get Quartermaster (John) or Dirty Boy (Rick) to build your backpack for you which will arrive SWAT ready.
Hope this helps.
Andrew.
-
Thanks Rick. Nice to know.Dont worry my friend...im sure your armor will arrive safely
-
Hi Rick,
I currently have one of the new AM kits sitting at the LA USPS (according to the tracking) wait to be shipped to Australia. Given that i have already waited 8 months (AM issue), & have paid in full, i hope it gets here.
Now i'm nervous!!!!!
Andrew.
-
Hi Andrew,
Yes RT Mod is great armor & i made enquire's about it to, but was told that the wait list is out to middle of 2014. As Frank said RS or TM would be ideal for you.
Good luck & it will be great to have another Sandy here in Australia !
Andrew.
-
Jason, I know how you feel !!!!!!!
I have waited 8 months for my armor & now finally it is at the USPS in L.A. waiting for deployment to Australia. I have a feeling that the next 2 weeks will be worse than the last 8 months.
Hang in there !
Andrew.
-
Glenn,
I love that neck seal, is it vynil or leather & did you make it or purchace it.
Andrew.
Almost forgot, your armour looks magnificent, nice to see another white pauldron.
-
Congratulations on your deyployment Vince. Hope to be there by the end of the year myself.
-
Good luck with your request Vince. After all the effort you put into modifying your armor you deserve it.
Andrew.
-
Brad,
Looks fantastic!!!!! My personal favorite is your Sargent set up with the DLT 19.Also can i ask do the straps on your Ab/Cod section just run up over your sholders & clip in on the front & then get hidden by the chest plate. I like the look of that set up.
Thanks
Andrew.
-
Hi again,
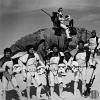
Can anyone help. is the guy 2nd from left the Cantina Sargent as that right ear on the helmet looks all white. if it is it will be a good photo to base the SWAT weathering off.
Thanks Andrew.
-
"Look Sir! another 12 months". Congratulations Rick.
-
Hi everyone,
Well my armor should be arriving in a couple of weeks & although i will still need to build it i have decided to construct & weather it in accordance with the cantina sargent. I have read the other topics that people have written in regards to his limited referance photos & was wondering if that particular trooper was emulated in any other seens. In the behind the scenes photo of the troopers standing in front of the Dewback (helmets off) is that him second from left as it looks like his helmet has the white ear. Also i have studied SANDFLEA'S swat submission & given that he is such a hard trooper to emulate, would it be considered cheating if i was to use his weathering detail as a guide. All my other equipment I have made or had it made in accordance to the Cantina CRL.
Thanks
Andrew.
-
Hi,
I will just be glad to finally get some armor (middle of year i've been told) & have it constructed, weathered & on display for you guys for deyployment. I have everything else & the anticipation of the last 8 months wait has been worse than when my first child was born.
Andrew.
-
Hi,
Has anyone heard anymore from AM with regards to what they intend doing from here ?
Andrew.
-
Forgot, I have also added the screws to the ears as required.
Andrew.
-
Tim,
I got my Hovi's from Keith over at the FISD on recommendation from other troopers on the MEPD (look in the ongoing runs). He is based in the UK, but they are well worth it & once you get them you will see why they want them changed. Also as Lou mentioned I have made the teeth larger & added the fourth tooth in. To remove the existing mic's I did what Quartermaster recommended & got the wife's hair dryer on real low heat & softened the glue & snapped them off without wrecking anything. Hope this helps.
Andrew.
-
Tim,
I also have done the same as you, but you also need to replace the Hovi's with the correct ones. The helmet is also only approvable for police officer & not SWAT. I used the Testors French Blue for the stripes.
Andrew.
-
Hey Scott,
Also forgot to say, I purchased a set of Anthony's pouches for my build & they are well worth it if you decide to upgrade yours for SWAT
Andrew.
-
Hey Scott, unfortunatly i got caught up in all this AM crap, so i have put myself on the ATA list & have a 6 month wait. so my son will be out there trooping with you daughter as a JAWA before i am. Currently working on his blaster.Thanks Andrew, hope your armor is coming along nicely. Look forward to seeing you.
Andrew.
-
Scott,
Congratulations on your deployment. Hope to join you next year.
Andrew.

SWAT TEAM! We Need Your Help
in MEPD S.W.A.T. Program
Posted
Rick,
This is a magnificent idea. I have just received my armor & was planing on building to SWAT straight up. Also those photos of Rolf's assembled armor are going to be a huge help just on there own as I have started to tape things together for fitting, but had no idea how much actually had to be trimmed of & how the final joins should look (butt not overlap). I will be printing them of & using them as a guide.
Thanks Andrew.