

SAND DEVIL
-
Posts
457 -
Joined
-
Last visited
Content Type
Events
Profiles
Forums
Everything posted by SAND DEVIL
-
*ACTIVATED* TD-10072 / SAND DEVIL / SWAT OFFICER #018
SAND DEVIL replied to SAND DEVIL's topic in MEPD S.W.A.T. Program
Update: Don't think my commitment can be questioned now, third time is the charm. Re-do #3, left stripes started: -
Update Bicept also/Lower leg too tight
SAND DEVIL replied to Bonded Hawk's topic in Sandtrooper Armor
Steve, I would leave the front at the smaller size and do an additional shim in the back. You really want your front to appear screen accurate and you can hide the shim in the back. You could do it the hard way (I did) and add a shim to the front and back for balance. The issue will be that you will have to bondo over and reshape to get the right look. Then add the right size strip over that. Someone may have another idea, but this worked good for mine. PM me if you need pictures. Good luck brother. Keep us updated. -
He sounds like a Jawa, someone get him! Hehe
-
AWESOME! Have fun and be safe brother. Don't use Griswald's sled enhancing spray...SHOOOOOM.....Stay warm.
-
*ACTIVATED* TD-10072 / SAND DEVIL / SWAT OFFICER #018
SAND DEVIL replied to SAND DEVIL's topic in MEPD S.W.A.T. Program
@ Frank, Thank you brother. Those notes keep me going. Everyone needs a push, so thanks. Update: OK, re-did, re-did stripes again. I think it looks much better and more uniform, but this trooper's opinion is not important for approval, so what do you think I need to change Boss (Mike). -
*ACTIVATED* TD-9389 / BEREN / SWAT OFFICER # 017
SAND DEVIL replied to Beren's topic in MEPD S.W.A.T. Program
Pete, Congratulations brother! Awesome, just awesome. Love the build and attention to details. Paying respects to an outstanding job. -
*ACTIVATED* TD-10072 / SAND DEVIL / SWAT OFFICER #018
SAND DEVIL replied to SAND DEVIL's topic in MEPD S.W.A.T. Program
I would need a boat...but you are welcome to come brother. -
Madison & Michael, welcome to the sand pit. Wow Vince, that is just cheating....too easy, but he is right.
-
*ACTIVATED* TD-10072 / SAND DEVIL / SWAT OFFICER #018
SAND DEVIL replied to SAND DEVIL's topic in MEPD S.W.A.T. Program
Daniel, (mein freund) Thanks for the chat on this last night. Yes it is too small of a tube for the 16 stripes. The middle ones are the right size, but had to squish the last few in. Because of the bucket type I can't have the right thickness and 16. I think you were right, I will try to reshape the front ones and make a little thinner. We will see how it works and looks. I think I will drive to Mike and show him the armor weathering in person tomorrow. Road trip to California... Thanks again brother. Have a good day. -
*ACTIVATED* TD-10072 / SAND DEVIL / SWAT OFFICER #018
SAND DEVIL replied to SAND DEVIL's topic in MEPD S.W.A.T. Program
Mike, Thank you for the update on the review sir. On the screen shots I am unable to tell how many stripes there are. I also reviewed all other Move Along submissions from last year and found all have different counts. I was also not able to find anything in the CRLs, except that they are different on the left and right (no counts). To try and be as accurate as I can, I went with the Christies Bucket (13 on the left and 16 on the right). I also completely removed my prior sticker stripes and went with hand painting them back on. I think it is more true and matches the hand painting flaws on the ears and tears. As you stated prior, different armor makers make the tube lengths different. It was difficult to get the 16 to fit. Glad I changed from stickers to paint though. A.) DEPLOYMENT OFFICER: Just waiting on final approval on tube stripes. -
*ACTIVATED* TD-10072 / SAND DEVIL / SWAT OFFICER #018
SAND DEVIL replied to SAND DEVIL's topic in MEPD S.W.A.T. Program
Vince, If you look at the picture above it is at the top of the radio. The bottom is flush with the bottom seed tray. I think it is the angle of the pictures? The parts are accurate, so if it was moved down, it would fall below the radar and seed tray. -
*ACTIVATED* TD-10072 / SAND DEVIL / SWAT OFFICER #018
SAND DEVIL replied to SAND DEVIL's topic in MEPD S.W.A.T. Program
Mike, For the record, I don't expect responses as fast as I am doing repairs. I just don't want to sit on anything and miss something. I get to go out of town on a troop this weekend and won't be able to do anything on my build. The pictures are bleaching out my overall weathering. I will see what I can do to get pictures that show the weathering better. Thank you again sir. Updates on progress sir: g.) Rank Bar -- (SEE COMMENTS) I need to see a pic of the right side of your helmet. The only thing that really stands out , and it could just be the lighting, is that the weathering looks a bit light. You may need to go back to it and darken. (?) We'll leave this as pending while we get more close up pics and examples. g.) Pauldron -- (SEE COMMENTS) As noted in the HELMET section, the weathering does look like it might need some rework. The pauldron weathering could use some more 'beating up' too. Play around with the 'circle' detail on the surface as well. A bit light and needs to be a bit more prominent. This one is always tricky because we all tend to go too light or too dark. I'm confident that you'll find the happy middle. The chest pattern MAY need some work. But not much. I'll let you know on the next pass. a.) Details -- (See Comments) 2.) No visible decals on the Radio face. Need to see new pics showing the change. 1. Painted completely over radio decals (sorry Robert - they were cool, I cried while doing it, lol): -
*ACTIVATED* TD-10072 / SAND DEVIL / SWAT OFFICER #018
SAND DEVIL replied to SAND DEVIL's topic in MEPD S.W.A.T. Program
@ Pete, yep the sand adds a cool touch. Mine isn't as cool as yours though. Road trip.....? @ Rick, Thank you sir, especially for all the encouragement. Means a lot. I know you have a ton going on. @ Mike, I understand and appreciate you taking the to look it over and give the needed feedback. Sometimes you are too close to it to be objective, so thank you. I have time, so no rush, glad to be on the move and started. Some pretty smart people said this was a journey. Little did I know how right they are. I will update all the fixes in a few minutes, I have to transfer to Photobucket to upload them. -
*ACTIVATED* TD-10072 / SAND DEVIL / SWAT OFFICER #018
SAND DEVIL replied to SAND DEVIL's topic in MEPD S.W.A.T. Program
@ Brad, Yes is it actual sand. One of the props from the Nevada desert. Same on my armor. And IMO you were correct sir. Thanks for the call out. Modifications below. @ Pete, Burn Umber paint, watered down oil, Nevada sand (redish), three layers. Reference Shot: After Mod: -
*ACTIVATED* TD-10072 / SAND DEVIL / SWAT OFFICER #018
SAND DEVIL replied to SAND DEVIL's topic in MEPD S.W.A.T. Program
@Daniel, Thank you sir, from a SWAT member that is appreciated. It was a lot of work to fix. Ok, had to give props: @Vince, Don't you dare let anyone say you are a cadet brother. You called it. I made the cadet mistake and just fixed. Thank you for the catch man. Wow, I forgot what the inside of seed trays looked like. Nothing like taking them off and doing it all again. -
AWESOME JOB! Congrats Boss Man.
-
*ACTIVATED* TD-10072 / SAND DEVIL / SWAT OFFICER #018
SAND DEVIL replied to SAND DEVIL's topic in MEPD S.W.A.T. Program
Signing off for a few days to let the group review and not respond until I get the DO's opinion. Too anxious and nervous....Thank you to all of you who have pushed me. I appreciate all the words of encouragement. This is such a great detachment. So much talent and great friends. Have a wonderful day. -
*ACTIVATED* TD-10072 / SAND DEVIL / SWAT OFFICER #018
SAND DEVIL replied to SAND DEVIL's topic in MEPD S.W.A.T. Program
To show the major changes from when I first started. I completely redid my strips with bondo and made them the correct width. OLD: NEW and improved, redid entire thing: -
*ACTIVATED* TD-10072 / SAND DEVIL / SWAT OFFICER #018
SAND DEVIL replied to SAND DEVIL's topic in MEPD S.W.A.T. Program
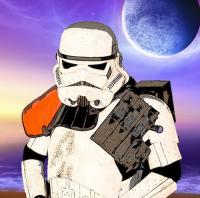
1) Post your personal information in bold: Name: Ben Anders Legion ID #: TD-10072 Forum Name: Sand Devil Garrison: Neon City Trooper Emulated: Move Along/Road Block Captain (PRE-BREAK), no gaff tape. 2) Post at least two, nice sized, clear photos of you in your armor at various angles. These photos will be used, in part, to determine if your weathering is satisfactory. Please look at overall equipment details on car port for most recent weathering, below (laid out picture of all equipment): Copy and paste the first three requirements from the S.W.A.T. requirements into the post in bold and note that you have achieved this to the best of your knowledge. Member must currently be deployed as an MEPD Police Officer to be considered. - YES Weathering must be appropriate to screen used armor. Too little or too much weathering will not be allowed. - YES, used burnt umber and dark sand technique with three layers and many troops of battle fatigue now. Pack, pauldron, and weapon combinations must match a specific trooper a seen on screen. - YES, took pauldron to leather repair shop to add a more 'fluffy' look due to questions I received the first time around. Feel the new pauldron is much more accurate than the first. E-11 for this trooper . Move Along Captain pack (Dirty Boy parts, Crashman radio face, and Gordon's cistern) 3) Post a close up photo of each major area and/or item listed in the S.W.A.T. requirements while continuing to copy and paste the requirements they relate to above the photo in bold. Pauldrons must be of the accurate “puffy” variety. Older style/flat and brightly/off color pauldrons are not allowed. Packs must have the appropriate details for the specific trooper which is being referenced. WIRE ADDED: SOUND SYSTEM: Pouches must be of the correct construction, color, and materials as reference trooper. MP-40 side pouches, leather and shoulder is canvas painted black with medical pouch in center of left side (correct rounded tips): 4) You may post multiple requirements met with the same photo... like so... Rubber gloves. Latex or silicone (i.e., “soft”) hand plates. Rivets on the left side of the ab/kidney plates: a total of six rivets with three on the ab and three on the kidney plate, equally spaced out along the depth of the armor and about 10mm from the edge. One snap on the top right hand side oft he ab plate: back of male side of snap should show on outside of ab plate. Visible fasteners under crotch area. Two (or 3) male snaps in the back and one split rivet or brad in the front. (not required to be functional) Boots must be screen accurate in color and make; they cannot have a seam on the front. FXhelmets, MRCE and/or ANHv2 helmets are not allowed. Hasbro blasters are not allowed, even conversions. 5) Post at least one "action" image. This photo should be taken of you from the waist up on a blank, non-colored wall (i.e., such as white, beige, grey, etc.) This photo should be taken and available in high-resolution for the deployment photo. NOTE: There is no need to repost photos of details which were needed for Police Officer deployment. Please — simply ease of reading posts — make sure there is a "space" between each bolded statement and each image. -
*ACTIVATED* TD-10072 / SAND DEVIL / SWAT OFFICER #018
SAND DEVIL replied to SAND DEVIL's topic in MEPD S.W.A.T. Program
Rick, Thank you for the clarity sir. It is appreciated. I totally understand the time and know what was going on in the real world and in the detachment. Wow, what a great question. Very subjective. To answer, YES. Nothing more I can think of to add, now that I have had several months to look at the details and made several adjustments. But I am very open to any accurate critiques. Especially from you or Mike. I will repost my pictures and details for review now. Thank you again for the support and acknowledgment sir. Have a great day. -
*ACTIVATED* TD-10072 / SAND DEVIL / SWAT OFFICER #018
SAND DEVIL replied to SAND DEVIL's topic in MEPD S.W.A.T. Program
Um, OK Nick, thanks for the post. -
Love it, you got a new haircut in the new picture. Awesome.
-
Brother ROLF, thank you for the support. I have to finish making the little figures and perfecting the prod before I move onto a full size Dewback, but I am designing one. Now I just have to convince the wife to let me take over the living room....hehe. Hope you and your family are doing well my fellow 66er brother. Luis, Long time brother. Hope you are good, thanks for the support. AL, you crack me up and keep me going man, you are crazy. Love it. Needed you today when my daughter's car broke down on the Las Vegas freeway. Her car was too small a job for your rig though. Be good.
-
Vince, nope, perfecting the rod. Have it down now.
-
Rick, Rick, he's our man, if he can't do it, nobody can. You got it sir. Thank you for your leadership.