

Prophet
-
Posts
64 -
Joined
-
Last visited
Content Type
Events
Profiles
Forums
Posts posted by Prophet
-
-
 Now that is some impressive work !
Brother you got the skills!
-
Really nice job!
That is the best Lewis gun I've ever seen!

-
Fantastic weathering job!
BTW , I really like your back pack !
-
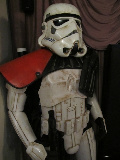
Oh yeah now thats a dirty trooper!

-
Looks like a winner to me !
-
Happy 35th birthday!
-
Thanks,
To all for the kind words!
I have spent the past year carefully reworking my former "shiny" TD
Rolf,Great weathering job on the helmet, good luck whit the body armor.
Hope to see you all suit asap

Thanks Brother seeing your TD was my inspiration !
Here's my "Cantina" display,
http://i535.photobucket.com/albums/ee356/t.../cantina003.jpg
http://i535.photobucket.com/albums/ee356/t.../cantina002.jpg
I plan to submit It for deployment when I finish my new backpack and my DLT-19!
-
Thanks!!!
"looks a lot like this weathering method...
Thats It!
The only thing I did different was to use tempra paints instead of acrylics.
I found the tempra paints dry into a chalky-dirt like stain, and there much more forgiving!
There easily removed with water even after several layers,
yet stay put when dry with just a layer of hairspray.
-
Wow, no comments......
Is it that bad?
-
Here are some before and after pics of my SDS #093 helmet,
http://s535.photobucket.com/albums/ee356/t...?albumview=grid
It's from the original 100 run back in 2001.
I've been told that I ruined it by doing all of the mods to it....
Tell me what you think!
-
Go with Charlie's kit !!!!!!!!!!!!!!!!!!!!!!!!!!!!!
My parts arrived today and I am so pleased with everthing!
Crashmann,
Thank you so much for all your detailed work, great communication, and low prices!!!
It's fair deals like Charlies that keep this community going !!!
Thanks Again,
Brian "Prophet" Kirby
-
Fantastic Job A !
You really captured the look! -
IMHO, I vote black!
-
Hey Denise, Great to see you here!
-
Fantastic job Mike!
I want one...
Cant wait to see it mounted on a pack!
-
If you pick the larger, you cut the extensions off the top down to the cross frame where the straps attach... On the piece at the bottom that bends round, you have to cut about 1 1/2" to 2" out of the middle, then use dowels to attach them together again as the bit that come out of the bottom sticks out too far...
I have the smaller "himalayan pack" and the top is smaller than the bottom,
also the "bend" is to far up on the sides?
-
Scootch, Thanks so much for taking the time to show your handywork!
I can't begin to tell you how much this helps!
Please,
STICKY THIS TUTORIAL!
-
Both.
And they'll always have to be cut up with a hack saw and bent in the middle.
Do you cut the whole top off and replace it?,
or cut the top in the center and rebend the sides?
-
Not too heavy if the inner system removed

Where they're located? Asia? America? Europe?
Looks like they're located in China.
It appears this is still in the development stage and the guns pictured are prototypes.
-
 looks really nice.....I heard the price will be around $700.00 US.
 -
Looks perfect !
Love the display, is it on a standard mannequin or did you build a custom one?
-
Fantastic Job Eric!
Thats an accurate look to be proud of!
-
What are the correct dimensions of a vintage tupperware stow and go?
-
The disk shape or pitcher lid should not directly touch the TD or "morter tube"...
Leave the neck piece, and mount it to the tube.
Most use a long bolt that will pass through the center of the lid and the neck piece then into the tube.
Attach a washer and nut on the inside of the tube and that should do it.
Is that an all black seedtray backpack?
in Field Backpack
Posted
It sure looks black compared to the canisters
and the stinger...hmmm!
Nice find Bro!