

TK6237
-
Posts
133 -
Joined
-
Last visited
Content Type
Events
Profiles
Forums
Everything posted by TK6237
-
Thanks! I used Mig Productions dry pigments mixed with the stickiest liquid hairspray I could find, applying it using kitchen sponges, and then wiping it off with a damp cloth. All the details are in the first post.
-
Happy to be of service! Clas Ohlson is the closest thing I´ve ever found to Home Depot this side of the Atlantic. Just be careful not to remove too much when you do the teeth, if you want to preserve the illusion of the material being thicker than it is - teeth look cool with a small return edge, like the rest of the armor parts. From what reference I´ve seen, it´s screen accurate as well.
-
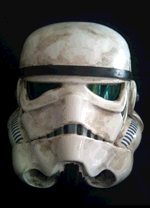
Finally got around to updating the first post with some more detailed shots of the weathering. ...Yeah, I seriously need to find a better material for the cowl.
-
I made attachments for the lenses out of modeling clay for two of my helmets (one TD, one TS). Worked a treat so far. It's a fairly cheap and pretty simple way to secure the lenses, while being able to replace them with a fresh pair if they get damaged.
-
I rough trimmed the teeth with a Dremel, took it one step further with a Stanley knife, and finished off with a set of jeweler's files. Looking great so far, keep up the good work!
-
*done* TD-2298 Requesting Deployment
TK6237 replied to TD2298's topic in MEPD Police Officer Program
Those are the faucet aerator nozzles that ships with the AP helmet kits. The screen used mic tips look like more this: Pic is of one of Keith´s excellent Hovi mic tips. I´m not sure if he´s still making them, but I think so..? (I borrowed the image from one of his posts here on the MEPD, hope he doesn´t mind!) -
Thanks for the comments! I love reading how-tos and build-ups from other people, just happy I got the opportunity to contribute for once. I really don´t wanna take all the credit for it though - I basically started out with Mike´s tutorial, but since working outdoors is kinda rough about 8-9 months a year here in Norway, I needed to find a cleaner way to do it, indoors. Hence the idea of putting the hairspray on the plate, mixing it with pigments and dabbing it on with the sponge, rather than spraying and drizzling that stuff everywhere. I´m still cleaning patches of Fuller´s earth out of the nooks and crannies in my apartment after my previous weathering attempt, more than a year ago... Thank you, hope I did the DL kit justice. By the way, I´m really pleased that you liked it, as I´ll be redoing my TM set of TD armor using this method, soon as I find time for it! This one´s really easy to do though - pretty fast, too. Clue is to just keep dabbing with the sponge, until you get the right texture, and then take your time when wiping it off. No hocus pocus, I promise!
-
I´ve weathered two TD suits so far, but never really been happy with the look afterward; the color´s either been wrong, too strong or too dark, or I´ve ended up with too much of it, and in the wrong spots...So, I decided to try something new when I weathered my TS, and I´m a lot more happy with the result - so much so, that I thought I´d share it with the rest of you. Instead of soaking the parts in hairspray, then sprinkling a pinch of dry pigments on it before I started working with the sponge, or going with acrylic paints - I did this: 1) First spray hairspray into something like a small plate (I used one from a tea set), until you have a small puddle of hairspray floating in it (about 2-3 teaspoons). 2) Drop a pinch (1/8th of a teaspoon, or less) of pigment in the puddle; if you want a really strong color, use more pigment. If you want a fainter color, use less. Adjust with adding more hairspray or pigment to the mix, stir until even. 3) After getting the right shade of whatever color you´re after, soak a sponge in the mixture, and apply to the armor parts in a dabbing motion; keep dabbing it (dab-dab-dab-dab-dab etc.) until the hairspray starts to get sticky. It´ll be runny and hard to work with at first, but just keep dabbing it all over, making multiple passes over the same area. This is important, if you want a sand-, dried dirt or smoke-like texture. Change the angle of the sponge every now and then, to brake up any too-intentional looking patters. Naturally, you can also smear the hairspray-pigment mixture on the armor, if you want it to appear as oil, mud or grease. Or, do a little of both. But keep working with the sponge until the hairspray starts to dry up, and the surface gets all sticky. I recommend cutting up the surface of the sponge a little, to avoid it leaving any straight lines. Just trim it lightly with a pair of scissors, to get an uneven surface. 4) If it dries up too quickly, or you want to redo an area, spray a small amount of hairspray directly on the part, then work it over with the sponge again. Re-soak the sponge in more pigment-and-hairspray mixture when needed. If you want some extra pigments in the nooks and crannies, you can also add some using a stiff brush with a little bit of powdered pigment on the tip, and sort of just dab it in there. 5) Once you´re happy with the part, put it aside to dry for a few minutes, while you start working on another part. 10-15 minutes of drying time should be enough. 6) After it´s dried, start working on the part with a slightly damp cloth, rubbing off the weathering, switching between dabbing and circular motions, trying to get it to look as random as possible. This is where the magic happens; take your time, keep an eye out for cool effects and patterns. I repeated step 1-6 about three times for each part, starting with a very heavy black color, of which I removed almost everything. Then a second layer, a bit thinner, but still removing most of it - and then a third time, using almost no pigment at all to lots of hairspray, resulting in a thin, just barely noticeable layer of grayish "grime". Also, try to find a cloth that isn´t fuzzy...The old terrycloth towel I used left tiny little balls of lint all over, sticking to the hairspray. 7) Once you´re happy with the look of things, let it dry for about a day before showering all the parts with a couple of more layers of hairspray to really fixate the pigments and make the weathering stick better. Be careful not to wet the parts too much at a time, which´ll cause the weathering to get all runny. Rather do several light passes with the hairspray, leaving the part to dry for an hour or so between each pass. 8) Aaaand you´re done! ...Here´s a rather crappy picture taken with my mobile phone of what my suit looked like after this process: More pictures of the finished armor HERE I found several advantages to using this method. First of all, it´s a lot cleaner than laying the parts on the ground, soaking them in hairspray and drizzling pigments on them - which, when I did my TD armor, resulted in me weathering much of our living room in the process. Another considerable advantage is having full control of the saturation and brightness of the color you´re using, adding more pigment or more hairspray, or even mixing pigments, to the mixture before putting it on the suit. It was also a lot faster than any other method I´ve tried so far (using acrylic paints or applying the hairspray and pigments directly on to the suit). And, should you want to remove the weathering, a little luke warm water with a drop of washing-up liquid will do the job, while the weathering will still hold really well to regular use and abuse of the armor. I haven´t been out in a solid rainstorm yet, but I´m pretty sure it´ll hold up well to a light drizzle, at least. Acrylic paint has a much stronger hold, but on the other hand, cleaning it off, if you want to redo the weathering, is one heckuva job! I find that this method is a lot more economic when it comes to the use of pigments as well, as you can leave the plate with the pigment-and-hairspray mix to dry if don´t have time to do all in one sitting, and revive the mixture the next day, or week, with a few more splashes of hairspray (much like working with watercolors!). The pigments I´m using are from MIG Productions, which you can pretty much get at any hobby shop that sells scaled model kits. I´ve tried several types of hairspray, but the one that has performed the best so far, is called Clynol Styling Spray, Ultra Strong, bought at Bunnpris (a chain of grocery stores) in Norway. Curiously, some other brands didn´t work at all, but I´m sure there are several others out there which´ll do. You just have to find one that´s really sticky. To apply the weathering, I used a cheap household sponge, hacking away parts of it here and there, just to give at a more uneven shape. I´ll update this post with some more pictures of the actual process, soon as I can get around to taking some. I´ll be redoing my TD using this method, when I can find time for it. Special thanks to Mike (TD-1536) and Gundamzeppelin, for being fantastic sources of both knowledge and inspiration! EDIT: Here's a few more detailed pics of the weathering: And here's the look I tried to emulate: (MoM Snowtrooper) ...Looks like I may need to add a bit more dirt!
-
Just make sure you stir and shake the paint well before you start (scrape the bottom well with a match or something, mix any "chunks" with the rest of the paint until smooth, then shake the tin vigorously for at least a minute). Also, let the first layer dry for at least 6 hours, before starting on the next coat. If you need to do a third and fourth, I´ve found that a couple of hours drying time is sufficient. Use a square, flat brush and lay the paint on really thin, if you want nice and even coats. After the second coat, I usually rub it down lightly with some P240 sandpaper to get rid of any runs or hairs, then apply a thin, third coat. I botched my first attempt at painting the traps and frown by putting on a second coat less than an hour after the first. This caused the first layer to liquefy, so when I checked on the helmet a few hours later, it was sitting in a small pond of Humbrol #5. I had to use copious amounts of White Spirit on the helmet, and some whisky on myself, to get things fixed so I could start over again. And though the whisky part made it more fun, there are better ways to spend an evening.
-
I´ve got my ROM/FX tucked away in my shoulder pouch, like so: http://forum.mepd.net/index.php?showtopic=5621&hl=
-
Indeed you can, but you have to use a heatgun, or, like I did, a hairdryer, to heat and shape the plastic first, so that it closes naturally in the back. The way I did it, I glued the front seam first, then started working the back, heating the plastic around the area of the back seams until you feel it go kinda soft. Using my hands, I started bending and shaping the two halves, until they closed the way I wanted them to. It takes a few tries, and you have to keep reheating the plastic when it cools off and goes stiff again. It probably took me at least an hour or two to do each shin, but it really is worth it. Aside from giving you that screen accurate look, having the shins open and flexing in the back allows you to move your ankles more freely, which is good for walking, climbing stairs etc. @Rolf: Doing a great job on the armor, as always. Will you be painting it, or just polish it to shine?
-
Happy to hear you liked it! Yeah, I also spent a long time looking for a good microphone, must have tried at least 6-7 different models. I currently use this one: JENSEN JTH-960 BEHIND-THE-NECK HEADSET WITH FLEXI-MIC (If this link goes dead, search Ebay for "Jensen JTH-960") ...Which is small enough to fit comfortably inside my AP helmet. Fairly cheap, too. I´m pretty happy with it. I recommended it to a fellow trooper in our Garrison a while back, and he seems happy with it as well. However, it has a 2.5mm minijack, so you´ll need a 2.5mm-to-3.5mm adapter to connect it to the ROM/FX - but adapters like that are available at any decent electronics store, and the one I bought cost me about USD $4. Or you can buy them off of Ebay, for even less (search Ebay for "3.5 mm to 2.5 mm", make sure you get the one with a 2.5mm socket and a 3.5mm plug).
-
A fresh TD from our Garrison was asking on our local forums for tips on ways to mount the ROM/FX. I´m pretty happy with my setup, so I snapped a shot, and put some labels on it. Thought I´d post it here as well, just in case: The ROM/FX motherboard goes in one of the magazine pouches, the two 4 X AA battery boxes in another. The speaker goes in the small tool pouch. There are holes cut in the back of the pouches for the wires from the motherboard to the battery boxes and the speaker, and the microphone jack. There´s also a small hole cut on the side of the pouch with the motherboard in it, for easy access to the volume control knob. I run the wire to the microphone on my headset under my chest plate, where in connects with the jack to the ROM/FX at the back of the pouch. Nice and tidy, just the way I like it. (Thanks to TD-6213 who supplied the pouch and did all the work!) I recently got hold of a more accurate canvas pouch, so I´m gonna move the ROM/FX over to that one, soon as I find time for it.
-
I dunno if this is the best way to do it, but...I took a deep breath, then drilled a hole slightly smaller than the screw on the sling swivel, through the little knob under the stock, which is what´s left of the original sling swivel attachment, I think. I filled the hole with E6000 and then set the screw in place. Works like a charm. Have a paper towel ready to wipe off the excess glue. The sling swivel I use look something like this: ...If you wanna go for the Enfield rifle straps as well, make sure the "eye" on the swivel is big enough to accept the strap before gluing the screw in place.

-
Aw crap man, I´m so sorry to hear about this. And after waiting all that time, too...Still, you seem to be coping admirably, I must say. I´d be off my rocker over something this, but I guess recent happenings related to your family status might have changed your perspective on things, huh? Does look salvageable, though. Make sure you post some pics of the rescue process, be interesting to see you bring this thing back to shape!
-
Thanks for digging that one out! I was sure I first learned about the MG-15 getting a SW designation on the MEPD, but couldn´t find the thread. Anybody else notice how hard it is to find a comfortable way of carrying this beaut? Not hard to figure the MG-15 was never designed to be fired from the hip...And the number and placement of the scopes doesn´t make it any easier. Still, it´s one of my absolute favorite blasters - that thing looks mean!
-
My Troopermaster Armor in ABS (lots of pics)
TK6237 replied to TKDUEUNO's topic in Sandtrooper Armor
Oh man, that is a beautiful build! Well done, Pablo - from one happy TM owner to another! One of the really cool things with this suit, in my opinion, is that is has all those tiny details that actually make the TK interesting, if you get my drift. While an FX TK is really just all straight lines, so much so that if you´ve seen it from 10 meters, there´s not much more to see up close - but the TM, now that´s a whole other story...You really need to see the suit up close to appreciate all the details and the beautiful definition. I get the most "oohs" and "aahs" after the troop is over, and the other guys (and girls) get a chance to actually handle the parts before they go back into the suitcase. My only grief is that the TM suit I have now is an older HIPS model, with every part having at least one crack along the edge, most of the parts have a whole bunch of hairline cracks. I´m continuously repairing the suit with E6000 and small strips of ABS, almost after every troop. This´ll be my first and last HIPS suit, I think. I´m busy with a backpack build, and after that, a LAWS TS suit (going back to Hoth to celebrate the 30th anniversary of ESB next year), but after that, I really, really wanna do a TM TK. Pictures saved for future reference! -
Couple of more pictures of the suit to be found here: http://www.flickr.com/photos/8394624@N07/s...57618412262132/ http://www.flickr.com/photos/26561474@N06/ ...Guess it shouldn´t be too difficult to figure out which one of the troopers I am by now. The other TD, with the black pauldron/RT-97C combo is my old FX suit, by the way. The occasion for the troop was the Norwegian Constitution Day on May 17th, which is kinda like our 4th of July, with lots of parades and stuff. This was the very first time the 501st Legion was represented in the May 17th parade in Norway, and it was a huge success; the crowds were cheering us on throughout the entire parade route. We´re already planning next year´s parade! I just got a fresh bag of Fuller´s earth, so I´m redoing the weathering as soon as I find the time for it. Thanks again for the feedback!
-
I pretty much did the same thing as Rolf, only I used snaps; one half of the snap under the shoulder strap, other half on the strap connected to my shoulder bell and on to the bicep. I bought heavy duty sew-on snaps, like these: http://www.albertzoll.com/product_info.php...=rauydrmaenbxhl ...And used white thread for the half fastened under my white canvas shoulder strap, to keep the stitches from showing - like so: ...This rig does pull on the shoulder straps a little, but it works pretty well. Hope this helps!
-
Just thought I let everybody know that IMA got the green canvas MP40 pouches on sale this weekend, marked down from USD $29.95 to USD $22.50 a set. They are far from perfect, but look pretty decent in my opinion. Seem to be made from moderately heavy canvas, has metal knobs and a short strap on the small tool pouch: http://www.ima-usa.com/product_info.php/products_id/325 ...Not perfect, but a far more screen accurate than many of the alternatives for a shoulder pouch Ive been considering, and at a reasonable price. I just ordered a set myself, although overseas shipping was pretty steep at approx. USD $30. EDIT: Added picture As to the color of these pouches: The Norwegian army used green canvas pouches when I did my conscripted service a few years back, but many of them had turned from the original army olive green to a much darker shade, almost black, due to many years of service, getting drenched in mud and dirt and weapons oil. If the pouches used in ANH were original WWII pouches, this might explain why the color appear to be so dark, instead of a brighter olive green or drab color.
-
Thanks guys, really appreciate your comments! One of my garrison mates just put up a Flickr gallery with some pics from our latest troop, first one where I wore the TM suit. I´m the guy with the T-21...well, actually, I guess I really didn´t have to point that out, should be pretty easy to spot: http://www.flickr.com/photos/knokkel/sets/72157617598027745/ ...He´s obviously got a lot better camera than me, so you can see the subtleties of the weathering more clearly. Something, probably the ceiling lights, is giving it a greenish hue, though. Anyway, at this point, I just wanna know what people think about the weathering technique itself, not so much the actual colors, as I´ll be redoing it shortly. And the fit of the suit, of course (which I must say, feels great when I wear it!). (Bonus points to the those able spot the other TM suit in these pics!) I just really, really love the fantastic weathering job you did on this suit: That look and level of weathering is pretty much what I´m aiming for - in the long run, once my weathering skills have improved. Greatly.
-
@Rolf: I guess the most screen accurate way of weathering would be to suit up, then have somebody smear brownish paint, perhaps mixed with sand and dirt, all over you with a huge paint brush, and then possibly shovel real desert sand over you, or just kick up a nice and thick cloud of desert sand dust and order you to walk through it, while the paint is still fresh...Problem is, there really aren´t that many deserts around where I live. Also, while it does look great on screen, I´m not sure the results would look too convincing when seen up close, in real life. Think I´ll stick to the pigments and the Fuller´s earth for now! Think I used about 7-8 different colors on this suit, plus a solid helping of Fuller´s earth. Next time, I´m gonna make due with a mix of MIG "Gulf War" (a yellow/grey pigment) and "Ashes White", with just a pinch of rust colored pigment, applied very lightly, before dusting the whole thing with two-three layers of Fuller´s earth, rubbing some of it back in between layers. What I do is, soak the part I´m working on with copious amounts of hairspray, then sprinkle pigments on using a makeup brush. I then smear the pigment all over the part with a wet rag or sponge, before working it over with a moist sponge to get a better texture. All of this has to be done while the part is still wet with hairspray. If it dries up, I spray on some more. After distributing the pigment, I let it dry for a while, before I start working it with dry and wet rags (like Mike does in his most excellent Youtube vid tutorial - thank you, Mike!). When I´m happy with the result, I let it dry for an hour or so, doing other parts in the meantime, before revisiting the part with the second layer of pigments, working my way from dark colors to lighter ones. In the end, I dust the part with two-three layers of Fuller´s earth, and rub some of that back as well, let it dry for a while, then seal it with two-three more layers of hairspray. Is that anything like the rest of you guys do? It´s just my luck to finally be able to acquire a TM suit, just as Troopermaster switches material from HIPS to ABS...I just saw some pictures of one of his new acrylic capped ABS suits over at the FISD, and it looks fantastic! Once I´m happy with the TD, think I´m gonna have to try and build a shiny white TM TK suit. Gluing strips of ABS plastic with E6000 to the insides of the return edges was actually TM´s own suggestion on how to strengthen the suit, and repair the cracks. Luckily for me, the weathering makes the cracks a lot harder to spot, and the ones you do see just helps with making the suit look worn, I think. I just need to keep the cracks from growing to long an deep, ending with pieces breaking off.
-
@Ray: Thanks man! I put a lot of work into this, so I appreciate the comment! @Rolf: As I´m betting you put more than a few hours of work into this suit as well, I´m really pleased to hear you´re happy to see it back in service again! I was kinda in a rush to get these pictures taken, to send to the Nordic Garrison GML for approval, so I can start wearing it to 501st events. I just suited up and had my girlfriend snap these in our living room with a small, digital point-and-shoot camera...I´ll get some better pictures taken by a proper photographer in a professional studio later this month. The weathering does look a bit better in person than on these pictures, but I think it´s still too dark. Too much black and brown. When I get the new bag of Fuller´s earth I ordered, I´m gonna rub off most of what I have on now, leave some in the corners and cracks, and then work it over with a mixture of mostly gray, some light yellow and maybe just a pinch of ocher. Then cover it up with a heavy dusting of Fuller´s earth. Think that should do the trick! Oh, and a word of advice to others wanting to try weathering with Fuller´s earth (and you really should!): Don´t do it inside, especially not in your living room. I spent 4-5 hours cleaning up afterwards...That stuff gets everywhere! The camouflage-ish pattern was what I was referring to when I wrote marbled...You can see it really well on the back plate. I was working with my nose way too close to the plastic, making the weathering patterns too intricate and detailed. Next time, I´ll put the part I´m weathering down on the floor every now and then, and take a few steps back, try focusing on the bigger picture. I was really sad to discover the cracks in the TM helmet, especially since the guy who sold the suit to me forgot to mention this to me...There are quite a few cracks in the suit as well, mostly around the edges, which I´ve tried to repair to the best of my ability. I´m also thinking of gluing some thin strips of ABS, using E6000, around on the inside of the return edges, to strengthen the integrity of the suit. I do wanna try and repair the TM helmet, but I think I´ll stick to using the AP with this suit. As I have to admit to being way too short to be a stormtrooper, I think the smaller AP looks more proportionate to my height. It´s still kinda nerve wrecking, working on a HIPS suit, after being used to the way more solid FX ABS suit. While the FX can take all kinds of abuse, the HIPS TM needs to be handled with a lot more care...Wearing it for the first time, I wanted to check if I could sit down in it (like I can in my FX). Bad idea. The butt plate cracked right away. The MH/SB back pack is next on my to-do list!...That, and a third go at weathering (second one for this suit).
-
I´ve been dreading this moment for quite some time, but I think it´s time now to show and tell... This is a TM suit built by TD-252/Rolf, passed on to me through another Nordic Garrison member; refurbished, adjusted to and weathered by me. Somewhere along the way, it got pretty banged up, so I´ve had to substitute the TM helmet for an AP, due to the TM helmet having quite a few nasty cracks in it, that I haven´t found the time to repair yet. Here are the pics: I´m already a 501st approved TD, but I´ve never been quite happy with my FX suit. Mostly because I´m only 175 centimeters tall (approx. 5´9"), so my chest plate would pretty much ride on my belt...Also, reading and studying this and other 501st forums gave me a taste for the more accurate armors, so when I saw Rolf´s old suit was for sale, I jumped on it. My FX suit I weathered with acrylic paints, which is another point I was never really all that happy with. It did look somewhat like sand from a few meters away, but if you had a close look at it, it looked like...acrylic paint. So this time, inspired by Gundamzeppelin and TD-1536´s weathering tutorials, I went for the dry pigments, Fuller´s earth and hairspray method instead. And the result is, in my opinon, much, much better than my previous attempt. Only problem is, I got sorta carried away, just a tiny, little bit...I really am more of a "less-is-more" kinda guy, but I guess I fell in love with the effect I was getting from the new approach, and got a bit overzealous. I´m pretty happy with the amount of weathering I´ve got on, but the colors I used are too dark, in my own opinion. Also, I put in too many small details, giving the weathering sort of a marbled look. The error I did was working on one piece at a time, forgetting to take a few steps back now and then to look at the suit and the weathering patterns as a whole. I´ve already ordered a new batch of Fuller´s earth, and will be redoing the weathering soon as it gets here. Still, I wanted to show what I got so far, to hear what you guys thought....Am I on the right track? Thanks for looking!
-
New Macrobinocular Source?
TK6237 replied to iam118's topic in Pouches, Pauldrons, and other Accessories
Found this one: Looks way too small. Could be a good source for parts for a home made set of macro binocs, though.
