All Activity
- Yesterday
-
Fourth of July Parade, Seward, NE; 7/4/2025
- Last week
-

NOT a new Member Introduction - Praetorian Blasters
postmortem01 replied to postmortem01's topic in New Members
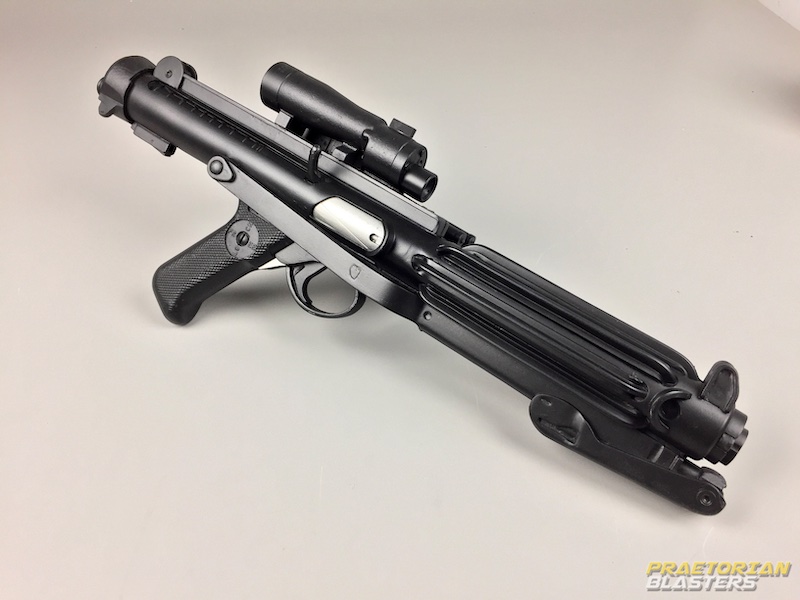
We've remolded this bad boy and now offer both styles of DLT-19 and DLT-19X. We're working on the Lewis Gun but it depends on how many are interested. -
postmortem01 changed their profile photo
-
Hello. I was asked to make an introduction and explain my/our background. I personally have worked in the film industry for over 35 years. From Independence Day to Pirates of the C to Transformers to Dark Knight to Iron Man to Avengers, etc. I've been a 501st member since 2003 or 2005. I created the original rubber blasters for the 501st as Sci-fire.com and then later Hyper-Firm. I gave that company over to someone else to continue so I could spend more time with my wife and son. In 2017, I created Praetorian Blasters designed to do less quantity but higher quality. In 2021, I was hired by Lucasfilm/Disney to be the Property/Droid Illustrator and oversee all prop and droid manufacturing for the series "Obi-Wan". I was then re-hired to "Mandalorian S3", "Ahsoka" and more recently in 2024 "Mando and Grogu". I've also worked on "Boba Fett" and "Skeleton Crew" to lesser degrees. Many of my blasters from Praetorian were used on these productions simply because I'd already done the work to create masters, etc. I've been making rubber blasters and armor for over 20 years (I'm old). Now that we're done with Mando for the time being, I've returned to our shop in Louisiana and we are working on several shows at once and continuing the blasters for the 501st members.
-
 aavidyandexto6571 joined the community
 -
Hey guys. It's been a minute. We just finished working on The Mandalorian and Grogu film in Los Angeles. My partner and I returned to our shop in Louisiana and finally got around to setting up the blaster store on our site. We have people who are permanent employees here molding and casting for us on a daily basis. Please check it out when you get a chance. I've just started populating the store page. Praetorian Blasters We had to leave Etsy and Facebook due to these being "restricted" items by their book. Not sure why but it is what it is. Basically every blaster we make is legacy and/or canon at this point but you should research and make sure that our products meet the criteria of the 501st. IF we do not, we will try to ensure that we will in the future within reason of course.
-
aangeshulzez2932 joined the community
-
June 29, 2025 - Columbus BBQ & Music Festival - Columbus, NE, USA
-
Welcome Steve! Great to have you here, have fun!
-

TD-86557 "Volksjager" Tour of Duty (43 Arrests)
Volksjager replied to Volksjager's topic in Tours of Duty
43. Supanova 2025 Day 2, Perth Convention & Exhibition Centre, Western Australia - 28/6/25 Day 2 of Supanova, the largest Comic Book convention in WA. Did a full 7 hours in the suit (No breaks at all, helmet on at 10am and not off untill 5pm) & I am exhausted! Second troop for my daughter as a member of GA, she is the 2nd Sister. She got quite a bit of attention And I got into the filming of a news segment -
TD-86557 "Volksjager" Tour of Duty (43 Arrests)
Volksjager replied to Volksjager's topic in Tours of Duty
42. Supanova 2025 Day 1, Perth Convention & Exhibition Centre, Western Australia - 28/6/25 Day 1 of Supanova, the largest Comic Book convention in WA. Was only able to arrive at 2pm due to commitments to the morning but got a good 3 hours in before closing. Also was the first troop for my daughter as a member of GA, she is the 2nd Sister. Crappy pic but all I have at this stage, more to follow -
49: Wake the Giant Festival, Warrenpoint 28/06/25 I should have packed the T-21!
- Earlier
-
tree guy joined the community
-
May 4, 2025 - Grand Forks Library - Grand Forks, ND
-
May 4, 2025 - ESB at Fargo Theater - Fargo, ND
-
May 4, 2025 - Brick Convention Day 2 - Fargo, ND
-
May 3, 2025 - Original Trilogy at the Quasar Drive In Theater (night #2) - Valley, NE
-
May 3, 2025 - Free Comic Book Day - Omaha, NE
-
May 2, 2025 - Original Trilogy at the Quasar Drive In Theater - Valley, NE
-
Apr. 12, 2025 - Community Egg Hunt - Shawnee, KS
-
Apr. 12, 2025 - All for the Children - Independence, MO
-
Mar. 29, 2025 - Tri-City Con - Grand Island, NE
-
Dec. 7, 2024 - Santa Goes to Space - Ashland, NE
-
Nov. 23, 2024 - Star Wars Night with the Rush - Rapid City, SD
-
Oct. 27, 2024 - Trunk or Treat - Omaha, NE
-
Oct. 27, 2024 - Goulish Gardens - Omaha, NE
-
Aug. 31, 2024 - Star Wars at the Palace Theater - Luverne, MN
-
Aug. 24, 2024 - Offutt Air Show - Omaha, NE
-
Aug. 17, 2024 - Kool Aid Days Parade - Hastings, NE, USA