Obievon Posted September 29, 2010 Share Posted September 29, 2010 Here I go. I've had this armor for awhile, it's been setting in the brown box. First let me say this is VT armor ABS. I got it as a half put together kit (easy parts were done). The price was right and I was looking for a ABS set to go TD. There was no helmet with it so I bought a AP. I might go with one of my TE2s I have, I'll wait and see when it is together. I can tell you that the only other kit I have put together was my TX (modified FX) So with that I start my build. As you will see there is some trimming involved. This is good and bad. I gives me plenty to work with but also because of the way the molding process the flash is out. Which is great for de-molding but when the pieces need to be butt fitted they bend away from each other. So I had to work around that. Made a template for marking and cutting the pieces. This will leave enough for the added ANH strips. This is what was cut off. I will use it on the inside to glue to and butt the pieces together. Getting ready to trim the back. Plenty of overlap...and trimming. Trimming As you can see gaps. Well I'll add more as the e6000 sets up. Also you might recognize my reference pictures. It is great to have access to the BEST! Quote Link to comment Share on other sites More sharing options...
Rudebrook Posted September 29, 2010 Share Posted September 29, 2010 I just built a VT kit. It was my first kit and I'm still putting my ducks in a row for my 501st application. I found it quite difficult to put together, but the overall look in the end was amazing. I'm very happy with the final results. If you'd like, I can post some pics with the completed pieces. They required a lot of trimming and shaping. I don't think I turned off my modeling iron for three weeks. Quote Link to comment Share on other sites More sharing options...
Obievon Posted November 5, 2010 Author Share Posted November 5, 2010 Okay, Well I started this as a build thread then I just got into it and didn't take the time to take pictures. Really it was a basic build however there was a lot and I mean a lot of messaging done to make this armor fit. I will do my best to get some close up shots of the finished armor soon. I need to get my pictures into the 501st for approval and then I would like to get the blessings here. I was very happy to get this together and just in time to help my garrison out with the kick off for the Salvation Army Bell ringing. Not the greatest pictures but you can get a basic idea of the over all look. Still need to do some tweaking on my pouches to get them to hang right on my belt (no biggie). It was very cold and I did learn a lesson. Just when you think you might have enough under armor on.....add a layer! Quote Link to comment Share on other sites More sharing options...
ground pounder Posted November 5, 2010 Share Posted November 5, 2010 Looks great! Pretty much the same as my TD impression (I have a TE2). Here is me from a couple weeks back Quote Link to comment Share on other sites More sharing options...
iconoclasta_88 Posted November 5, 2010 Share Posted November 5, 2010 Your armor looks really cool Bill. thumbs up! Whenever you can, share some close up picts with us. Its always great to see armor put together!! Saludos! PS. Like the weathering a lot. Quote Link to comment Share on other sites More sharing options...
Obievon Posted November 6, 2010 Author Share Posted November 6, 2010 You bet, I'll post more as soon as I can get them together. After all of the extra work to get it to fit together I think it turn out pretty good. Ground Pounder we could be twins....LOL! Is all your armor TE2? My helmet is a AP and the body is VT. More soon. Looking forward to joining the ranks of the MEPD and getting deployed. Quote Link to comment Share on other sites More sharing options...
Rolf Posted November 6, 2010 Share Posted November 6, 2010 Great looking sandy Bill. Looks like the AP, and VT works good together in the plastic color etc. Better get deployed asap bro Quote Link to comment Share on other sites More sharing options...
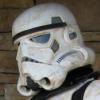
Obievon Posted November 12, 2010 Author Share Posted November 12, 2010 Took some time to finally get some pictures taken to submit for approval of the TD. I think I have it pretty close. I went with the Catina Sergent Pack #5. I saw that the shoulder pouch was not needed so I removed it. What do you think, before I send in for approval? Thanks to everyone here for all the help and inspiration to get this TD added to the ranks soon. I'll try to take some individual pictures of the armor pieces if you all are interested. Quote Link to comment Share on other sites More sharing options...
sandtrooper Posted November 12, 2010 Share Posted November 12, 2010 Wow, your armor looks great. Very well done, Bill! Quote Link to comment Share on other sites More sharing options...
iconoclasta_88 Posted November 12, 2010 Share Posted November 12, 2010 Yes! That TD looks great! very well done bro! So, what maker is your radio? It looks really cool and at the moment I am very interested in radio, radio references and radio versions from all around. Would love to see some picts of your radio build too... Saludos BTW, Awesome weathering!! Quote Link to comment Share on other sites More sharing options...
Obievon Posted November 12, 2010 Author Share Posted November 12, 2010 So, what maker is your radio? I am. It's made out of card board, and plastic signs. I used pill bottle caps for the dials and 5hr energy for the small ones. Small nails drilled and nailed for the ends of the plastic. The end of a soda can for the inside dial. I'll try to take some finished pictures soon. Glad you like it. I added more details on the finished piece. It's my first attempt, the dimensions might be off a little. I'll get it right the next time. Quote Link to comment Share on other sites More sharing options...
iconoclasta_88 Posted November 12, 2010 Share Posted November 12, 2010 Well, that is an amazing radio Bill!! Very good job there. And it looks awesome on your pack. I specially like how you solved the speaker issues. The little "sun rays" out of the main circle for me are the most difficult parts to replicate and I think your solution is very clever and does a great job! Also the finished radio with weathering looks amazing. From the picture I couldn't tell it was scratch built. I thought it was a Zenix or maybe somehow you were able to get a MH radio. Very very nice piece! Congrats bro! I will be taking this in consideration when finishing the last version of my radio for sure! Saludos Quote Link to comment Share on other sites More sharing options...

Recommended Posts
Join the conversation
You can post now and register later. If you have an account, sign in now to post with your account.