


oztrooper
-
Posts
17 -
Joined
-
Last visited
-
Days Won
3
Content Type
Events
Profiles
Forums
Posts posted by oztrooper
-
-
Special thanks to dustytrooper for all his research and the stimulus so I could further research and create a proof-of-concept. The results I hope will help us all further re-create a resemblance to Pack gear that looks closer and closer to screen used...after all, that's what we are all here striving for...
-
 1
1
-
-
On 11/18/2022 at 6:50 AM, Hausi said:
That really looks good, I guess I'll have to upgrade my pack sooner or later.

Thankyou....you are an inspiration
-
1
-
-
Everyone, I am back from Australia in 2 days, dealing with family affairs, when I return I'll get those capacitor dimensions and weigh the pack once I add the sonix radio on to it. I can tell you the radio shell without the components inside is significantly lighter.
-
I built a capacitor rack following dustytrooper's photos and a lot of research I did on my own...So this rack of 5 capacitors and resistors was fairly common across amps in the 60s and 70s and as technology progressed, so did their look. The base of this rack is cardboard found that was from the mid 1970s, the capacitors are vintage from Ebay that came with ringmounts that I cut down and secured with small machine screws underneath. They made the same version without the ring mounts that can also be sourced from Ebay. The resistors are also vintage 70s from Ebay and the solder points are small rivets that I just carefully removed the shaft from. Mounted on the pack it looks almost EXACT. I spent a lot of time going over measurements and I feel this size capacitor best fits...and it also is wrapped in black paper which makes for less painting..lol.
My thoughts on this set up after mounting this : The original cardboard mount on the real rack was too wide so they trimmed the back down so it would be small enough to fit the tray side. Doing this meant cutting the solder points and rear wire from the capacitors causing no real support. Also , it appears that the 5 capacitors were pushed forward so they were more centered and pushed over the top of the 2 resistors. Screws from underneath the cardboard mounting plate were screwed through and into the middle of each capacitor, which on screen you can see from Dustytroopers previous pics and does explain how they are all angled differently, but rotated from a Centerpoint. I chose not to cut the back wires off from the tips of the capacitors, but easily could, I folded them under so you really don't even notice them. I haven't painted it black, what you see is straight vintage parts. If this was all painted black it would make it very hard to unlock all these details...I feel this is it and I'm very happy with how it looks on the pack.
https://imgur.com/gallery/RzAczHT
-
1
-
-
On 11/2/2022 at 2:12 PM, Hausi said:
That's really cool! I have built a Sonix replica which also includes the back view with a battery compartment and cable... but it doesn't match yours with the working dial... and mine doesn't work.

Amazing job!
I saw your build some time ago and you inspired me !!!
-
1
-
-
Thankyou everyone...it's hard to believe these were cheap and plentiful once..lol
-
https://imgur.com/gallery/TSO1JqV
https://imgur.com/gallery/eHqtI19
This is a project that required vintage modified and grafted in PRECOR radio parts, a first gen cast off an actual Sonix faceplate and knobs, graphic work by Hondo Supply (Thankyou for the cross hair graphic), a green dial graphic and other scratchbuilt and sourced components. Though the video does not show this, there is volume and all radio bands work. I have the video with sound posted on IG and FB for those interested. The back of the radio has also been reproduced and I am currently working on the cardboard and vinyl work. It uses 4 D batteries or power cord to operate.
-
https://imgur.com/gallery/wcSMpvn
See if this works.
-
6 hours ago, Marv said:
Sorry links don't work for me
Buggar...OK let me work on this ...it's been a long time since I've posted pics on a thread...I'll work on it today
-
https://www.dropbox.com/s/1qpclgj3c3216x9/20221011_185023.jpg?dl=0
https://www.dropbox.com/s/bt6ztskq3gh6raq/20221011_185005.jpg?dl=0
https://www.dropbox.com/s/g5hy9p1p43s4crm/20221011_184959.jpg?dl=0
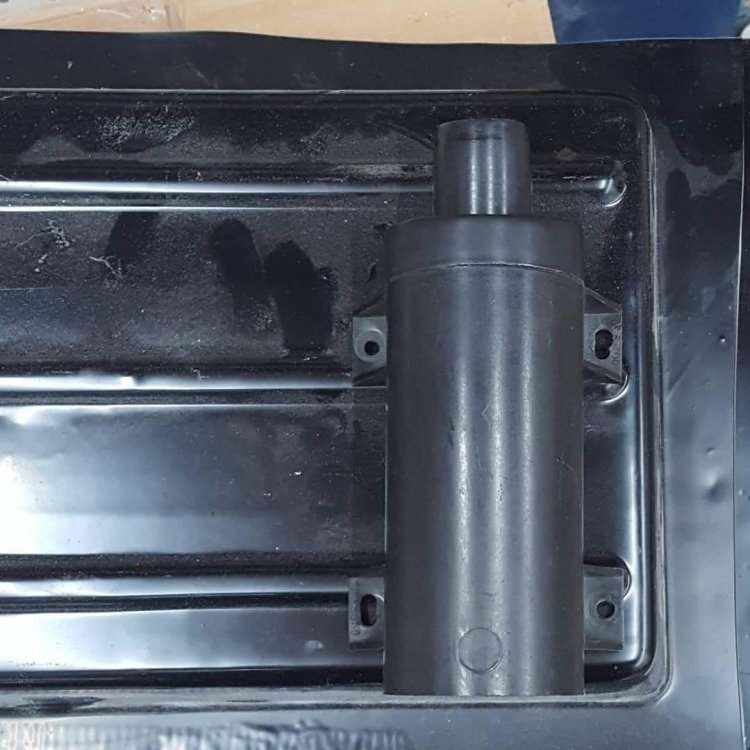
Close ups of the exhaust port modified from the above mentioned find ...hope these links to Dropbox work
-
1
-
-
https://www.dropbox.com/s/jwxk7pff20jd4ue/20221011_175925.jpg?dl=0
This is my pack build so far...RWA seed trays, Shires UP100 cut down to UP90, correct plunger caps, gio bottle..used an old oil spout and end as bee stinger.. matches shape of screen used..RS props supplied the mortar tube and end caps, RWA supplied the sandtrooper detonator plate...genuine karrimoor tote em pack with original straps dyed black, brexton lunch box and a replica sonix radio yet to be installed...and by replica I mean IT WORKS...dial spins and picks up stations, switches work, jacks work..is a working replica radio..
-
1
-
-
On 3/2/2021 at 11:45 PM, Sithlord337 said:
I think a very similar thing has been found, but the person won't give any details on what car it came from!

Sent from my YAL-L21 using Tapatalk
So this was me, that is a photo I took of the part I spent many hours looking for. It is not quite correct, but very close. I modified mine a little to match it to screen references...I ended up buying 2 of them to build one final unit . Sorry everyone, have been going through family issues last 2 years as my father was going through end of life so was very spotty and semi absent in the media department. I can post a pic of the finished unit. I added ribbed hose the next diameter down from Tie Pilot hose and used metal tubing and an O ring to mimic that end piece, though I suspect it was originally an old vacuum cleaner fitting
-
1
-
-
On 3/2/2021 at 11:45 PM, Sithlord337 said:
I think a very similar thing has been found, but the person won't give any details on what car it came from!
Sent from my YAL-L21 using Tapatalk
So this was me, that is a photo I took of the part I spent many hours looking for. It is not quite correct, but very close. I modified mine a little to match it to screen references...I ended up buying 2 of them to build one final unit . Sorry everyone, have been going through family issues last 2 years as my father was going through end of life so was very spotty and semi absent in the media department. I can post a pic of the finished unit. I added ribbed hose the next diameter down from tie pilot hose and used metal tubing and an O ring to mimic that end piece, though I suspect it was originally an old vacuum cleaner fitting
-
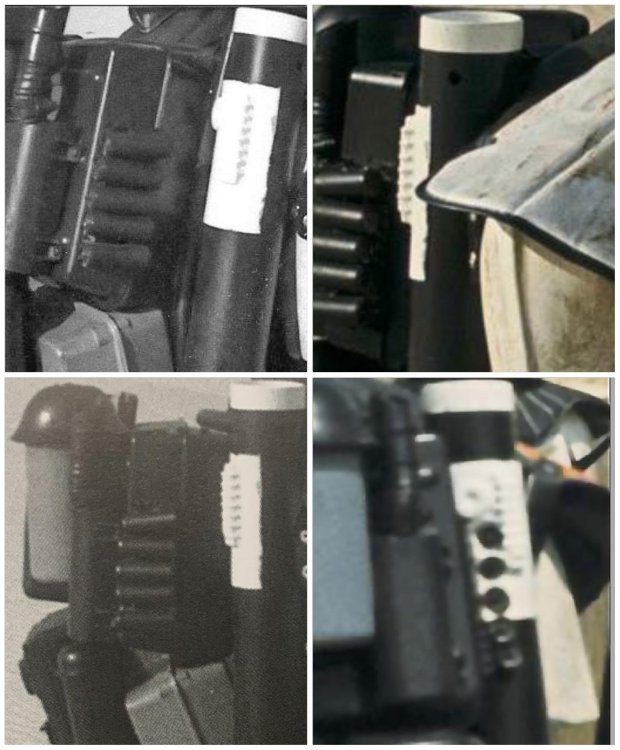
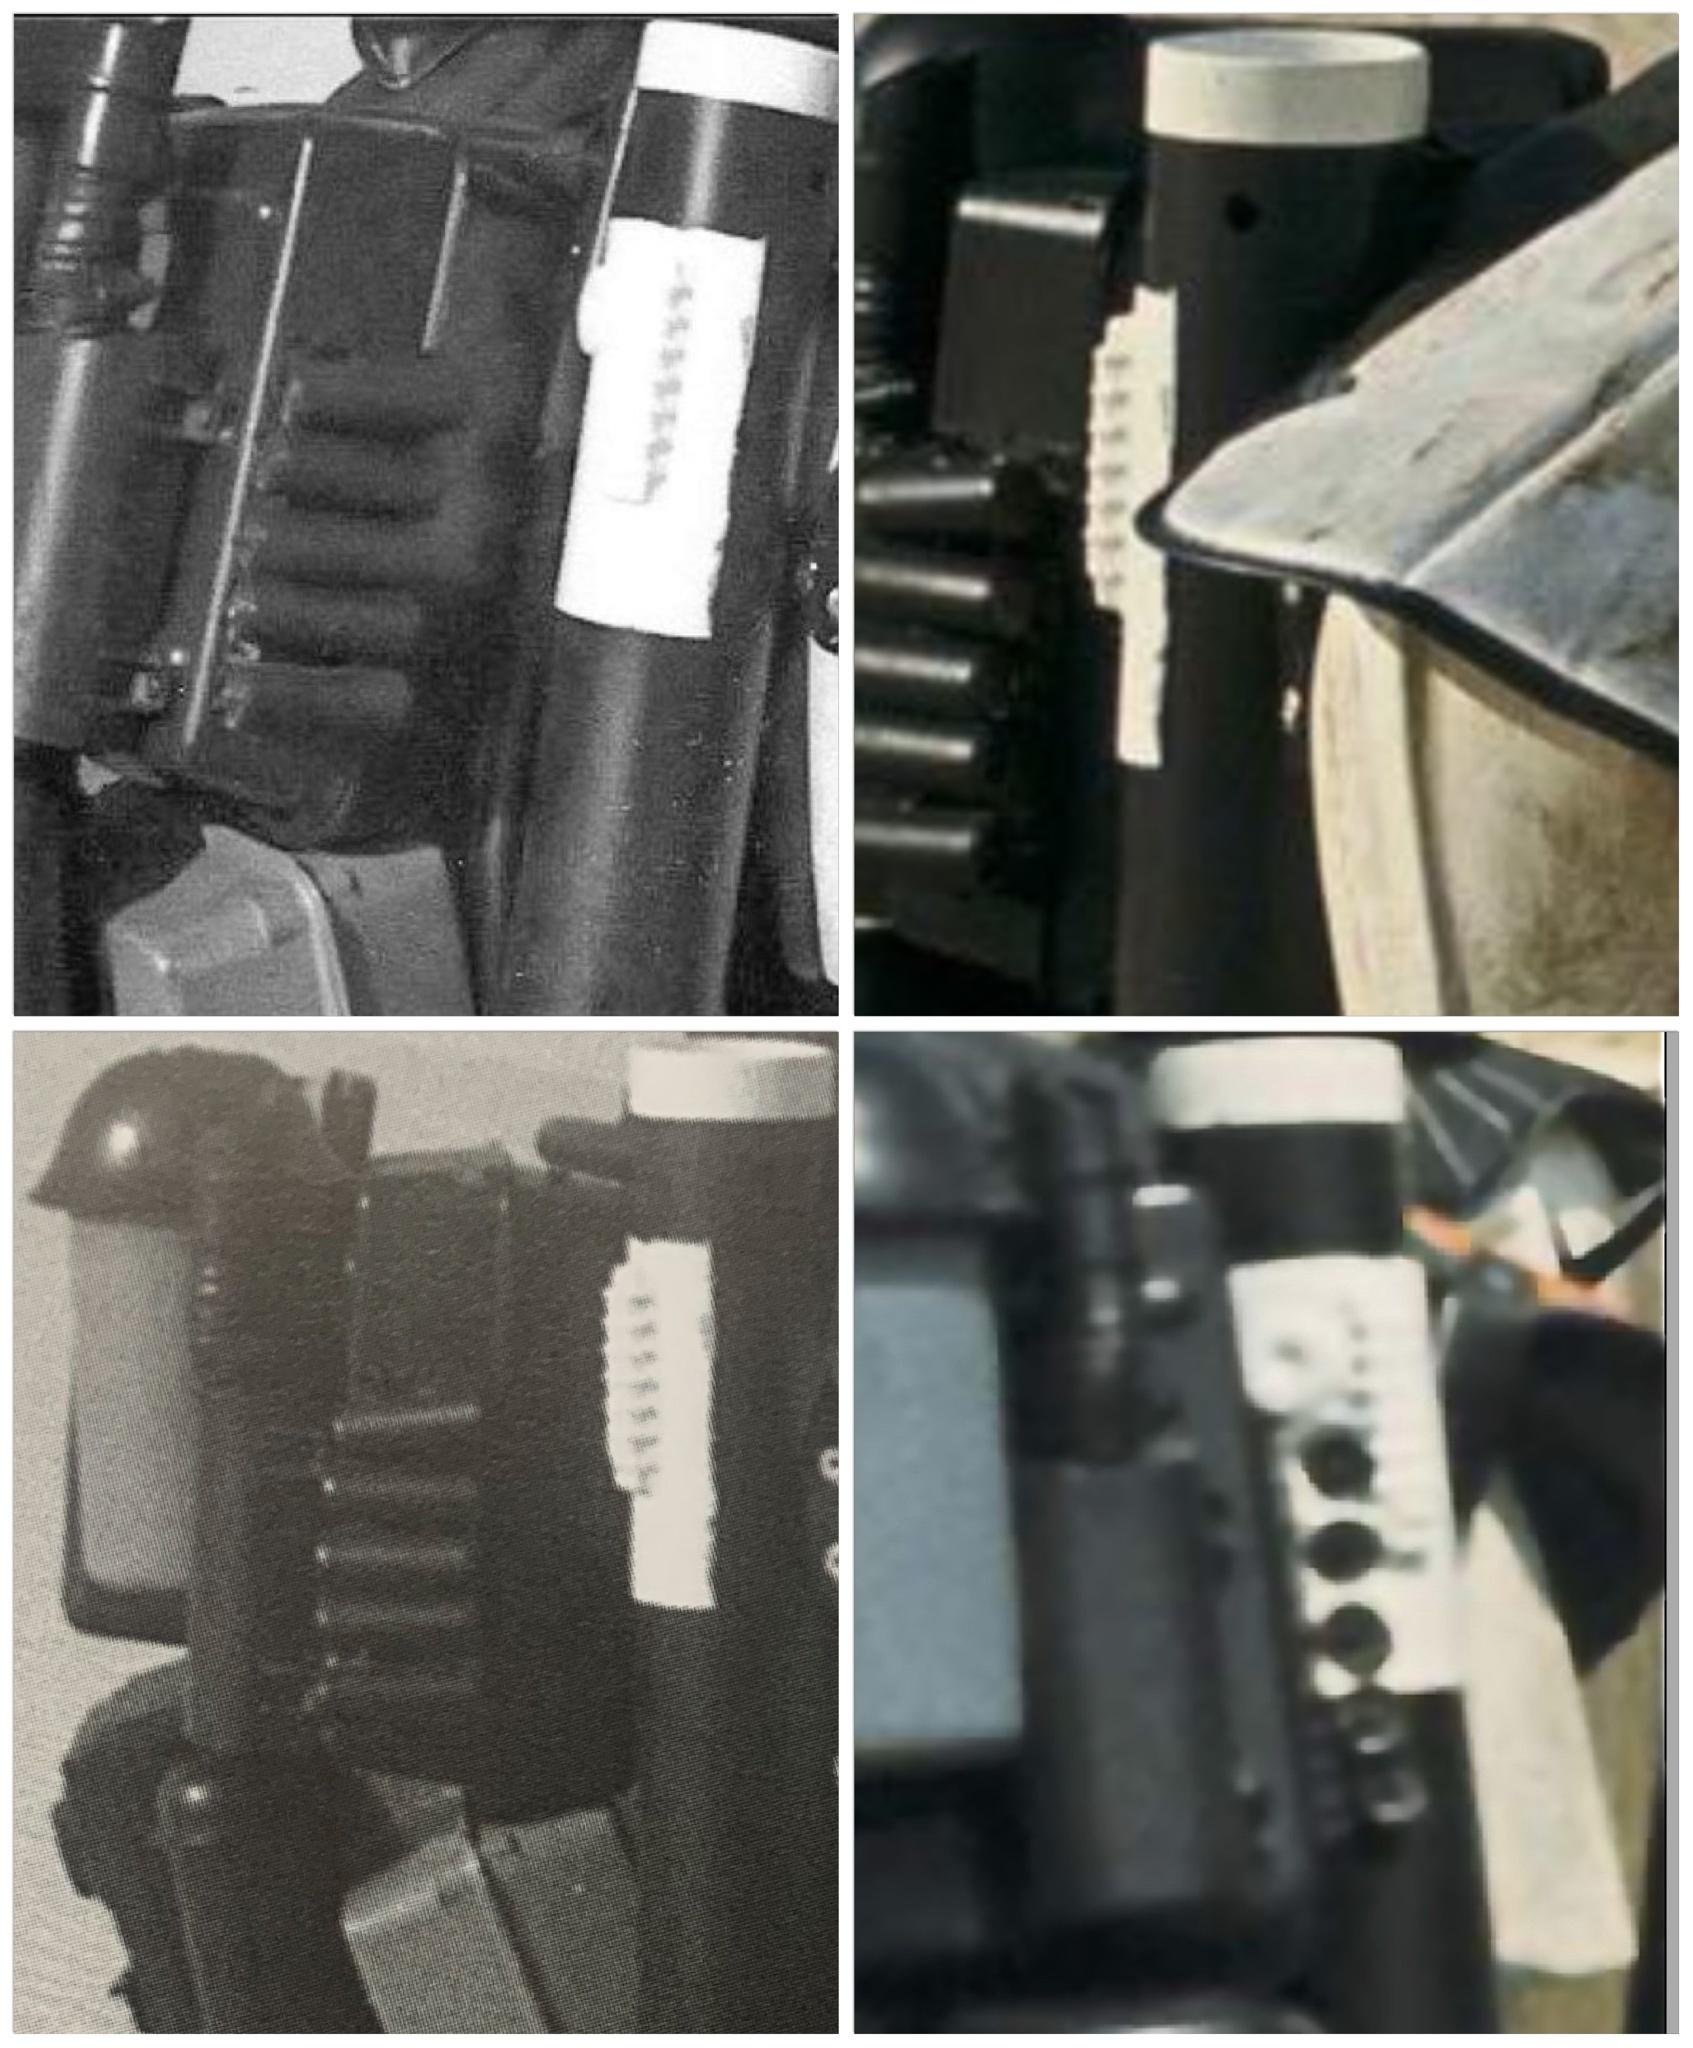
On 6/13/2022 at 2:45 AM, Sithlord337 said:
Onto another part which might be very close. The exhaust port. Doing a bit of digging and although not the correct year and certainly not quite the right shape, I think I may have stumbled onto something


Sent from my ELE-L09 using Tapatalk
Actually first used in the 1982 pontiac firebird...
-
 1
1
-
-
Glad I could be of help...and THANKYOU...
-
what size plunger..medium or large?


Comprehensive Radio Comparison & Brief History
in Field Backpack
Posted
Excellent work Henry !!!