

Wook1138
-
Posts
182 -
Joined
-
Last visited
-
Days Won
17
Content Type
Events
Profiles
Forums
Posts posted by Wook1138
-
-
Eh, you're a Centurion so this is a piece of cake. Looking great. Now get to the fun part and weather it!
Lol. Spoken like a true sandy.
Sent from my iPhone using Tapatalk -
It is funny how these things come together. After picking away at little things for what seemed like forever - I started adding some strapping and viola, I can see the light at the end of the tunnel. I just need to finish some arm strapping and the basic build is done.
For various reasons I am not using the original bracket strapping system for the chest. So I glued in some snap plates about 4inches up from the lower return edge.
Added snap bases near the top edge of the ab.
Taped chest to ab to double check alignment.
Realized I need to shift a snap base.
Test fit. I’m trying to get the placement if the chest with relation to the ab to match the reference (more or less) but still fit okay. I did need to redo one chest to ab strap because the chest was slightly skewed.
Reference
Left side (mirror) pic. More gap than I would like, but not terrible.
Right side mirror pic. I’m using a plastic reinforced nylon strap for the right connection. It doesn’t overlap but it does cause the two haves to offset like this. May need to revisit this.
And back. The gap between the back plate and the kidney plate is a lot less here than on my first TK. I’ll need to hot bath the shoulder tabs at the back to bend them down a bit - they are sticking up about half an inch or more above my shoulders.
-
Minor progress these last few weeks. Life with young children is not conducive to building armour - plus we’ve been away on vacation for a bit. Oh well, here are some more check boxes that I’ve checked off.
I managed to get all the holes drilled for the original bracket strapping system and tested some of the connections. I also did some more minor reshaping of some return edges with the always scary heat gun.
Drilling holes.
Glued 3 button plate.
Glued rivet covers on belt.
And started painting a bunch of screws and rivets white.
Started to add the canon bracket strapping.
I managed to get the screws counter sunk a bit.
I have seen other people use elastic along the left kidney to abdomen connection. They also used a extra piece of ABS to support it. I tried the same method, but once I got the split rivets set, a gap formed. The elastic got stretched a little a now won’t retract due to the ABS support.
This is a lot more gap than I want. Not too happy.
I changed out the right ab snap for a “Tandy”-less snap.
Added some bits of ABS to the inside of the thighs. I will ABS paste the outside. The screen used thighs appear to be filled as well - probably paint.
Reference

Snap bases for shoulder straps. I also added a snap base opposite the right ab snap (not shown)
25mm coverstrips for back of shins. Adding Velcro before gluing. I’ll see how that works.
Just waiting for one snap base to set.
Happy belated Father’s Day. My wife ordered me a couple of helmet bags from Trooperbay. She even knew that one should be TD. Just when you think they don’t care...


-
 1
1
-
-
1 hour ago, TheSwede said:
Nice edition to the collection arrived today


Rats! You even reminded me of this run and I totally forgot. It looks awesome!
I am now consumed with envy and regret.
-
2
-
-
And...Approved:dancing-trooper:
Congrats!
Sent from my iPhone using Tapatalk -
Looking very good, sir!
-
2 hours ago, Airborne Trooper said:
I would recommend using the non-Tandy labeled snaps where visible. At least on the top right side.
As much as I prefer Tandy... . Will do. At least for the right ab.

-
On to snaps and belt.
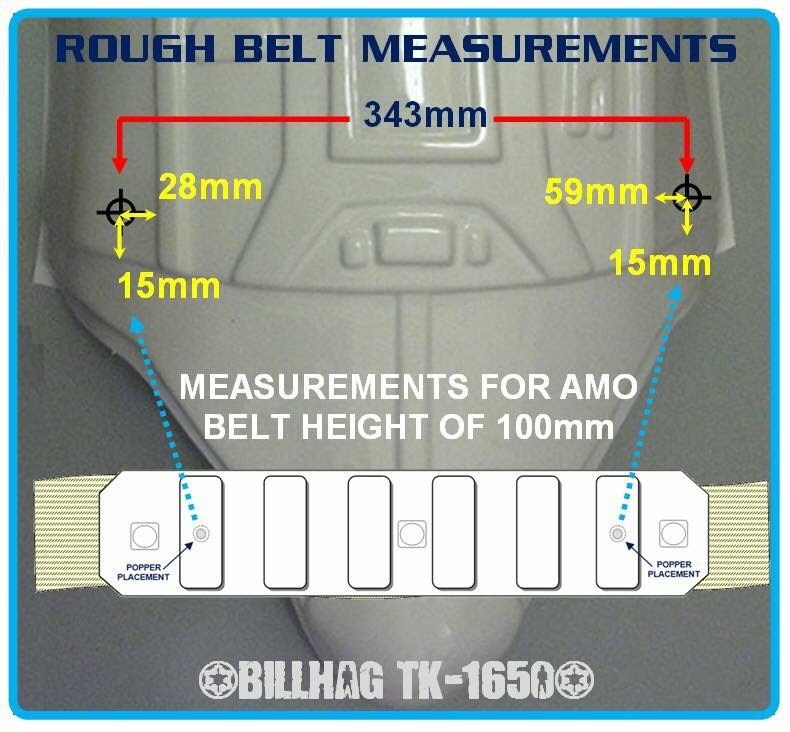
First off - Belt: I used the standard measurements (various builds and the Billhags diagrams) for placing the snaps on the ab on my first build - the left side of the ab calls for 59mm from the return edge as shown below. this is way too much for this armor. I went with 40mm instead and it worked perfect. The right side stays the same - 28mm.

Usual measurements
By the way, taping the anvil to the back side of the armor works great for setting these snaps.

Also reaming out the holes helps the snaps (male base) to sit flush.

The left belt snap (tandy line 24) and two snaps for the posterior.

Right ab to kidney connection snap and the right belt snap.

Once I've centered by belt to the armor, I taped it in place. I took a sharpie marker and marked up the snaps on the armor - then I pressed the belt to the snaps to leave an impression of the marker on the belt. The belt is level and placed just below (but touching) the center button panel.

This leaves nice marks where the snaps should go. I did this process twice - just to be sure.
Belt in place. I still need to trim and glue on the rivet covers. I used Tandy small single cap rivets to attach canvas belt to ABS ammo pack. The docking bay 94 captain actually has a low fitting belt - it looks like is has fallen down post-weathering. I will need to reposition this belt for SWAT application - but I am told that I need to have the belt here for basic approval. I find it weird that something good enough for L3 approval is not good enough for basic. Oh well. anyway, I was going to install another set of snaps to allow me to easily adjust this in the future - but I forgot and put on the ammo pack before adding the snaps.

-
Sniper knee is looking good now

Concerning your question about the ammobelt, attach it in the regular position for basic approval and PO and then move it slightly down for SWAT.
I suppose the chest from the picture above isn't the one you will be using for this present build?
Thanks!
Chest is for the TK.
Sent from my iPhone using Tapatalk -
So, the belt looks low on the DB94 captain. Do people usually install where the belt should normally go and then move it if applying for SWAT?
-
Looking at it from the side, it seems to sit a little low, especially compared to the reference pics of the dockingbay captain.
Oh yeah. Thanks! Let’s try this again.

Sent from my iPhone using Tapatalk -
Sniper knee plate. A lot easier than a TK knee (for the AP kit at least). Added some pieces of plastic to the back and glued into place. I hope it is enough to hold. The shin is curved and the plate is flat, so I piled on the E6000 and will hope for the best.


Reference - in addition to RoCko's pics.

Also trimmed this guy.
Reference pic
-
4 hours ago, RoCKo said:
Here’s a compilation I did for knees, I hope it helps...
Yes it does. They are trimmed fairly thin. Thanks!
-
A few more things done on the build. Pretty much all the gluing is done with a few small exceptions. All holes are drilled and I think I'm ready for some strapping. Anyway, here is what I've been up to.
Sizing the shins and thighs. Here is my crazy method of figuring out how much to trim off each side so that it fits and the seam will run at a nice angle down my leg. I hope it works.
Belt and thigh ammo belt trimmed and ready for installation.

Kept my trim to about 4mm - default for how Mark pulls these pieces.

My 45° cut on the belt is 10mm to fit my canvas belt properly. The canvas belt is sitting a bit low in the picture, but it does meet up with where the 45° cut meets the outside edge.

I had to do a whole whack of hot bathing and heat gun. I needed to reshape my kidney piece and make it not so wide. I traced the original shape on to cardboard for reference and used hot baths to squish the outsides in a little. This caused buckling of the top and bottom return edge, so I had to use a heat gun and some pieces of wood to reshape the return edge. Sorry no after pics, but it worked out pretty good - mind you, I am terrible at hot baths and heat guns.

Also had to reshape how the back meets the kidney. This is an issue with my TK as well - no amount of strapping adjustments could fix it. the back seems to pivot at the outer edges when fitted to my body.

This is the return edge along the top of the kidney and AB. The AB side flares up so I also had to reshape that too. Again, no "after" pics. But all is good now. Also shaped my shins to they close better and my posterior to avoid "butt flare".

Marked the hole for the cod. Measured about 1-1/8 inch from end and drilled with 1/8" bit for a split rivet.

Posterior. Two 5/32" drill holes for line 24 snap bases. I think I measured about 1" from edge and then another 7/8" for second hole.

5/32" hole for snap in right Ab connection. The hole ended up being about 18mm from edge and top.

1/8" holes for split rivets along left ab to kidney connection. the holes are 10mm from seam. 20mm upper return edge and there is about 58mm between each hole.

So, at this point, all the arms and legs are assembled except for the 25mm back coverstrips for the shins. I still need to drill holes on the Ab for the belt and assemble belt. And some trimming of coverstrips here and there. Also need to finish up the helmet. And then... I can finally start getting dirty.


Need to trim for the three-button button plate and the sniper knee.

Anybody know how thick this thing should be? Time to do some research... .

-
yeah, I should have picked up that bucket when it was on sale.

Looking good!
-
I have not been working much on the armor these last few weeks - summer weather and young kids keeps a guy busy enough. I have managed to get a few things done.
So I have my arms glued together and ready for strapping. My thighs have the inner cover strip glued in. My right thigh needed some extra work so I glued the top half first and the bottom half is setting tonight. The shins have an inner cover strip in place and one shin has the outer cover strip glued on - then I ran out of magnets.

Managed a little more work on the helmet. I painted the frown and started on the traps and tears. I will need to expand the traps and tears a bit - the return edge is tricky to assess on the softer AP helmet. Taking a picture with the flash really brings it out so it is easier to compare to the reference material.


I broke off a piece from the upper left corner of the left eye (right corner in pic). You can kind of see it in the first picture above. I added some ABS paste and will sand it down tomorrow. Doesn't look like much in the picture, but I almost threw-up when it happened.
 Gotta love that ABS paste!

I also started the tedious process of sanding my T-21 3D printed model. I'm using a rust coloured filler primer - I might use this with liquid mask to create a worn rusted look eventually. I'll see what I think then I actually start to paint.

This is actually my second coat of filler primer. the pieces on the left have been sanded up to 600 grit. I will need at least one more coat of primer - probably two.

-
Looking sharp, Daniel!
-
I was wondering what that was.
") awesome job!
awesome job!
-
Found some time to work on my helmet again today... happy stormtrooper day (TK 4-21). I had no idea that was a thing until today. Anyway. I think I finished my paint blemishes and I fine tuned the shape of the brow some more. I still have to finish shaping the ears and cut some length off the brow.
I found this on someone’s SWAT application - used it as a partial check list
Here are mine. The lighting isn’t great and you can’t really even see the large run on the top, but weathering should bring out some detail.


-
5 hours ago, Airborne Trooper said:
How'd you mange to get the ABS paste in place exactly how you wanted without it running?
Short answer: practice. I used a small brush, dipped it in the ABS paste, and carefully brought it to the exact spot I wanted. As the “paint” transfers to the helmet, I dragged the paint brush upwards when it starts to look like the drip is getting too large. The ABS paint sets very quick, so if it looked like it might start to run, I just gently blew on it and tilt the helmet back. The paint forms a skin very quickly so you can use that to keep things in place.
Oh, and luck.
I actually had no intention of doing this when I did but I was testing the consistency of the ABS paste and it was working on a piece of scrap, so I went for it.
-
1
-
-
9 hours ago, m4vrick said:
You did very well on these paint drips. I just noticed this thread. And will be following with great interest ! Go on Greg, you have our support!
Thanks Vincent!
-
So I just bit the bullet and went ahead with the defacing of a perfectly good TK bucket. I mixed up some ABS paint. Which is essentially coloured acetone, and proceeded to slop it onto my helmet.

This will take a few attempts and some sanding and polishing, I’m sure. It is just a few drops here and there, but still nerve wracking.
-
13 hours ago, Hausi said:
One thing about the ears though, they fit nice and snug now as it seems but bigger gaps would be screenaccurate.
Yeah, I noticed that in the pics (and have seen more than one SWAT applicant get called on it too
") ). It took a lot of effort to get rid of the gaps on my TK build... and now for my TD I have to add them.
). It took a lot of effort to get rid of the gaps on my TK build... and now for my TD I have to add them.  7 hours ago, RoCKo said:
Imho the helmet is, beside the armor weathering of course, the most noticeable part of every TD!
Agreed! After staring at reference images, it is amazing how different they can look. And armor or not, it is usually the person's face we look at most... well, usually.
-
Picking away at things. I’m upgrading my TK right now for a big troop in a couple weeks, so not much time left for the TD.
I got the ears rough trimmed and on for my first of many rounds of seeing where I need to trim. This guy has spaces, so I don’t need to close the gap.Question: is his right ear thinner than his left? All the pics I've seen seems to suggest so, but the angle is hard to figure out.

Here are the ears. The tape are reference markers for paint blemishes on the original.
The original has a very roughly painted surface. I won’t be replicating every bump of course - just the ones that are seen onscreen or have been pointed out in previous SWAT applications. Of course, SWAT applications are notorious for becoming more strict every application. I did consider painting the helmet HDPE-like green and then painting over with white - but I didn’t want to do that for the whole suit. Plus, I want the whole thing to still look good in person to the general public. I want it to look like how they think they remember the armour looking, if that makes sense. Maybe others will chime in and change my mind about that.
I’m trying to test how I’m going to add the paint drips. Just using white paint doesn’t work well - it is a warmer white and just interacts with light differently than ABS. So I’m planning on using ABS paste. Really runny ABS paste as it turns out. Paint is on the right. My first attempts at ABS paste on the bottom. Final test on the left. Should work but the ABS does dimple so... who knows.
You can’t tell from the pick, but I was able to fine tune the locations of the blemishes by overlaying pics in photoshop.
-
 1
1
-
Wook's Docking Bay 94 Captain Build (AP)
in Sandtrooper Armor
Posted
Weathering test number one.


Although I like the look of the subtle weathering one gets with Fullers Earth, I worry about the durability and, more importantly, I need to be able to carefully control the pattern of the weathering. I feel I can do that better with paint since I have experience painting and zero experience with Fullers Earth.
Try one is using regular art acrylics and a shop towel to dab the paint for texture.
I used burnt umber, black, yellow ochre, and white.
I started off drawing a pattern and filling it in with dark grey. Then I did a coat of brown. Then a coat of sand colour. After each layer I rubbed off most of the paint with a towel.
Well, I wasn’t happy at all with that. Too dark. So I wiped the piece clean with some mineral spirits and tried again.
Outline pattern.
Paint in area.
Dab with towel and spread some paint around.
A layer of brown/tan colour and dab with a towel.
Rub away some paint once dry.
Flick some brown and yellow at it.
Rub off some of the specks. I needed to use mineral spirits for the flecks as they were pretty stubborn.
In sunlight at a distance.
Sunlight, bit closer. Not terrible.
I will try the same thing tomorrow but I’ll use an airbrush.