

SDB15
-
Posts
32 -
Joined
-
Last visited
Content Type
Events
Profiles
Forums
Posts posted by SDB15
-
-
1st Arrest: Diabetic Clinic Halloween Party, American Fork Hospital
We were called out on a possible animal at large. Booking photos to follow.
-
 1
1
-
-
TD-15115 requests access.
-
They should be symmetrical as well as interchangeable. When in doubt, cut it too big and try it on until it matches a reference picture.
-
I think I may be close. I'm not quite happy with the shoulder fit and may do some tinkering. I also need to do some work on the helmet interior.
I set my phone to time lapse so I've got a lot of photos: https://goo.gl/photos/kVU2pNBJt6Bx4eAU9
-
Ok, here is the first pass. I think I'm happy with how it all turned out. I may stop here or even go a little lighter on the legs.
-
5 hours ago, LoveMonkey said:
Good luck with the weathering, it took me several times to get it right. I did a dry brush technique and that seemed to be the easiest. But whatever works for you. Just remember that you want the natural sand look and not too heavy
Thanks for the advice. I will keep it very light for my first pass and post photos before continuing.
-
Ok, so partial success on my first attempt at weathering:
The dark edge on the right side didn't work at all and the sanding on the flat surfaces looked terrible. This poor mask took some serious abuse in the name of experimentation.
It wasn't all bad. I like the way the sanding under left eye turned out. My sand mix looks great and I'm getting the hang of getting the right consistency of paint (watering down using equal parts paint and water).
I like the oil color (50-50 burnt umber and black with just a touch of ochre to lighten it) far less than the sand (40-60 burnt umber and ochre). I will use the oil mix sparingly and maybe only on the legs. The darkened edge didn't work very well, but the blaster burn is pretty cool.
Things I learned:
Weathering takes time and patience.
The initial application of the paint does not matter very much, it is the wet paper towel pass that gives the texture.
The paint needs longer to dry than you think before doing your dry paper towel (removal) pass.
Sanding is highly technical and should be used very sparingly.
You should use strokes in one direction only.
Sanding on flat areas does not produce a good effect. The only places that should be sanded are the high exposed edges (see the left eye) and the recessed crevices where you want sand to build up (see the lower edge of the tears).
Circular sanding motions do not look natural, even when a blaster burn is the intended effect.
Sanded plastic will only take the first color that is applied. Subsequent passes won't do much.
So here is my plan so far:
Use the weathering approach from the left side as the first pass for the entire kit.
Sand the left raised edge of the center of the chest plate using diagonal strokes from the corner, inward (same process as with the left eye). Use the dark oil mix on this area.
Add an oil pass to the legs and work up with successively less on upper pieces.
Do you see anything I'm missing? Any suggestions?
-
Here's a link to the album while I troubleshoot: https://goo.gl/photos/kVU2pNBJt6Bx4eAU9
*Update: should be fixed now. Sometimes pictures will show up in the editor but the sharing settings aren't updated. I think I have the formula down now.
-
I've made those changes, but haven't done another fitting. I also put a hard hat liner in the helmet and did some additional trimming to improve air flow.
It is a new month, so I was able to buy paint. I'd like my weathering to be a combination of the following:
To me, this is the perfect amount of weathering. It is dirty, but not overpowering or caked on. I bought yellow ocre and burnt umber. Do you think I'll be able to get this effect from those pigments? Or should I look for a tan as well?
I really like what this guy did with the chest plate and pauldron. I'd like to add a couple of these grease spots, but I think I'll keep the grease off the helmet. I'm following the grease tutorial in the weathering board.
I have a mask piece that was damaged in shipping, so I'm going to use it to experiment on.
I started by hitting some of the raised edges with some sandpaper. I also went over the undersides of the eyes. Next, we'll see how the scratches pick up the paint (particularly, my grease spot pass). This isn't how I plan to do my actual helmet, but it'll hopefully give me an idea of how to get the result I want.
-
6 hours ago, Hausi said:
I think your kit is already coming together nicely

While working on the kneeammobelt, you should also have a look at the inside riveting, as the rivet should be at the top of the upper corner, just as you have it on the outside.
To me it also seems like your biceps armor is still a little too large but if it fits you well, that's okay.
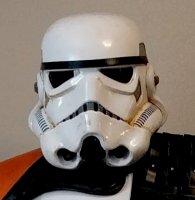
One thing that stuck out to me is the vocoder part of your helmet, it should be painted in a way that you can still identify the separate lines, I hope you get what I mean. Have a look at starwarshelmets.com to see pics of the screen-used sandtrooper lids.
Keep up the good work!

Thanks! I see what you mean on the vocoder, but I'm not sure how to fix it at this point.
Placing the rivet high made the belt look crooked. Should it have an angle on it?
-
Based on those comments (thanks again) . . .
To Do
Raise thighs (reduce elastic 1/4", but save previous version)
Round off ammo knee
Taper right leg
Add helmet chin strap
Check tension on bicep elastic
-
-
I am way happier with the pauldron fit and foam padding in the forearms is helping keep them in place. The foam block on the back of the knee is helping with the thighs, but I may need even more padding. I also took the crown pad out of the helmet so it sits lower.
Here's what I see (let me know if I'm headed in the right direction):
Thighs need to come up a bit and need a bit more padding to keep them out of the way of the greaves. (as has been pointed out before, the right thigh may even need some additional trimming)
Forearms may need to come up (less padding) (or should the biceps maybe come down? I like the mobility I have, I can touch the top of the helmet.)
Left lens fog is bad. I bought some fans and have a USB power supply ready to go.
Head mobility is very low (I know, you're shocked right? I thought I would be able to look down a little further.
Thanks in advance for the feedback.
-
New test fitting. I'll need help again identifying problems and then I'll put together my next ToDo list.
Here's a comparison with last fitting.
-
Rough concept:
-
My paint arrived today:
I have pretty shaky hands so every moment with that paintbrush was misery. I'm way more comfortable with a dremel. A few more adjustments until my next fitting, photos, and ToDo list.
-
Hi all, law enforcement often gives out honorary officer stickers to kids at their events. Has anyone ever tried to make something similar for MEPD? It would be fun to hand something out to kids at our troops.
-
TO DO:
Forearm padding (the straps to biceps make kitting up impossible for me and they rotate on me without em)
Add shims to knee plate (keeps it away from the thigh by moving it forward)
Trim thighs for mobility
Strap thighs to ab plate (belt is inconsistent. I think this will make the fit more reliable. If I knock the knee plate off one more time so help me . . .)
Shoulder Ammo Pouch (how do you keep it from moving around. I'm thinking about velcro on the chest plate)
Belt Ammo Pouch
Add snap to tighten pauldron
Carve deeper corner into ammo knee
Paint helmet details
Helmet padding and straps
Frown Screen
Weathering
-
New pictures in my build album. First attempt was not perfect, but I did get that "hey there's a stormtrooper in my house" feeling.
https://goo.gl/photos/kVU2pNBJt6Bx4eAU9
Problems I see:
Shoulders were twisted forward.
Knee plate got pushed off calf. Why not attach thighs to bottom of ab plate? It seems like this would be more reliable than the belt and elastic I'm using now.
Ammo knee doesn't quite look right.
Pauldron is too loose.
Anything else I need to look at?
-
18 minutes ago, Airborne Trooper said:
I suppose it's ok for basic approval but I've never seen anyone leave them connected unless you're doing a ROTJ TK
Got it. Thanks.
-
4 hours ago, Airborne Trooper said:
You're on the right track, don't forget to separate the butt and kidney. You'll need to create the return edges on both pieces.
Thanks! I got this from the CRL, is it wrong? Or is it just a bad idea to use a single butt and kidney?
"It is allowable to have a single Kidney and Posterior Armor piece.
If a separate Kidney plate is used, it lines up with the Abdomen Armor, with the top of the Kidney Armor flush to or under the Back Armor."
-
As Tarkin would say, it'll look even better with blood on it. https://goo.gl/photos/kVU2pNBJt6Bx4eAU9
I've got a long way to go.
-
1
-
-
I find that I'm constantly saying to myself that I may not win any imperial beauty contests, but I am enjoying the build.
I have divided it up into tasks and would like to have the uncompleted list done in time for a troop that will be happening in town within the next couple weeks. Perhaps wishful thinking. I think I have done all I can do without someone to help with the fitting. Is anything missing?
I also need to buy those gloves and some padding material.
DONE:
Trim Flashing from all Parts
Cut Helmet Eyes and Teeth
Assemble Helmet Face and Cap
Trim and Install Ears
Back to Lower Back Brackets and Straps
Chest to Ab Plate Brackets and Straps
Back White Shoulder Straps
Shoulder Bell Fit and Straps
Shoulder Bell to Torso Straps (not installed until the shoulder straps are applied)
Chest Snaps: 2x shoulder, 1x codpiece, 2x canvas belt
Back Snaps: 1x butt plate
Green Helmet Lens Cut and Install (removable)
Thigh armor belt and straps (not sized)
TO DO:
Torso Clamshell Snaps and Straps (plus any shimming necessary)
Torso Fit and Shoulder Straps
Canvas Belt Assembly (I would like this to close on the side rather than the back to make it easier to kit up alone. Thoughts?)
Shoulder Ammo Pouch
Belt Ammo Pouch
Bicep Fit and Glue
Forearm Fit and Glue
Thigh Fit and Glue
Calf Fit and Glue
Paint Helmet Details
Helmet padding and straps
Frown Screen
Weathering
-
Thanks for the help so far. Worst case scenario, I may end up not using the decals. Minimal sunk cost though.
Walt reports that my kit is delayed. So I've got time to watch more YouTube videos and read more build threads. I'll probably wait until my kit arrives to post again. Let me know if you see any gaping holes in my supply list.
Here's where I'm at:
Purchased:
Kit from Walt's Trooper Factory
TK Boots
Neck Seal - Darmans Props
Straps and Brackets - https://trooperbay.com/costuming-accessories/kits-combos/stormtrooper-sandtrooper-full-bracket-set
Decals - Possibly won't use them.
Frown Screen - Trooperbay
Lens - Trooperbay (Dark green) https://trooperbay.com/costuming-accessories/lenses-eyewear/dark-green-lens-material
Mic Tips - Trooperbay (necessary? should I just paint and use regular screen material?) https://trooperbay.com/costuming-accessories/armor-parts/mike-tips
To Purchase:
Gloves - (Trooperbay? Or maybe these? https://www.amazon.com/Rapdom-Tactical-Flight-Gloves-Medium/dp/B0089QIDK6/ref=sr_1_1?ie=UTF8&qid=1496505530&sr=8-1&keywords=black+flight+gloves)
Undersuit - should I buy from trooperbay or just look for some underarmor?
Helmet Padding - https://www.amazon.com/FMA-Replacement-Universal-Padding-Accessories/dp/B0185O0R6E/ref=pd_sbs_200_1?_encoding=UTF8&pd_rd_i=B0185O0R6E&pd_rd_r=YCS49FCERQXQ4609SN9K&pd_rd_w=SV1Es&pd_rd_wg=MP5hY&psc=1&refRID=YCS49FCERQXQ4609SN9K (my only complaint with the kit I borrowed to try out was I couldn't keep the helmet positioned. I'd like some padding and straps so I'm not fighting with it.)
Straps for Chest Plate - included in kit?
Canvas Belt


TD 15115 is 10-41
in Tours of Duty
Posted
American Fork Diabetic Clinic Halloween Party.
We arrested and interrogated the suspect,
but decided to let him off with a warning.