


trooperexpert
-
Posts
212 -
Joined
-
Last visited
Content Type
Events
Profiles
Forums
Posts posted by trooperexpert
-
-
The last stunt helmet I made and finished 100%.. enjoy it! funny thing is I NEVER EVER kept a single thing I ever made... now how strange is that????
Matt/STE
-
oh wow, a time machine.. dang it all.. I need to get this project done and then I will make sure to start right away on melting my brain.. Thanks Jack! LOL!
Matt/STE
-
I think maybe one pack I have seen has this plunger thing, but the rest are clearly the tupperware hamburger storage stackers. The bttom lip is not even evident on the plumbing thingamajigger.
My silly thoughts for the day.. well, there will be more... sure of it..
Matt/STE
-
fret not, diets are wonderful things.. I know a certain expert that lives in Hillsboro, OR that can help you with making sure it fits. Lose some weight and magical fittings can take place.
I will be helping Irob with his and a few other locals in WA as well...
Matt/STE
-
do the best of both worlds... Get a GT armor kit to fit your frame and get a TE2 helmet from them when they are ready to roll out. That way you can lok spiffy accurate helmet wise. It will look fantastic with the armor.
See? You can go with both and still look great!
Matt/STE
-
I smell a beating for Seth coming round the corner.
Reason I mention it is the stupid TIE pilot kill decals and also the stormtrooper shoulder decals out there. Makes me want to beat someone and burn their armor.
Grrrrr.....
Matt/STE
-
PLease dont wear it on your armor or helmet. Thats all I am thinking.
-
The original belts are cut and piled and sewn. How many layers I have no clue. As far as attaching things I am sure it would be fine as long as you riveted them as per the originals were done or make it a tad bit thicker so it can handle extra weight.
Matt/STE
-
Thats the one. Best thing to do is remove the black rubber gasket on top and bottom, then remove some of the fins, basically cut away 1/3 of the paper fins. Then re wrap it and get the more spread out effect. How to attach? No clue... I only work here... I dont make this stuff! LOL!
Matt/STE
-
Youa re right, it is more than likely an air filter. One of the closest I have sen so far is the newer Sears ones for their 6-6.5hp shop vac's.. Check it out.
Matt/STE
-
well, I got news for you. I already look stupid so I am ok with it! DuRRRRRRRR! LOL...
Just kidding...
Matt/ STE
-
of course. People will always have an opinion unless we have concrete proof. Sad thing is that the original packs are all gone and some parts we will never ever know.
Good idea!
Matt/STE
-
I am slightly color tone blind. I think it looks beige althought it could be natural. also age may add to that factor. They are not dyed. They dont match the color of the armor or make an attempt to.
Sent you a PM
Matt/STE
-
Close.. the real belts canvas goes all the way around the waist even in front of the belt facing. Also the color is beige, not white. But darn good! I think it looks great!
Matt/STE
-
Well, time for one last reveal folks.
While at the archives doing some work for LFL this last summer I was able to find some ANH stormtrooper suits they did not know they had. I was able to see the strapping, and also the belts. Cool stuff, but paper thin. It is not the .080 AA claims was used. It is .060 and not the color AA claims it was (Surprised? Me neither.)
So I can say I can tell you 100% what the belts are as I actually touched the stupid things and the archivists agreed 100% on the material...
Drum roll.....
CANVAS
So there you have it. I cannot commnet on the interior strapping, nor can I draw you a diagram and I am sorry about that. Use this info above to assist you in making your suits even better. No, it is not leather as some beleive it to be. 100% cut and stacked and sewn canvas.
Enjoy.. (Another fine bit of information brought to you by TE.. when in doubt, toss it out. Like all the AA crap)
Matt/STE
-
yeah! TE suit on the front page! WOOHOO!
Matt
-
Yeah those are too big. Same size we inityially made ours. Seth has a run of the correct size coming up.
Matt/STE
-
Ok, it is time. In order to all make the most accurate packs, we need a list of the correct tuperware items and also the part numbers on the bottom of those parts. The tupperware numbers, if still being sold today, do not change.
So, start lisiting! I will add to this list when I get home today.
Matt/STE
-
i think you don´t have to make it smooth...
look at this picture of an screenused pack...
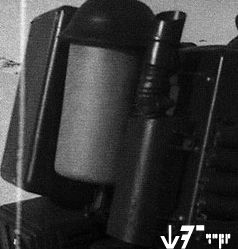
Also whats the thing next to the gray canester?
well, it looks to be one of two things:
An antenna mount or a coupler mount. Either way I dont think we will find the exact one. In the electrical section you can find something similar, but not exact. I am going to fabricate this from found objects.
Matt
-
I can see the top and yes it is part of the other wierd stuff, but I can see an edge where the bottom is seperate and does not 100% snug up.
What is this thing? no clue. I think they used the hamburger thingies... Makes sense since so many other parts are identified tupperware.
Just using deductive reasoning.
FYI, injection molded air cleaners did not start showing on vehciles until the 1980's.. around 1984-1986...
Matt
-
Those aluminum side wings will scrtach hte **** out of the armor, maybe even gouge it.
I would not want to see that happen at all..
 Even a GT suit.. ( I am kidding folks )
 Matt
-
Make sure to use a pair of plyers to grip[ the rear of the rivet when you drill and dont go too fast.
Since it is a desert trooper, add a piece of plastic to the back of the area to be filled in first. That gives it something to latch to when adding either bondo or JB. I would use bondo myself.. wet sand it smooth and then why worry about polishing it? Make that area dirty!
Happy drilling!
Matt
-
Well I would but it is in Seattle with the rest of my stuff and I wont be gettng it until a month or two from now. If I find one in my goodwill runs, I will let you know. Until then, ebay!
See what you can find!
Matt
-
Unless you remove the aluminum sides and slightly bend the frame, it will REALY mess you are up nicely. Just dont dive in to save money. It cna cost you MORE in the long run. just voicing concern...
Matt
TE Sandtrooper Appreciation Thread-Here's My Bumpy Cap
in The Barracks
Posted
You are more than welcome!
Sadly no.. I sent it to AA and demanded my money back since he told me it was pulled from the actual molds.. I was not happy in the least...
Matt/STE