


CrookKnight
-
Posts
377 -
Joined
-
Last visited
-
Days Won
5
Content Type
Events
Profiles
Forums
Posts posted by CrookKnight
-
-
This is a build thread I originally did back in early 2017. This should be helpful for people looking to build there own. the pack ended up a little wider than I wanted, but that can be adjusted. I will try to update some of this as soon as I can with my latest V4 pack. Of course, most of that is 3D printed. What you will see in this build thread is things be made from scratch.
I will be updating some of the photos and adding how to build the shin armor.
I am going to show each and every step on this build, so if you would like to build it for yourself, you should be able to. This is a very technical build with some materials we do not typically use.
On this first post, I will continue to update the materials list as I go. This will be a slow process, but the end results should be very good.
UPDATED ON 1/8/2017
MATERIALS:
- Cardboard for templates and/or stencils. I used an old shipping box.
- Very fine steel wool
- Chrome Aluminum Gloss spray paint
- Red felt tip pen
- MM / CM Ruler
- Online Metal Supply PVC Expanded Plastic Sheet 1/4" x 12" x 24" - White (4 Pack): https://www.amazon.com/gp/product/B0163IM5U0/ref=oh_aui_detailpage_o06_s00?ie=UTF8&psc=1
- (2) Source One LLC 1/8 th (or 1/4" )Inch Thick Acrylic Plexiglass Sheet, Clear (12" x 24"): https://www.amazon.com/gp/product/B01FEF0VQI/ref=oh_aui_detailpage_o00_s00?ie=UTF8&psc=1
- (2) White Sintra 24" X 24" X 3MM (0.118") Plastic Boards https://www.amazon.com/gp/product/B00NQC0EIC/ref=oh_aui_detailpage_o01_s00?ie=UTF8&psc=1
TOOLS NEEDED:
- Small and medium exacto knife.
- Sharp Scissors
- Red Pen
- Belt Sander - Table Version
- Dremel with circular butting blade for cutting acrylic plexi glass
- Full face shield for safety
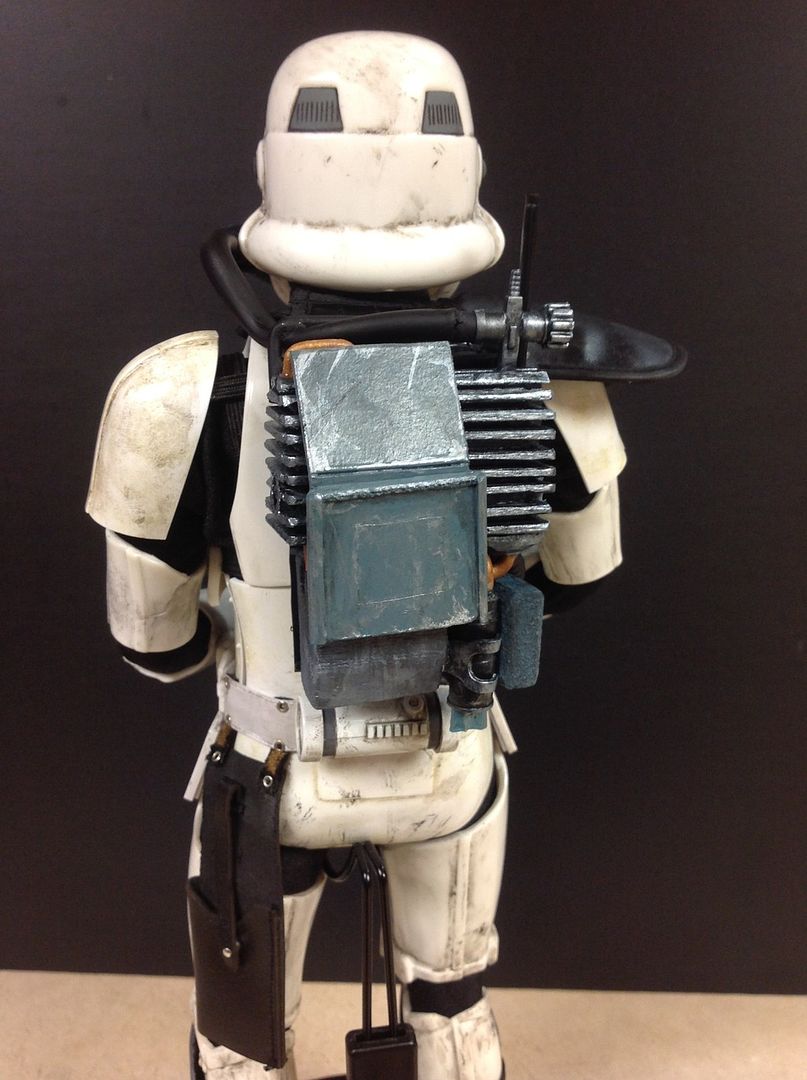
CURRENT PROGRESS (PHOTO) OF MY BUILD
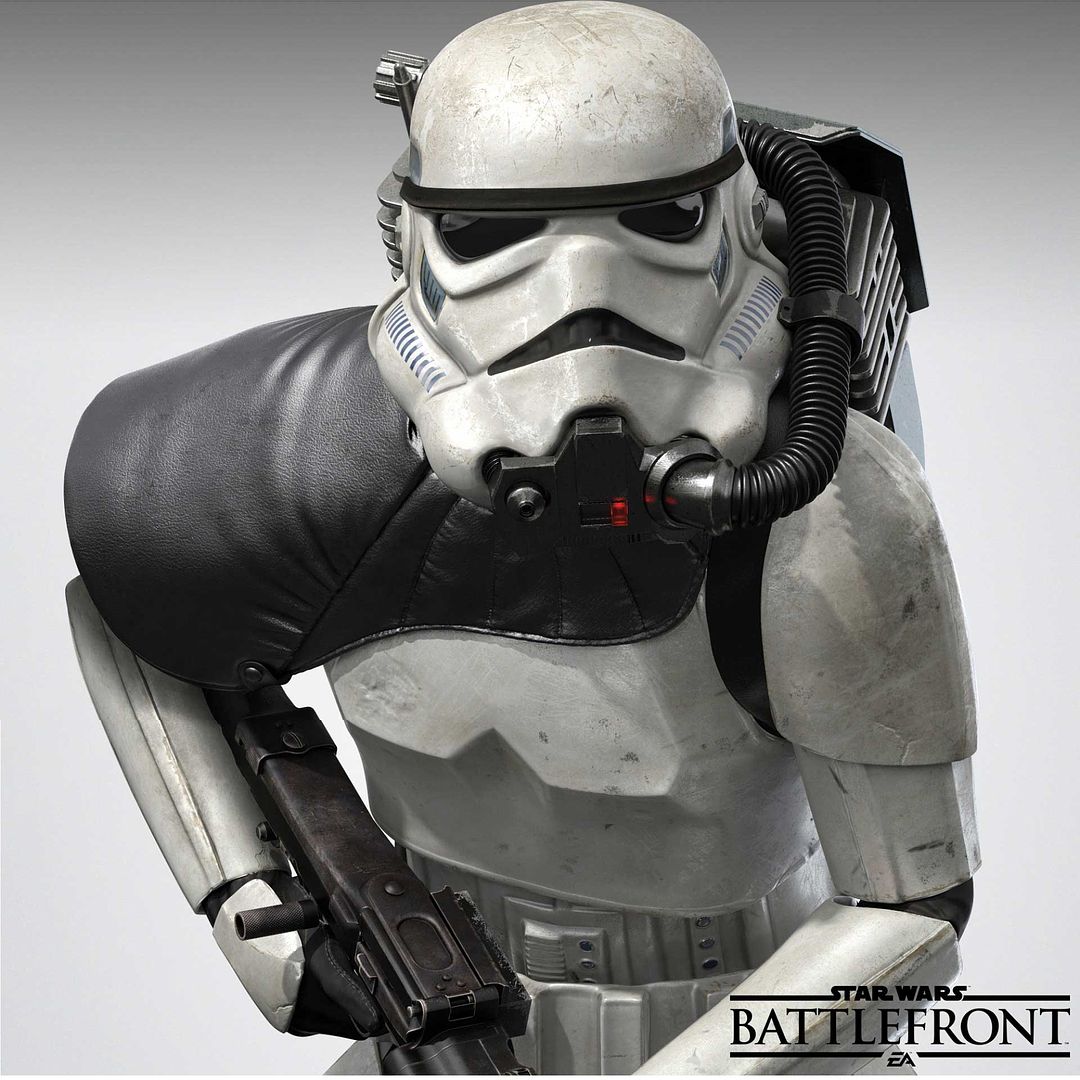
REFERENCE PHOTO - From Battlefront Game:
-
Sounds good.Sorry about the hit and miss contact over the trays. RS is doing them for me and they've been mobbed throughout Oct. Rob has them ready to ship I'm just playing the waiting game.
I'll mark you down for one radio. Rob and I have been working on more pack parts too. I had the exhaust part done for them and it's incredible. Shoot me a friend request on FB. Woody Howton and we can communicate better. We're working on the toilet cistern right now. Though not cast from original it will be the most accurate available. I've got a casting of a real one we've used to do the model.
Sent from my SM-G930P using Tapatalk
-
I will buy one. I am building my own personal pack. Just let me know when you need the money.I'm thinking of doing a run of 8 fully finished radios for $160 shipped domestic. If you're international I'll work with you on a price plus actual shipping. I'm going to need all 8 spots filled before I'll commit to the run. I took a HUGE loss with the purchase of this radio and then losing all my sales to the Tosche Traders recast so I really need to move some of these so get one ready to mount for an insane low price.
THX
Woodman
Sent from my SM-G930P using Tapatalk
-
My bubble lenses should be here next week for my ROTJ bucket. I will take the new pictures with the newest version of the pack at that time. I will also go ahead and photoshop them for you guys.
-
I use the same RAL7031That's way too blue. You want battleship grey or RAL7031.
Sent from my SM-G930P using Tapatalk
-
My bad. But still looking for the picture of what MEPD would require for SWAT.Current TD CRL lists pack as “optional” and not necessary for basic approval and loose interpretation is allowed but accuracy is encouraged. PD requires but is still flexible for high accuracy, swat whole other animal. But PD and SWAT are detachment level approvals not GML.
Sent from my iPhone using Tapatalk
Sent from my SM-G930P using Tapatalk
-
 1
1
-
-
What is the final consensus on Backpack #1? Does anyone have a picture of the one that the GML will use for approval? I have seen different discussions on this, but cannot find the official MEPD picture showing it.
Do I use the image on Looksirdroids.com?
-
6 hours ago, Cantina Security said:
Beltsander, yes sir. One in every room and in the house! Looking good Brother.
Thanks dude.
-
1
-
-
Very cool.
Sent from my SM-G930V using Tapatalk -
Of course you're going to want to practice a little bit before you use it. When I do my next piece. I will post a link to a video that kind of shows the process I use. You don't want to get over-excited and melt your armor or trim off too much. So I have a process where I work my way in the outside in and have steps where I check it while I go. I do a lot of this with my packs.
ME TOO!
I've done my previous trimming with Lexar scissors and a Dremel but that looks just too easy...
I thought of that at some point too but was always worried it would melt the plastic by producing too much heat while sanding!
Great info, thanks for that!
Sent from my SM-G930P using Tapatalk
-
12 minutes ago, Airborne Trooper said:
Sweet! They just built one close to my house so I'll have to swing by and get one soon! Must be a cool feeling to be able to finally build something for yourself this time!
Yes. It is cool.
It has been a while since I have done armor. That is one reason I am posting here, so people can let me know if I am screwing up.

-
Yes. Harbor Freight tools. Under $100. I have used this one for a year.
Right now I'm only doing the initial trimming to get rid of the excess material.
Sent from my SM-G930V using Tapatalk -
SHIN AND THIGH ARMOR
I decided to build the shin and thigh armor first. As with any armor, there is a good amount to trim. However, there is an easy way to do this. Instead of using a knife or scissors, I use a sanding table. With this thing, you can trim all of your pieces to the size you need with ease.

This is the sanding table that I use for everything (especially building my packs). It only costs about $75 USD and is worth its weight in gold.

Here is the shin piece before I start.

Sanded down all corners and pieces within about 15 minutes. By turning the sander vertical, you can match all of the angles of the armor easily by using the end.

Initial trimming of the piece is all done. Next, I will trim the other 3 pieces to this state. Once completed, I will then size to my shins, which will involve additional trimming.


-
Cool deal. I was just curious. Trying to figure out which sandtrooper variation I am going to do first.From what I understand the CRL is being reviewed by the LMO team, so all we can do is wait for them to finish and then approve it.
Sent from my SM-G930P using Tapatalk
-
Any movement on this?
-
3 hours ago, Magmatrooper1205 said:
How is the status of the CRL right now?
Can we see the design again?
")
The pictures are being photoshop'd at the moment. Should not be long now.
-
-
Update pictures:
Link has been sent for download.


-
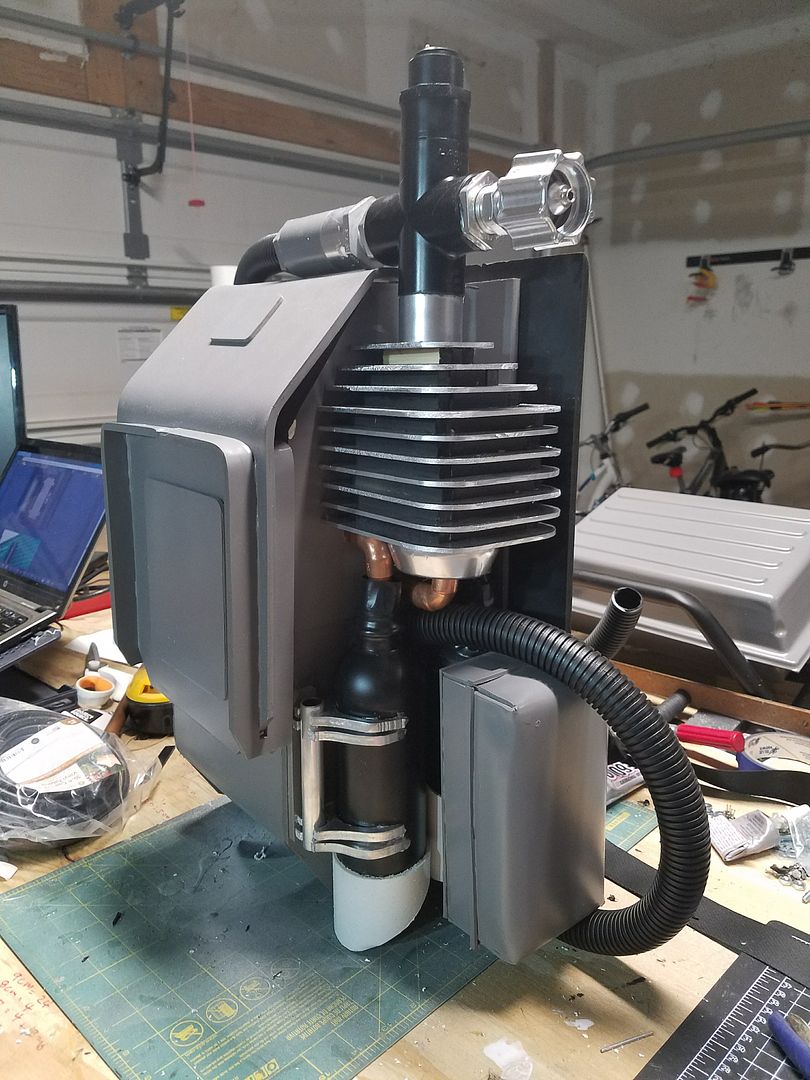
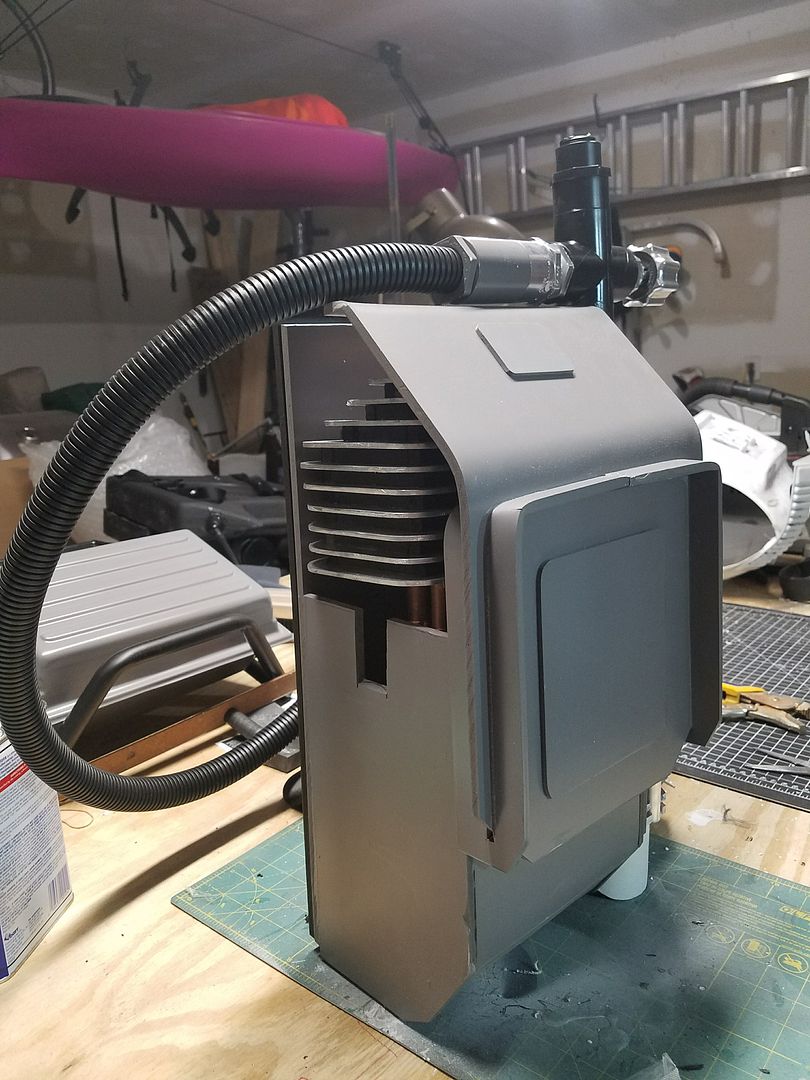
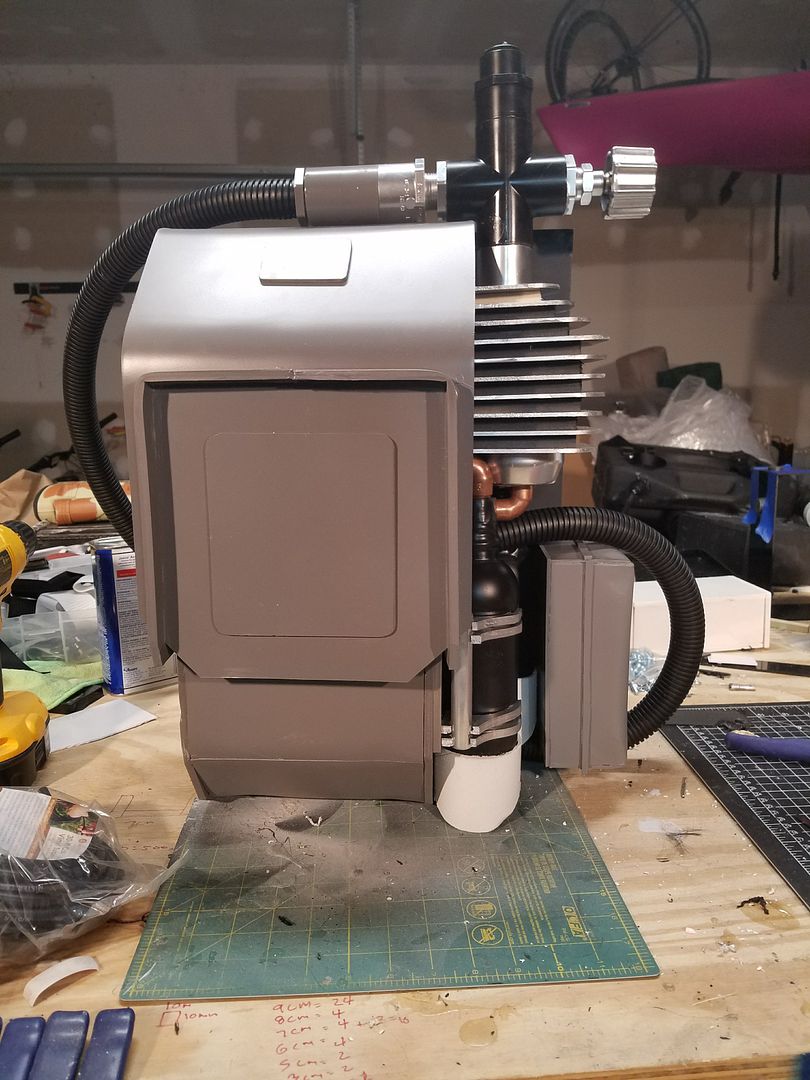
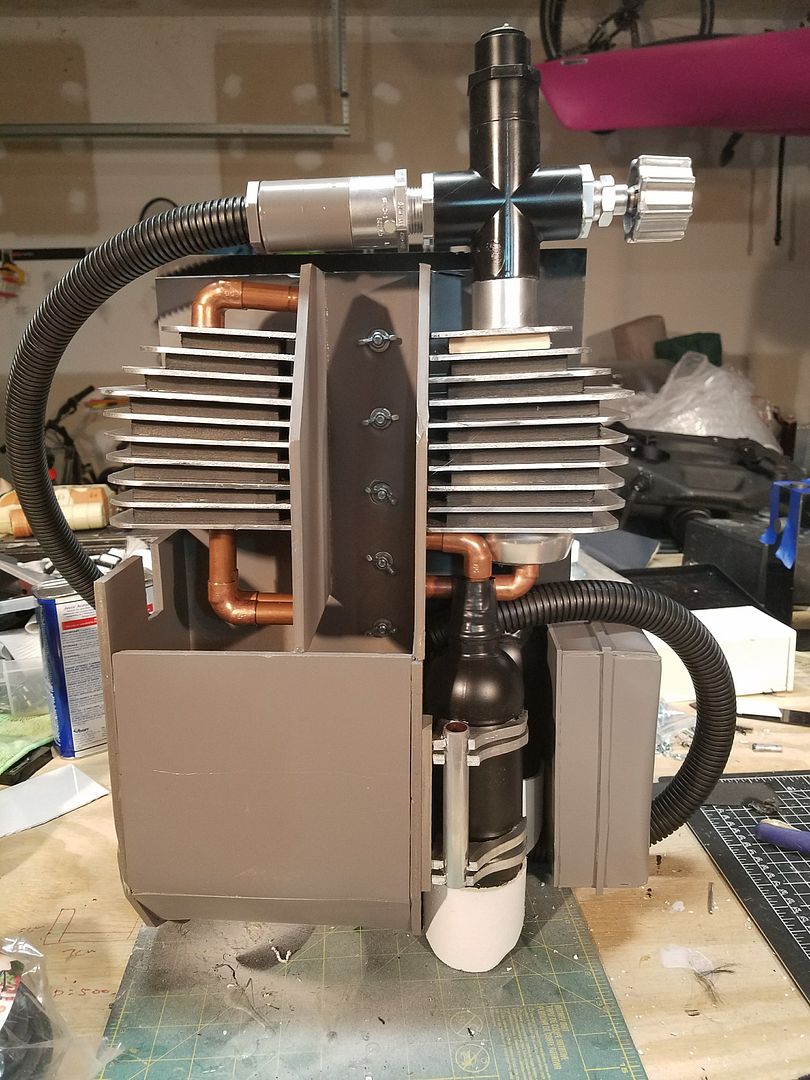
In final assembly right now. It is actually more gray than Green in person, but the pictures make it look more green. Weathering is complete. Copper pipes have been added. Letting everything dry tonight and then final fitting and pictures tomorrow. Most pieces on this pack are 3D printed. So this is very lightweight including the respirator.


Sent from my SM-G930P using Tapatalk -
You will have everything this weekendGuys, is there anyone of you that can make pictures of the helmet , the backpack and the respirator mouthpiece.
Still need those for the crl
Sent from my SM-G930P using Tapatalk
-
1
-
-
Thank youShawn, excellent job on that pack, it looks terrific.
The Magmatrooper backpack, breather hose, and LED is a beautiful addition to Stormtrooper armor. And also its dirty
Sent from my SM-G930P using Tapatalk
-
Yes. I will be taking HD pictures of those also.Guys, is there anyone of you that can make pictures of the helmet , the backpack and the respirator mouthpiece.
Still need those for the crl
Sent from my SM-G930P using Tapatalk
-
1
-
-
9 minutes ago, Airborne Trooper said:

I'd say the shins are a charcoal grey and the pack is a dark grey with a hint of blue/green. I wouldn't quite call it green though.
I am going to go with that. I will also give it the chipped and weathered look to match the photo. The pack will be ready on Saturday along with everything else. I will post finished pictures here.
-
Here are some photos with light weathering. I think with weathering, it could match really close with the game pictures.


Crookknight's Battlefront Magmatrooper Build V2
in Battlefront Magma Trooper Field Pack
Posted
CONSTRUCTION SECTION 1:
THE FINS:
The fins can be seen on the left and right side of the pack. They appear to be silver in color and spaced equally apart.
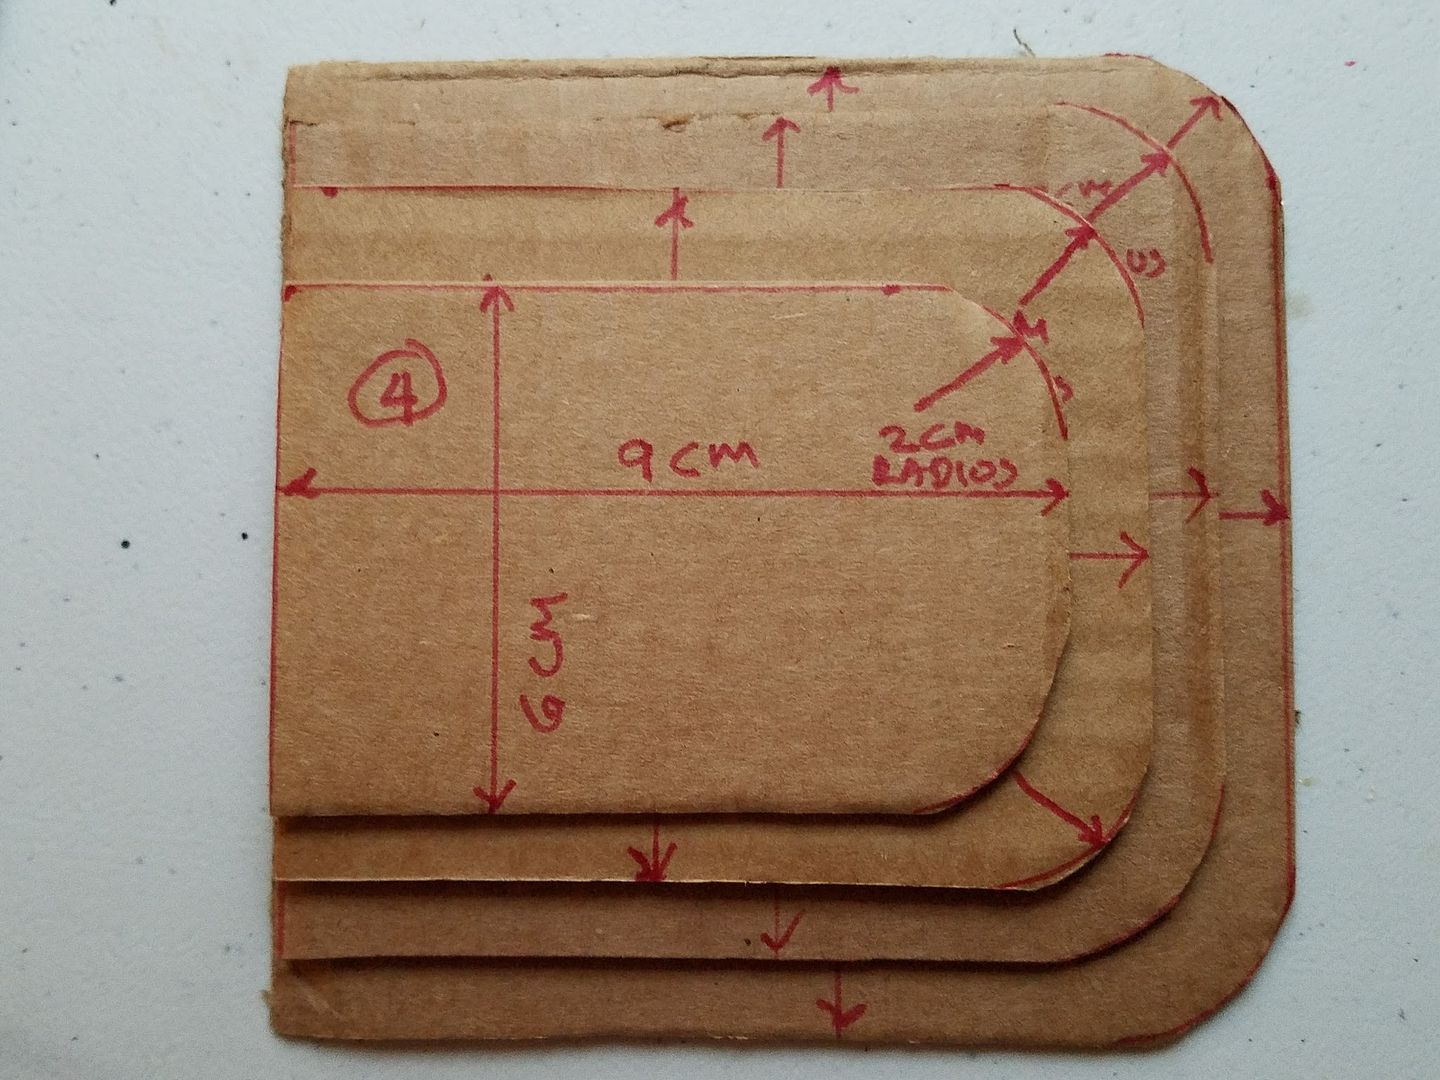
The first step is to make the stencils. You will need to make 4 different stencils. See below:
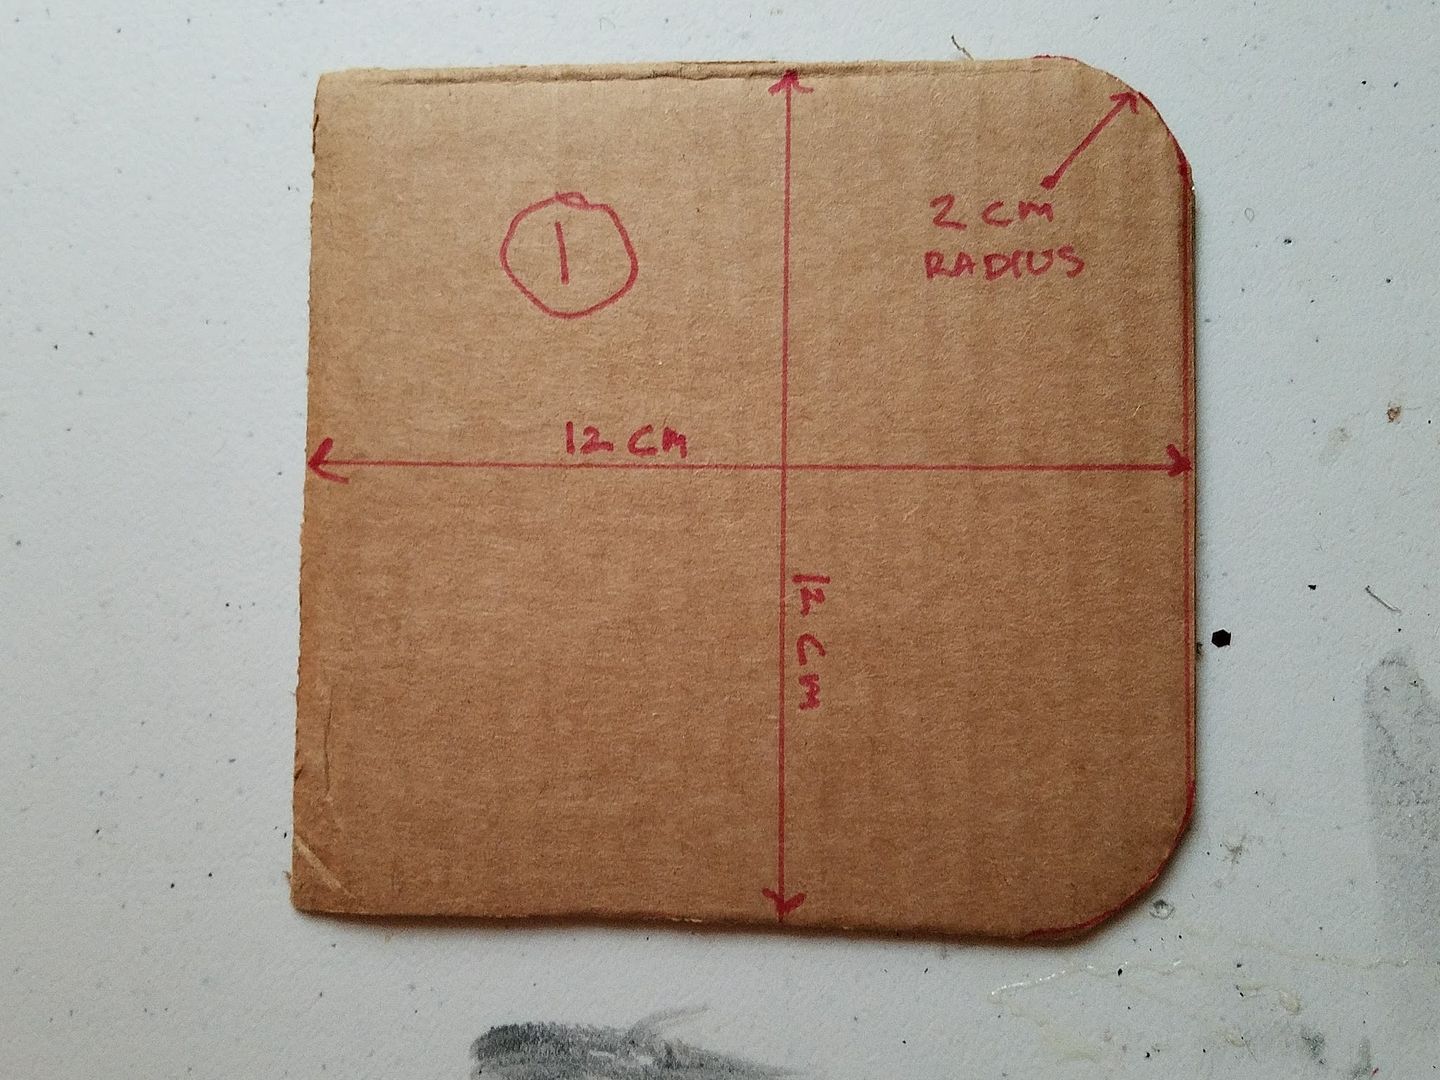
Fin Stencil 01:
12cm x 12cm with (2) 2cm Radii.
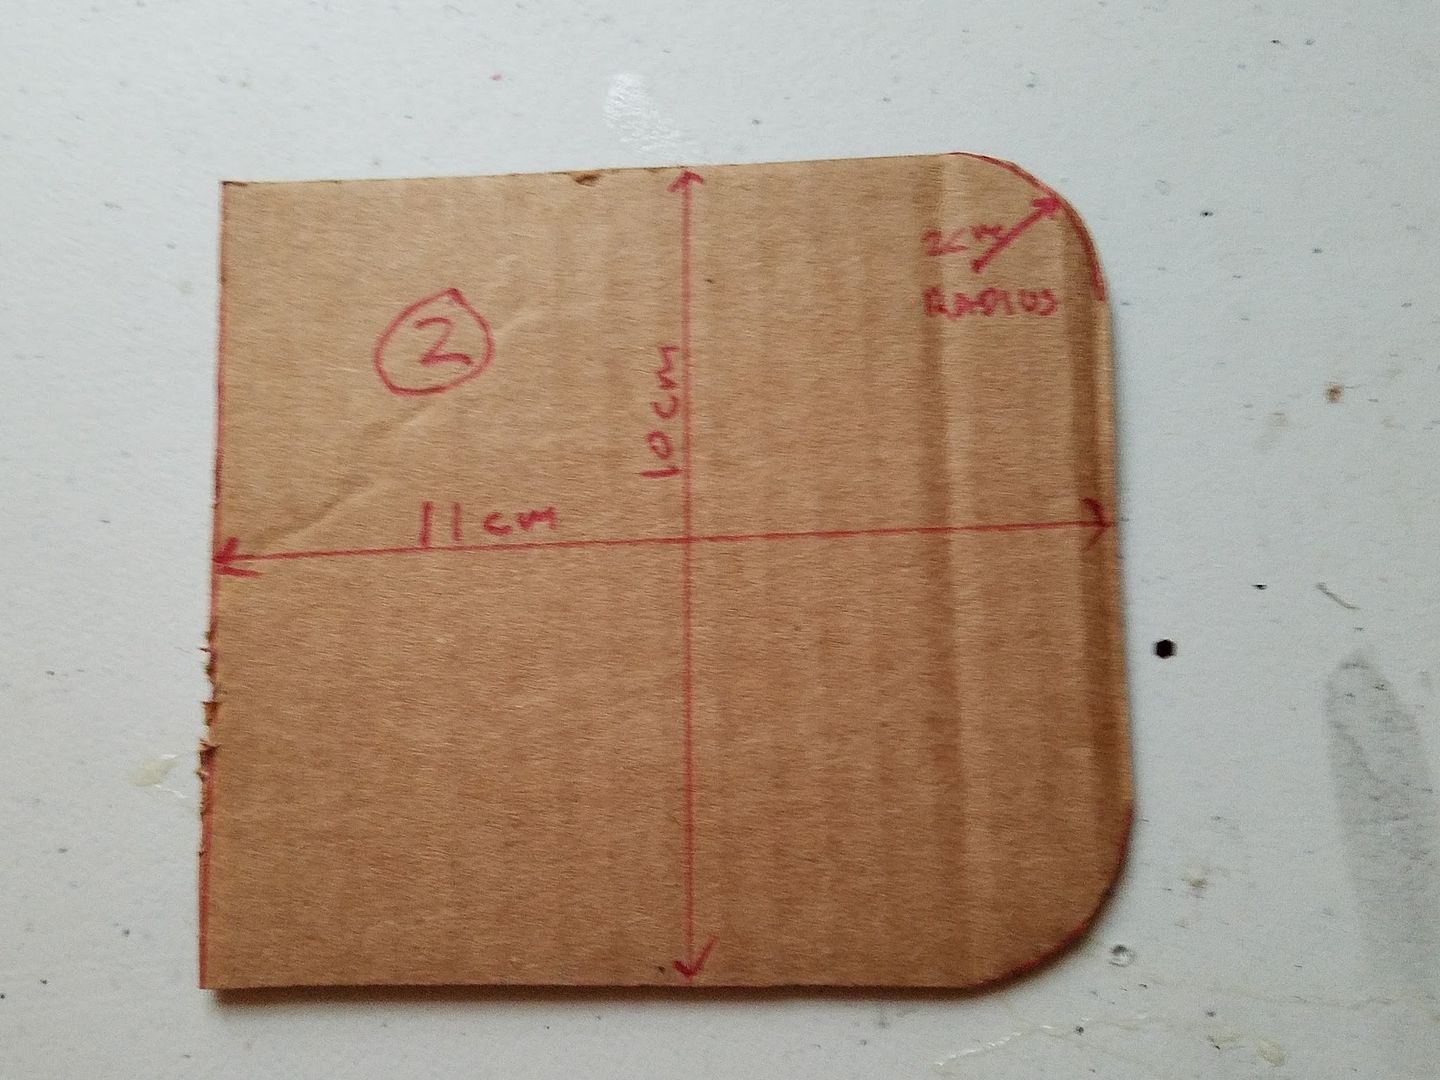
Fin Stencil 02:
11cm x 10cm with (2) 2cm Radii.
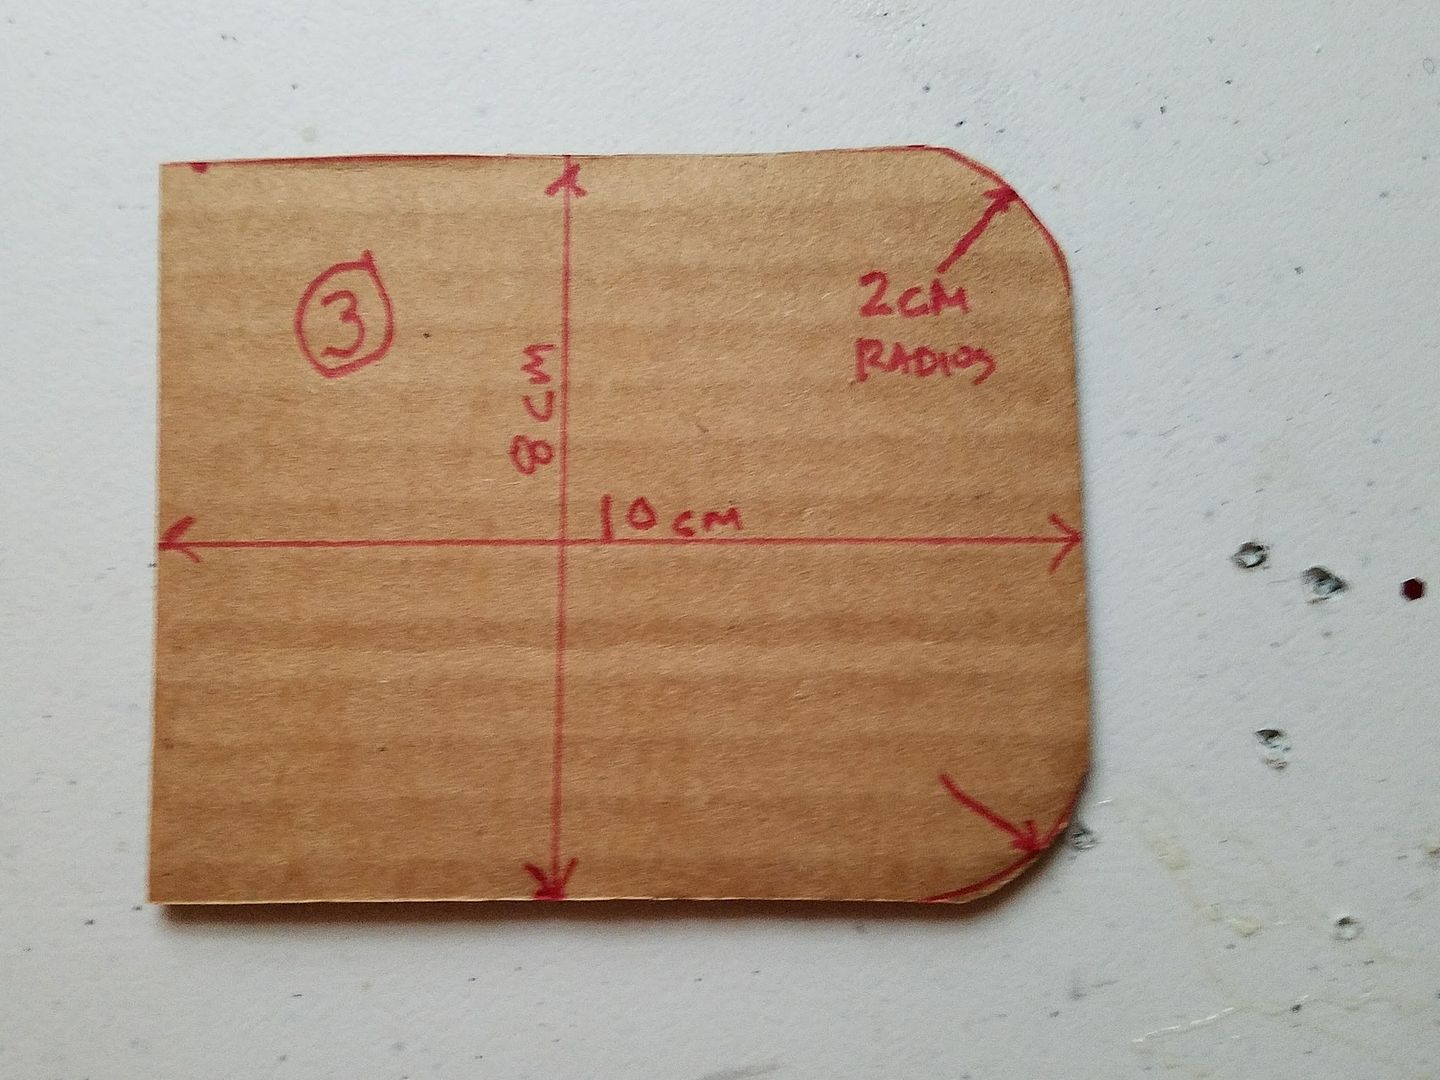
Fin Stencil 03:
10cm x 8cm with (2) 2cm Radii.
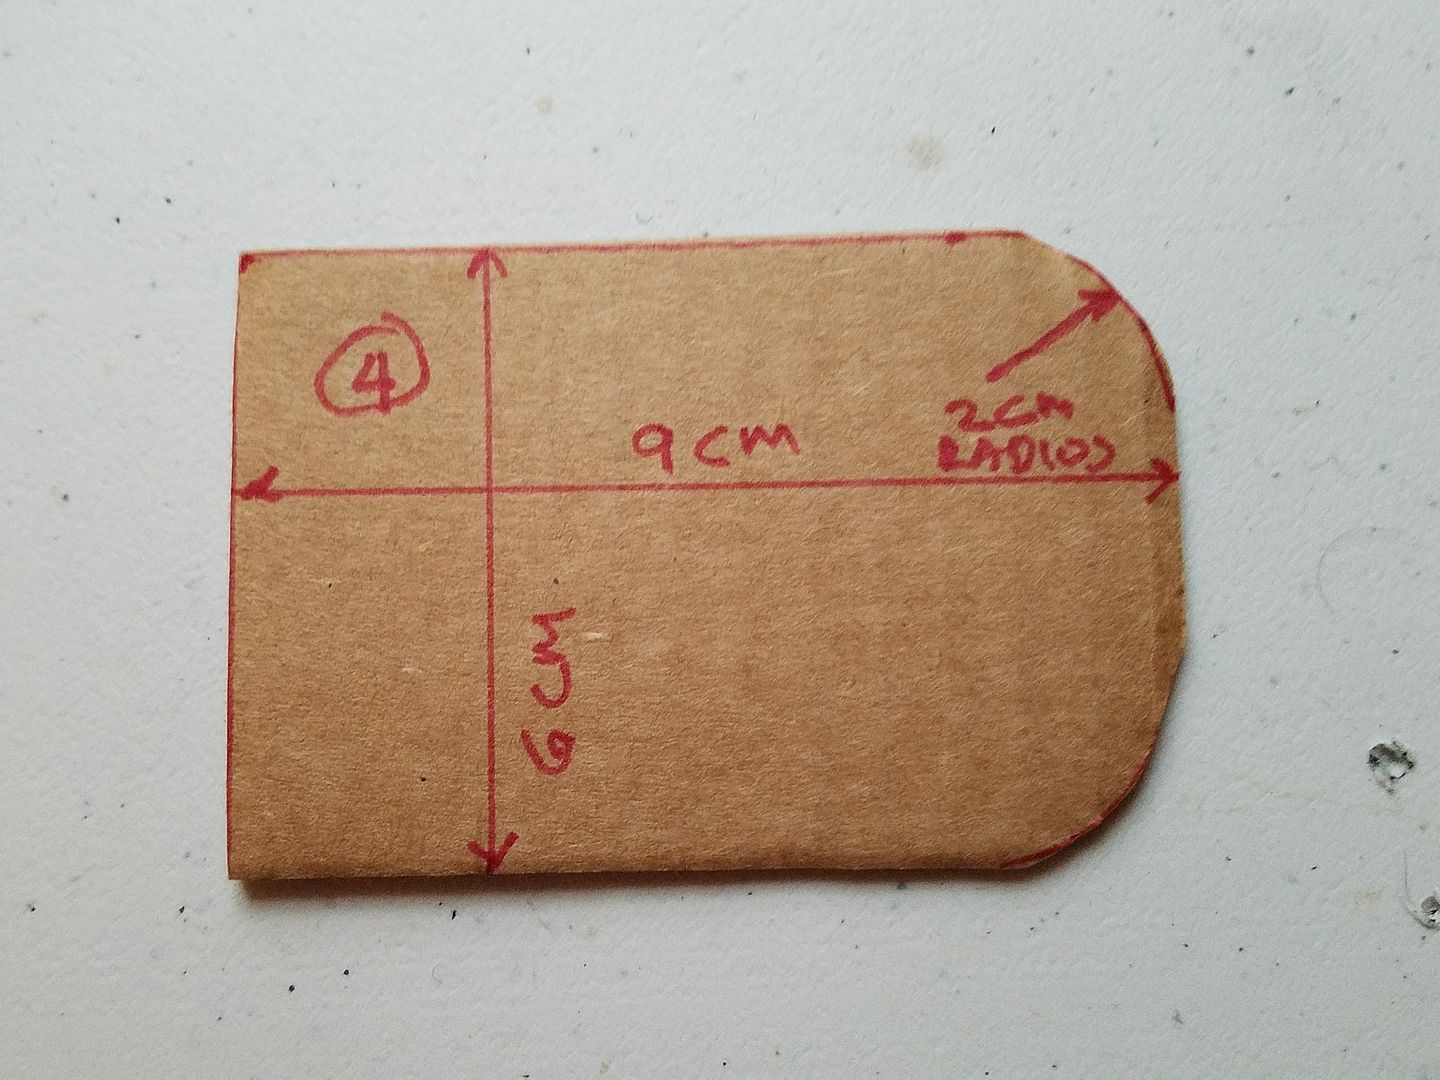
Fin Stencil 04:
9cm x 6cm with (2) 2cm Radii.
From these we will be cutting 14 fins.
I ordered the following material for the fins:
1/8" thick acrylic plexi glass sheets, clear 12"x 24"
Once this arrives, I will be able to begin cutting. Expected delivery is 12/16/16.
12/18/2016:
Alright, the material for the fins, arrived.
I decided to leave the plastic cover on the plexi to make it easier for me to trace the stencil.
First, I placed stencil #1 on the bottom corner of the plexi. This is so I could have 2 good straight edges to work with. I then traced the stencil with the red pen.
Next, I put on the protective face shield and used the dremel with the circular blade to make the cut where marked by the red pen. If you go slow enough, you can keep it in a straight line.
You will notice I cut the 2 corners at a 45 degree angle. I will shape it properly on the sanding table.
I then sanded the edges to make a smooth radius at the corners.
The end result...I will now cut all of the remaining pieces (14 total) and then apply an aluminum type spray paint.
I wanted to go ahead and test the paint adherence to the acrylic, so I painted 4 fins.
First, I cleaned off the plexi glass with very fine steel wool to make for a smooth surface the paint would stick to.
Next I used a premium Chrome Aluminum Gloss Spray Paint from a local hardware store.
I laid the fins out to paint 1 side at a time.
I then applied 2 coats to each side. This is what I ended up with. I am happy with this result and will continue with this method for all remaining fins. Unfortunately, I did not order enough of the material, so I will have to wait for it to come in.
Finally finished all 20 pieces. This has got to be the most difficult part of this build.
Made some good progress on the Fins / Valves.....Here are some of the pictures. I will add details and more photos tomorrow.