


Lozzer86
-
Posts
264 -
Joined
-
Last visited
Content Type
Events
Profiles
Forums
Posts posted by Lozzer86
-
-
Hi buddy.
I made that myself.
It's just a standard microUSB cable that I've spliced the switch into.
Diagrams are in this thread

-
Wow !
That is one of the coolest trooper choices

Nick, that looks fab mate.
Hope I get to troop along side you at some point.
-
Thanks for your comments guys, it means a lot
-
Welcome everyone !
You've got exciting times ahead
Please start your build threads in the appropriate forums and everyone will be able to help with your progress and questions
-
Thanks Buddy.
It's carefully applied with Tamiya Black Gloss Acrylic.
I actually suspect it's some sort of glue (maybe CA) that's left over from trying to repair the Field Pack on set.
I used paint instead as I couldn't guarantee the control of the fluid to represent it. Looks similar though
I'm still looking for accurate parts though, but it'll do for now.
-
I think we are done !
Here's some shots with some light weathering....


-
Weathering and final fit and finish today
Will have to do a few fitting trials with my body sections armour on, to see where I need to apply some foam tape or adhesive felt. I'll report back (hopefully with a finished Field Pack) !!! -
This is the exact same size and shape as my Karrimor frame, Juan.
You might find Sid's trays a little on the small side, but I suppose it depends on the style of pack you are doing.
-
Thanks Buddy, it's mostly your kit parts too
I'm hoping to get this really close.
-
Nailed it !!!


Doesn't look very robust does it
But the bottom tray has a large block of styrene foam bonded between the front and back trays. It's not going anywhere.
The tape is just for decoration.
Pleased with that
-
We have a strong tradition on Advent Calendars in our house.
Even the dog gets an Advent Calendar !
So am I too old for this one ?

ABSOLUTELY NOT !!!!

Just a shame I have to wait till December to line up all the Rebels

-
We are aiming for completed armour photo's THIS WEEKEND !!!!
So excitied
I'm just waiting for my Pauldron to come back from the ISD (He's making it fit my fat neck)
Then I'll grab all the photo's I can with the wife's DSLR.
Lot's to do still....
Have to finish up the Field Pack and weathering, which will happen tomorrow.
-
Thanks for all your help, mate. And for posting the photos
I'm gonna struggle to get a thicker (2") wide piece of duct tape to wrinkle like that without some heat applied. I'll try some tests on both thick and thin, but I suspect it's a 1" wide roll that was used.We also have enough images of the scenes to determine that the tape wasn't wrapped all the way around the seed tray.
It looks like the right hand side lower tray (when looking at the back of the Trooper), was made up of multiple strips overlapped, which makes it about 2" wide. Then further tape applied to the bottom right, although i'm still not sure on the thickness.
On the left hand side, we have 2 diagonally placed tape strips of 1" wide.
Might mock that up and see how it looks.
Thanks for your help again

-
Do you think the tape has been applied to the same thickness on the bottom as the top though ?
It would make sense, but it's difficult to see conclusively from the stills.
-
Ah ok, interesting !
So you think it's not a one fat piece, but a few wraps around of thin tape ?
That sounds more feasible, as the cross on the tool box would be a similar thickness.
Maybe the tape to hold everything together came from the same type of rolls ?
-
Guys and Girls,
I need your help !!!!!
I've been looking at the Duct Tape that holds the 2 halves of the lower seed tray together, and have been looking at many completed Field Packs.....
I've also managed to get a reasonable screen grab from my 1080P version of ANH and I have shown where the Duct Tape is positioned on the lower seed tray below.

What is looks like at first glance is 1 THICK piece and 1 THIN piece holding the two halves together.
But when I zoom in and adjust the contrast a little....
To me, it looks like both duct tape sizes are the same, only the bottom one wraps around the bottom of the outer seed tray.

Now I've been through this scene frame by frame, and the bottom piece definitely shows some sort of 'crease' in the duct tape that extends beyond a thin piece.
To me, it looks like 2 thick pieces.
So my question is, what do you think ? (Sorry, I got there in the end)
-
Tonight saw the marriage of my Shotgun Shells to my top seed tray

I've also got my gear in a massive plastic trunk now !
It's got wheels and a handle so I can cart about unnoticed.
Can't figure out if the wife is pleased after I promised to get rid of the large cardboard box in the office (only to replace it with this)
-
It's on the list, buddy !
Just need my finances to recover
-
Yep, my Radar Dish is too big

But they are so hard to find now, that I've decided to keep it and go for a 'Long Range' Field Pack
That's my excuse and i'm sticking with it

-
YAY !!!!
Free products out of thin air !!!
Well, not technically free or made out of air... But you get the idea
Best gadget ever. When it works.


-
It's that time again !
Time to dust off the old 3D printer and print one of these little Shotgun Shell Supports !!!!

Or more precisely, 10 of them

They don't have to be perfect, they just have to support each shell underneath.
I'll report back once my printer has decided to start working again

-
Time for the shotgun candelabra
There's been lots of discussion about this...
What are they ? How do they fit etc..
Are they actual shotgun shells ?
Are they hollow pipe ?
Are they pipe with some gauze shoved down them ?
The simple answer is, I don't think anyone knows. But it's very unlikely that they were actually shotgun shells given the firearm and explosive restrictions in place for the filming in Tunisia at the time.
The whole reason for the Bapty blaster was to get around those restrictions, so I doubt very much they were actual shotgun shells (with or without powder).
That said, I have my own suspicions and suspect that they are a set of 5 Capacitors...
In fact, ones like these are used to stabilise the current draw from large motors / pumps (Like you would find on a Hot Tub or machinery).
These ones are from a Hot Tub Parts Supply company.
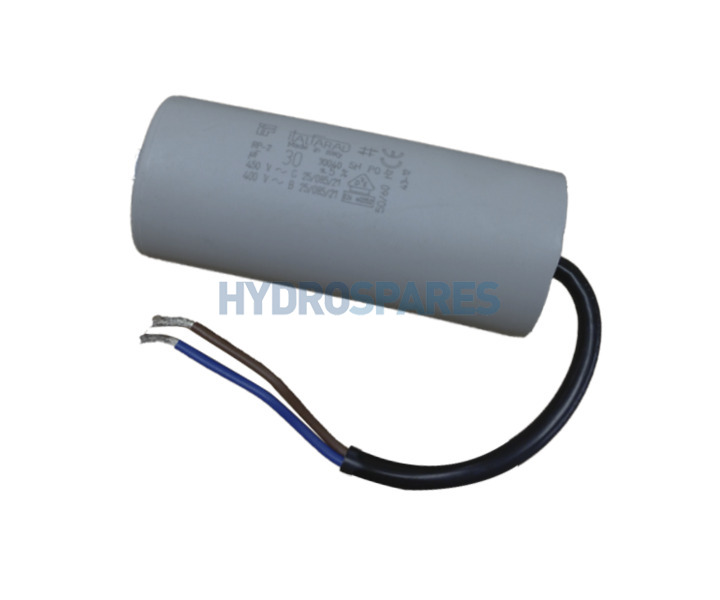
It's a fair bet that ones similar to this were available back in the 1970's and very probably available from an electronics general parts store in the uk.
Unfortunately, I do not own 1 of these, let alone 5 of them.
And I'm not paying £15 each for them !!! (That's almost 100 bucks for a set).....
So i'm gonna make some of my own
This is what we are trying to reproduce.....

First things first...
Cut some 2 1/2" long tubes from the 'shotgun shells' pipe in Crashmanns kit (It's been a life saver for parts)
And fill the ends with Auto Body Filler or whatever you use.
I use filler a lot.
In fact, the filler I use is an Auto Body Repair filler made for repairing plastic bumpers.
This means it has some flex, but is really easy to sand. I hate sanding


Then we fit some 'Tails' into the pipe which can be seen in the reference photo above (I appreciate it's not the best photo, but there are plenty of reference photos showing the same thing).
I used a small length of 3mm Copper Wire, countersunk into one end.

Hang them up and time for a quick spray of Matt Black
Now I've just got to figure out how to mount them.

-
A bit more work today.
Moved the top canister down and made some room between the tool box and exhaust port.
As it turns out, the tool box isn't on straight in the reference, but slightly skew. This made just enough room for the mushroom cap to fit (just)
Also bonded the bottom seed trays using some hard packing foam as a spacer. Bonded all that and fitted the stinger.
Also cut and fitted the mortar tube control panel


Now we need to figure out these mysterious shotgun shells !!!!
-
Just a bit of fun to compare ....
I'm miles off in a lot of things
But that's down to parts really. As I go along, i'll try and pick up more accurate parts

Machine's Move Along - Pack 3 Build (WiP)
in Field Backpack
Posted
Didn't even know you could get those
Basic soldering is definately a good thing to learn, and with a bit of practice you'll be making all kinds of stuff !
My OCD kicks in when I have cables that are too long. That's why I pretty much make all my own.
As the switches in Crashmann's kit are real 2 position slide switches, it makes sense to use them
With armour on, I can actually reach my arm around the fieldpack and switch it on and off by myself.